> ## Documentation Index
> Fetch the complete documentation index at: https://docs.getunblocked.com/llms.txt
> Use this file to discover all available pages before exploring further.

# Unblocked CI failure agent

> Automatically analyze CI failures and get actionable fix suggestions

## Overview

Debugging CI (Continuous Integration) failures in pull requests can be time-consuming and complex.
Unblocked automatically analyzes failure logs and provides actionable fix suggestions
when it has high confidence in the root cause of the failure.
When a CI job fails on a pull request, Unblocked will post a report as a comment in your pull request,
helping you quickly identify and resolve the issue.

## Connecting CI Systems

Unblocked supports Bitbucket Pipelines, Buildkite, CircleCI, GitHub Actions, and GitLab Pipelines.
Select the CI system you'd like to configure:

<Tabs>
  <Tab title="Bitbucket Pipelines">
    ### Configuring Bitbucket Pipelines

    To connect Bitbucket Pipelines to Unblocked, follow these steps:

    <Steps>
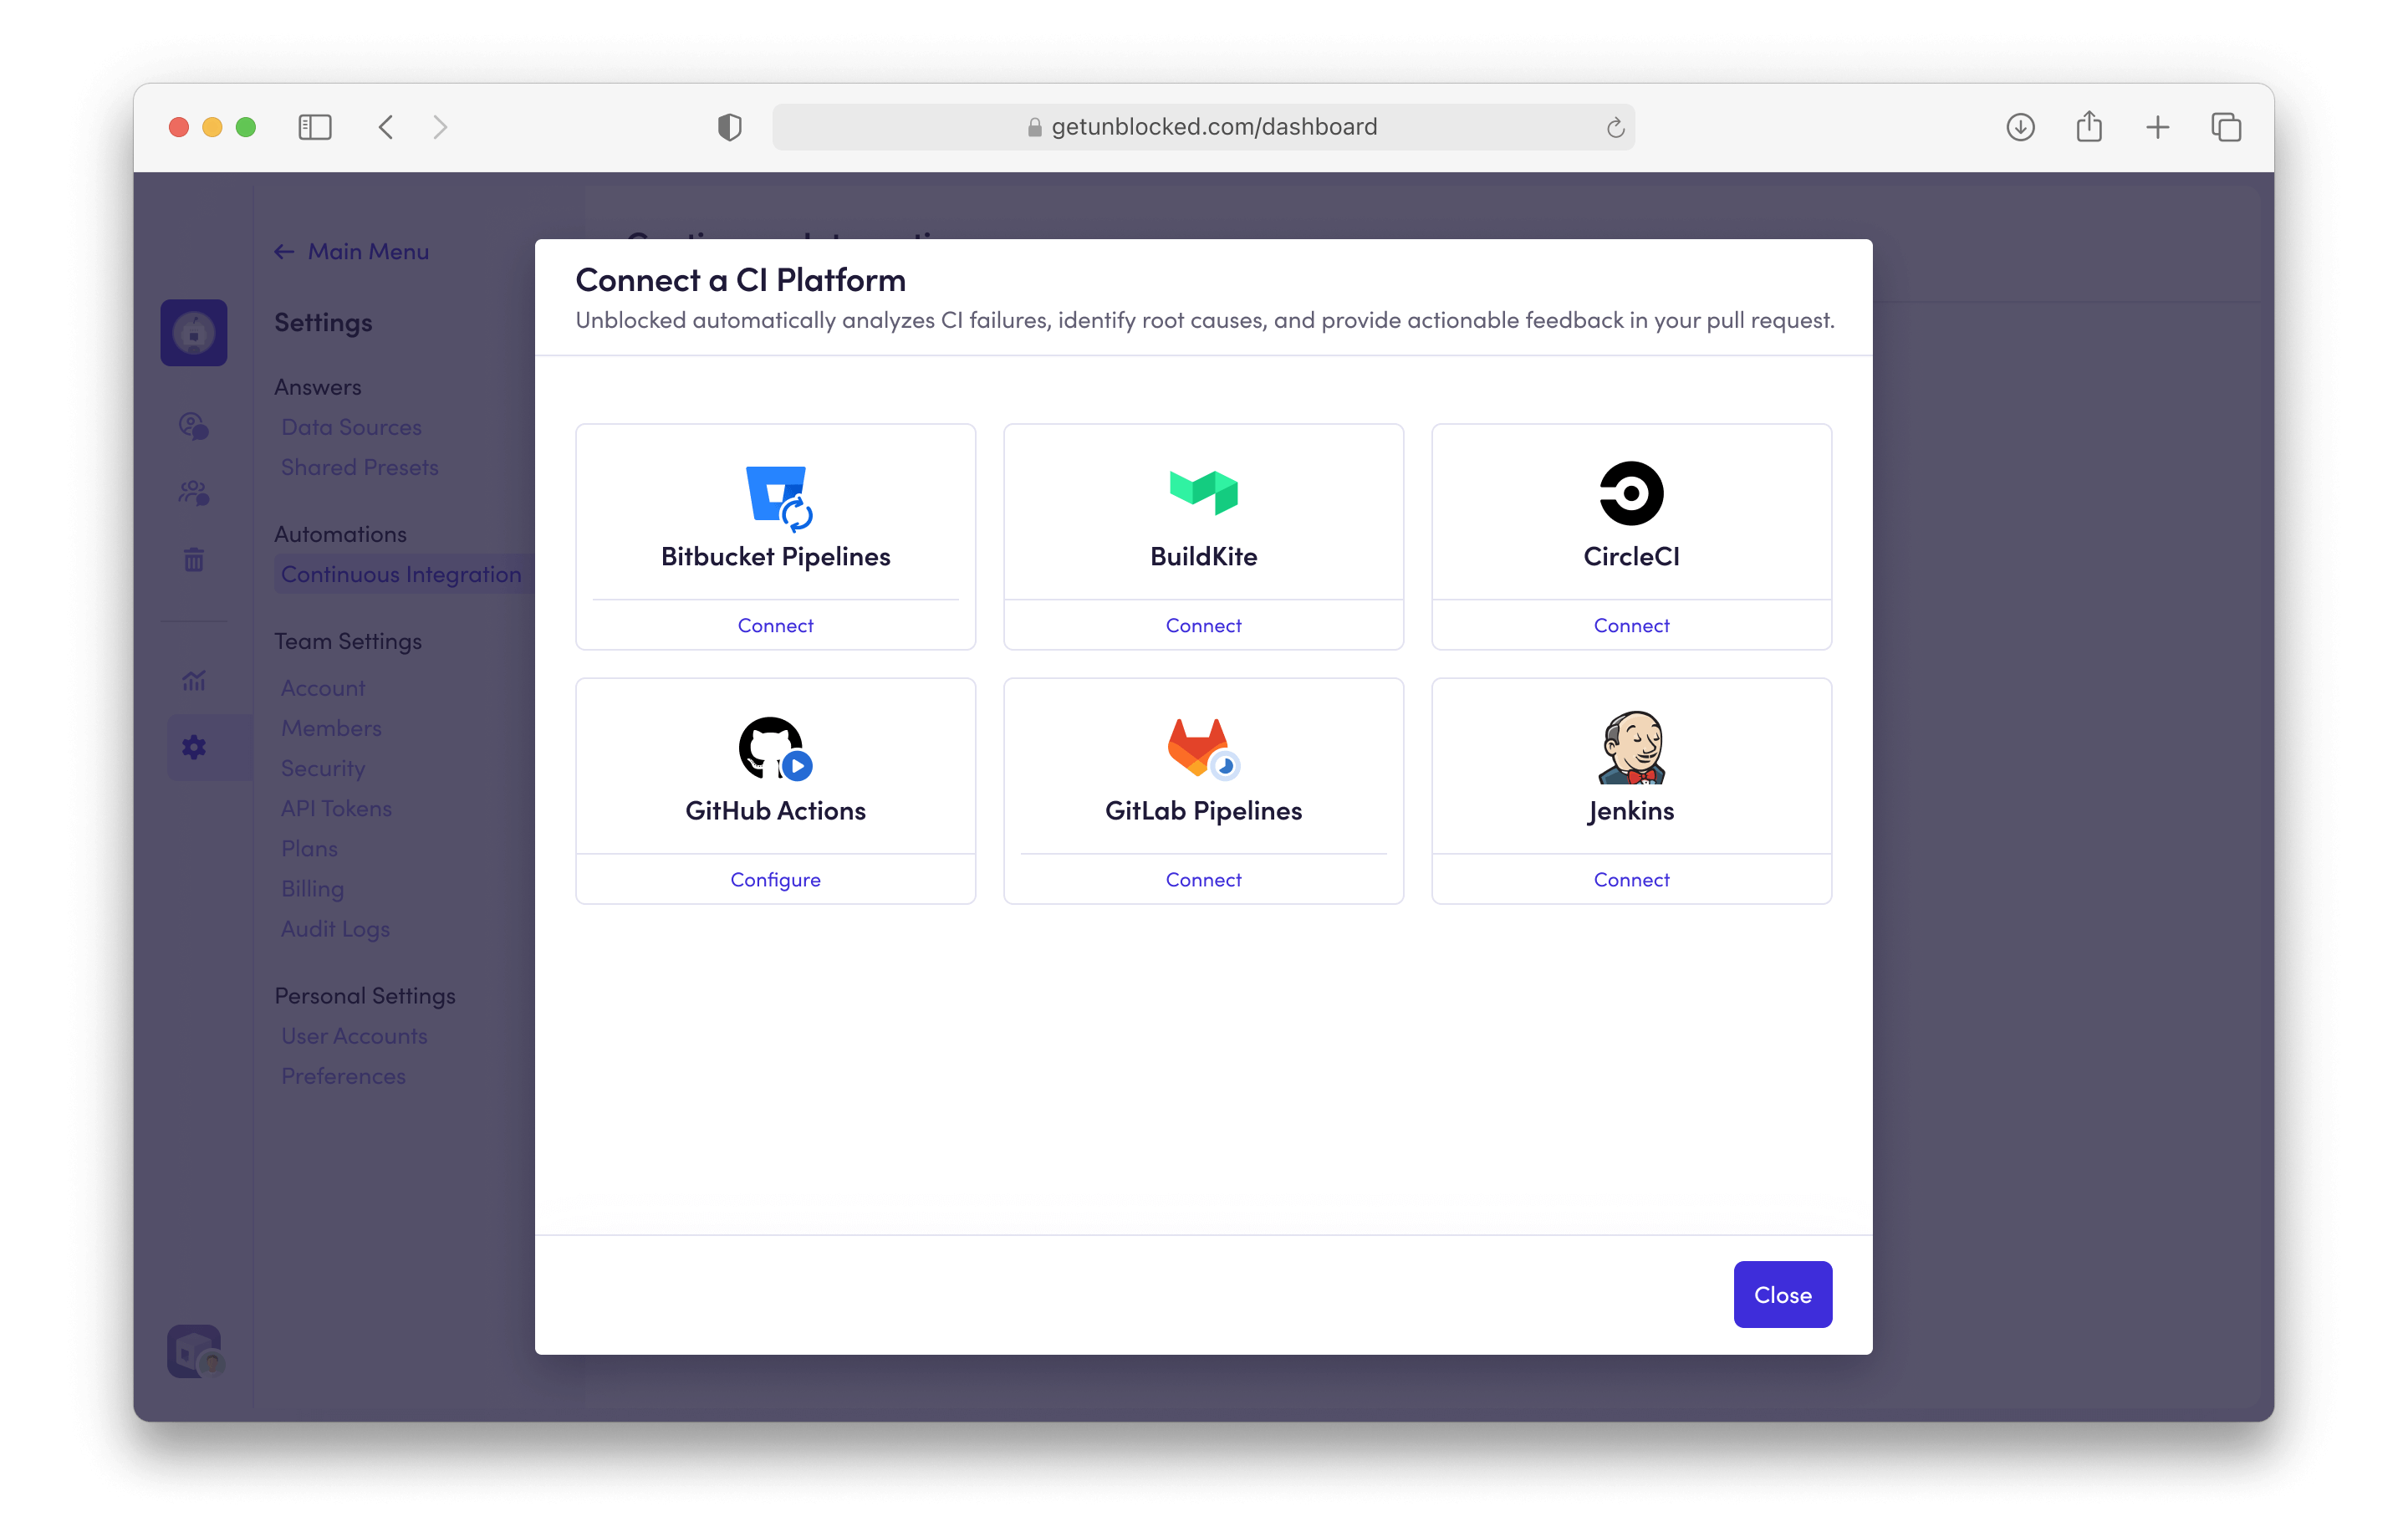
      <Step title="Add CI Data Source">
        In the left sidebar, click on **Settings** and then **Continuous Integration**.
        Then click on **Add CI Provider**.
      </Step>

      <Step title="Connect Bitbucket Pipelines">
        Click on the **Bitbucket Pipelines** tile. <img src="https://mintcdn.com/unblocked/yVsbHSyeiIZi1Xp1/img/ci/Data-Sources-CI-Integrations.png?fit=max&auto=format&n=yVsbHSyeiIZi1Xp1&q=85&s=e6a299769b0a789f5a462d89d323603a" alt="CI Add" width="2880" height="1820" data-path="img/ci/Data-Sources-CI-Integrations.png" />
      </Step>

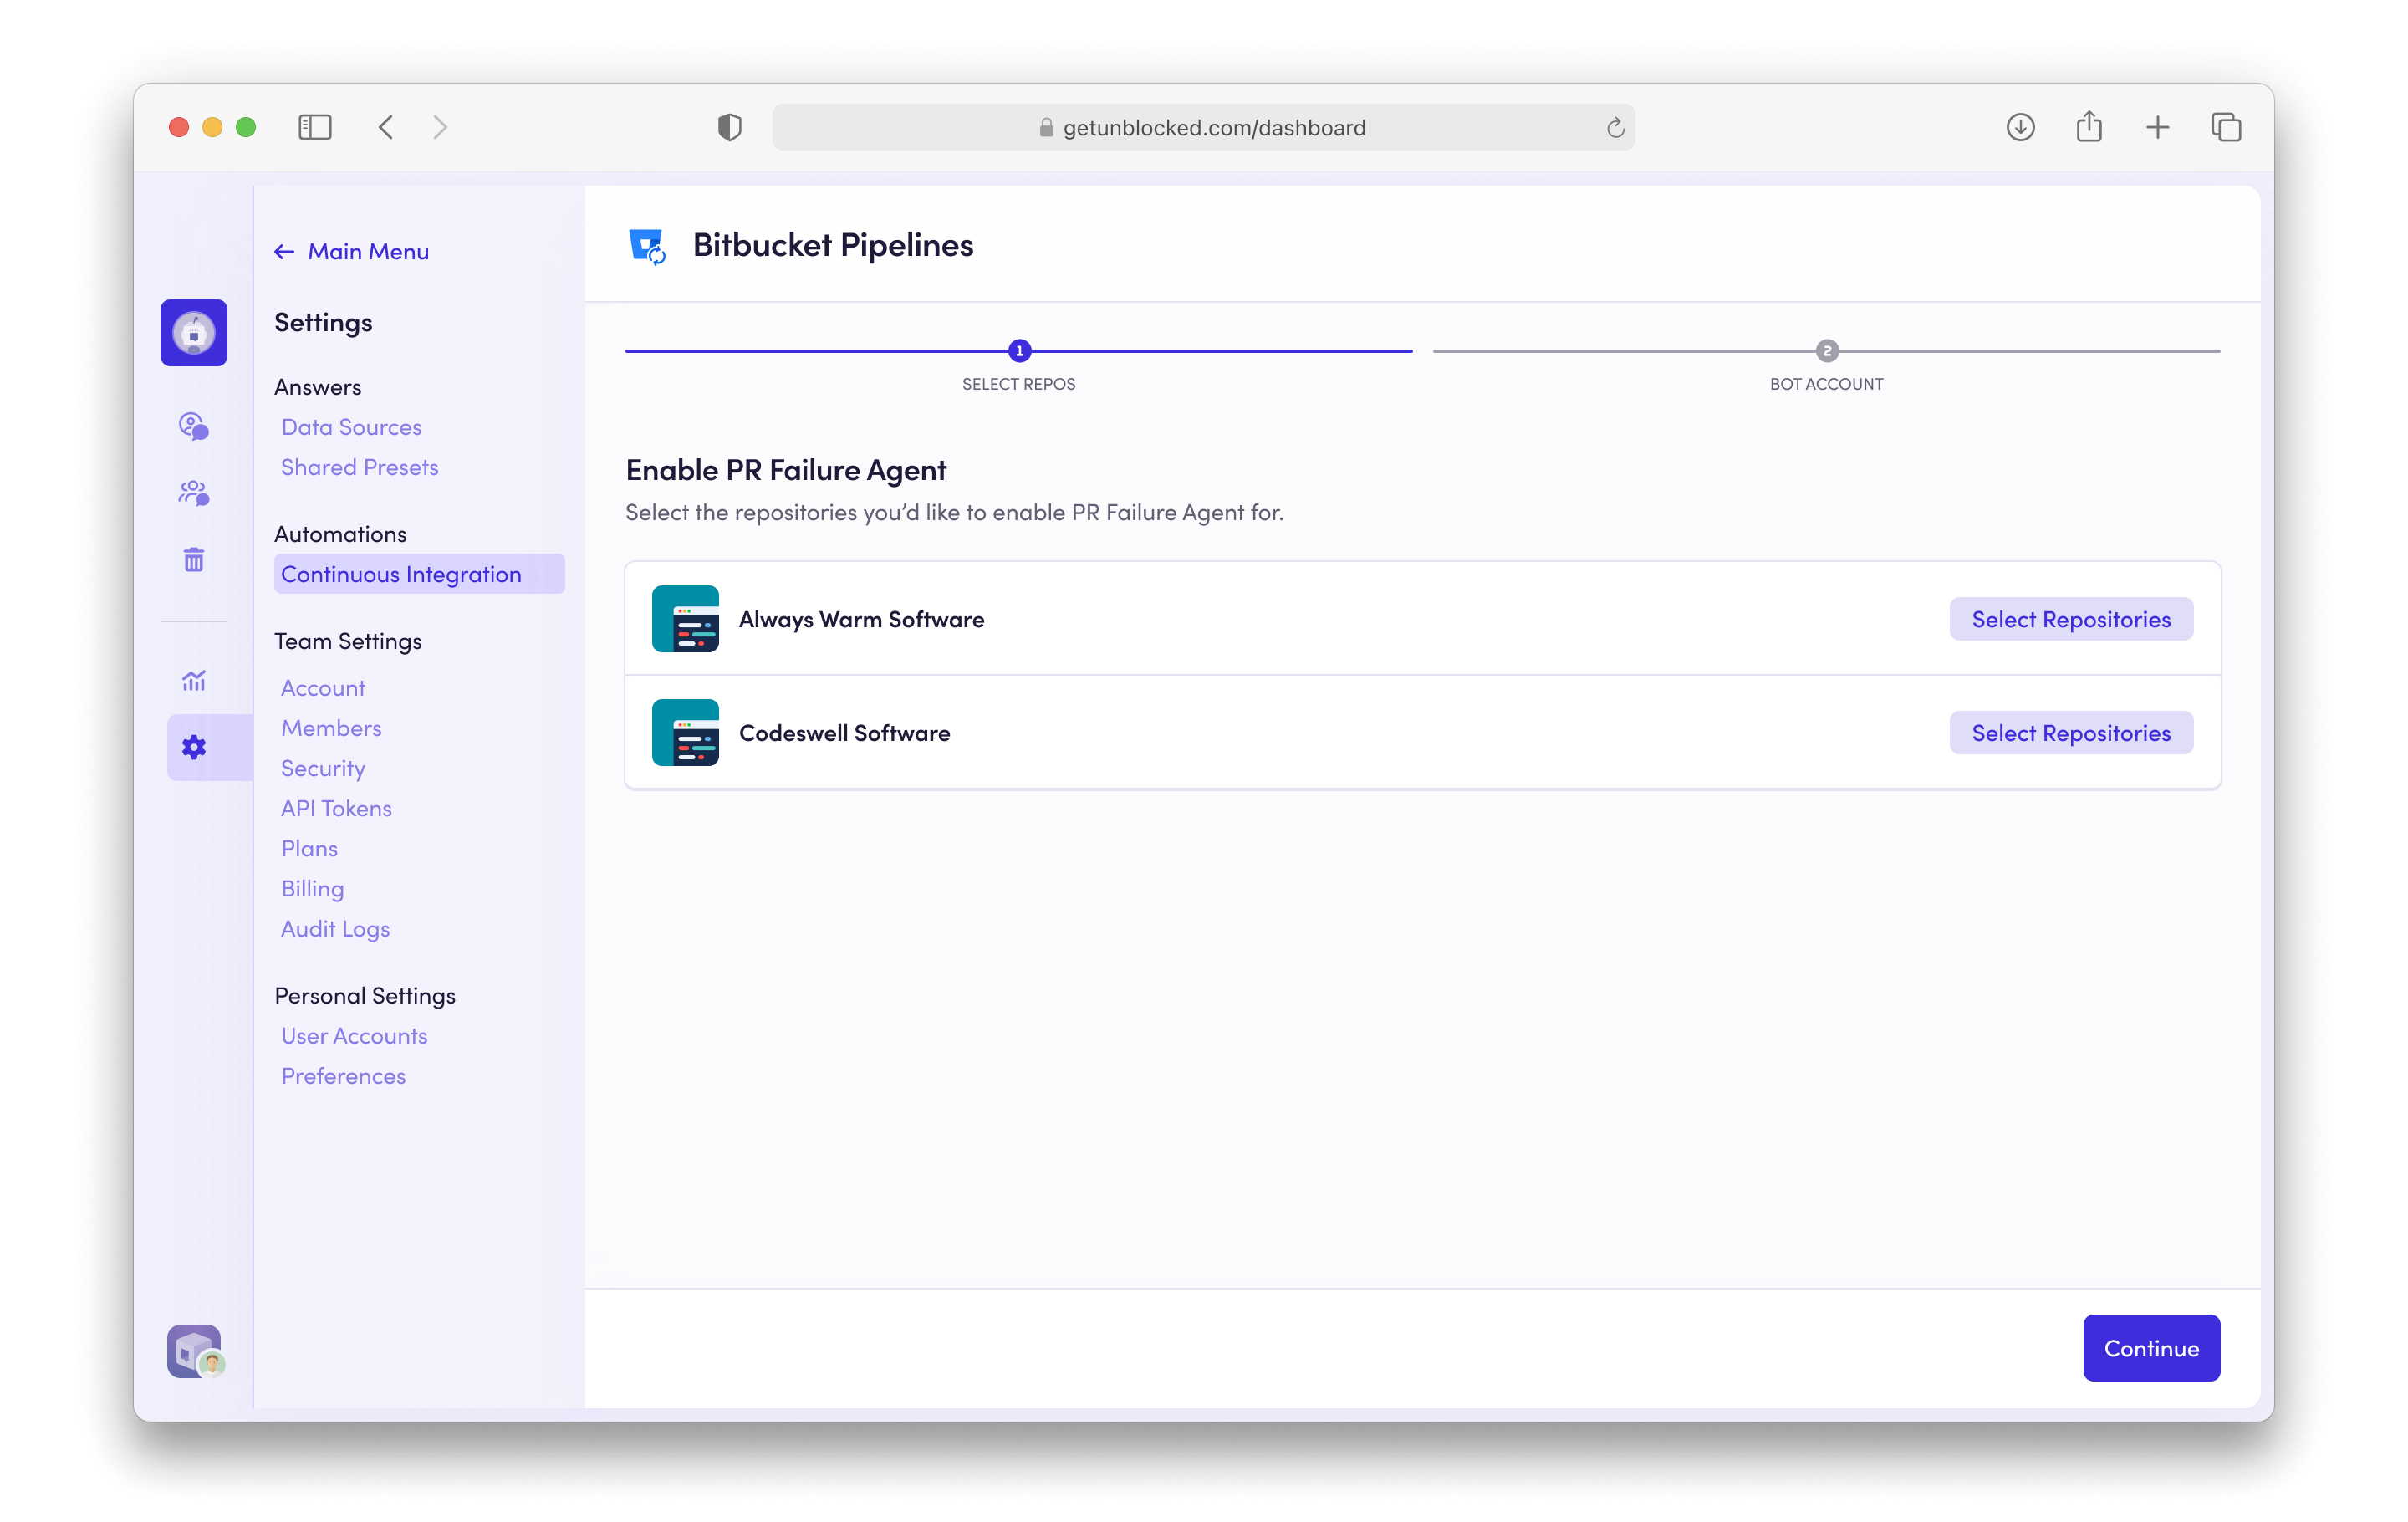
      <Step title="Enable CI Failure Agent">
        Click **Select Repositories** to choose the repositories
        you want to enable CI Failure Agent on. <img src="https://mintcdn.com/unblocked/yVsbHSyeiIZi1Xp1/img/ci/Bitbucket-Pipelines-selectRepos.png?fit=max&auto=format&n=yVsbHSyeiIZi1Xp1&q=85&s=605643ea593a045a5718a96d583714ae" alt="CI Configure Bitbucket Pipelines" width="2880" height="1820" data-path="img/ci/Bitbucket-Pipelines-selectRepos.png" />
      </Step>

      <Step title="Select Repositories">
        Toggle the repositories you want to enable by selecting them.
      </Step>

      <Step title="Create a Bot Account">
        CI reports from the CI Failure Agent need to be posted on behalf of a Bitbucket user account. We recommend
        creating an Unblocked bot account for this specific purpose.

        <Note>
          <h4>Already have a bot account?</h4>

          <p>
            Some teams already have a bot account they use for posting automated messages. If you already have a bot account that you can repurpose for posting CI
            analysis reports, select it and skip to the next step.

          </p>
        </Note>

        * [Create a new account](https://id.atlassian.com/signup?application=bitbucket\&continue=https%3A%2F%2Fbitbucket.org\&prompt=select_account) in Bitbucket with the following information:
          * **Name:** Unblocked
          * **Avatar:** download and use the Unblocked logo below

                    <img src="https://mintcdn.com/unblocked/soZi90zJ9_abJhu-/img/Unblocked-logo-with-bg.png?fit=max&auto=format&n=soZi90zJ9_abJhu-&q=85&s=4254a1a1add3321511dfe55c842cf890" alt="Unblocked logo" width="160" noZoom data-path="img/Unblocked-logo-with-bg.png" />

                    <a href="/img/Unblocked-logo-with-bg.png" download="Unblocked-logo.png">
                      Download PNG
                    </a>

        * [Switch accounts](https://id.atlassian.com/login/select-account?application=bitbucket\&continue=https%3A%2F%2Fbitbucket.org) and sign in to your Bitbucket Workspace as a Workspace admin.

        * Click the gear icon in the top right of the navigation bar, and select **User Management**.

        * Invite your new bot user to your workspace.

        * Accept the email invitation that was sent to your bot account.
      </Step>

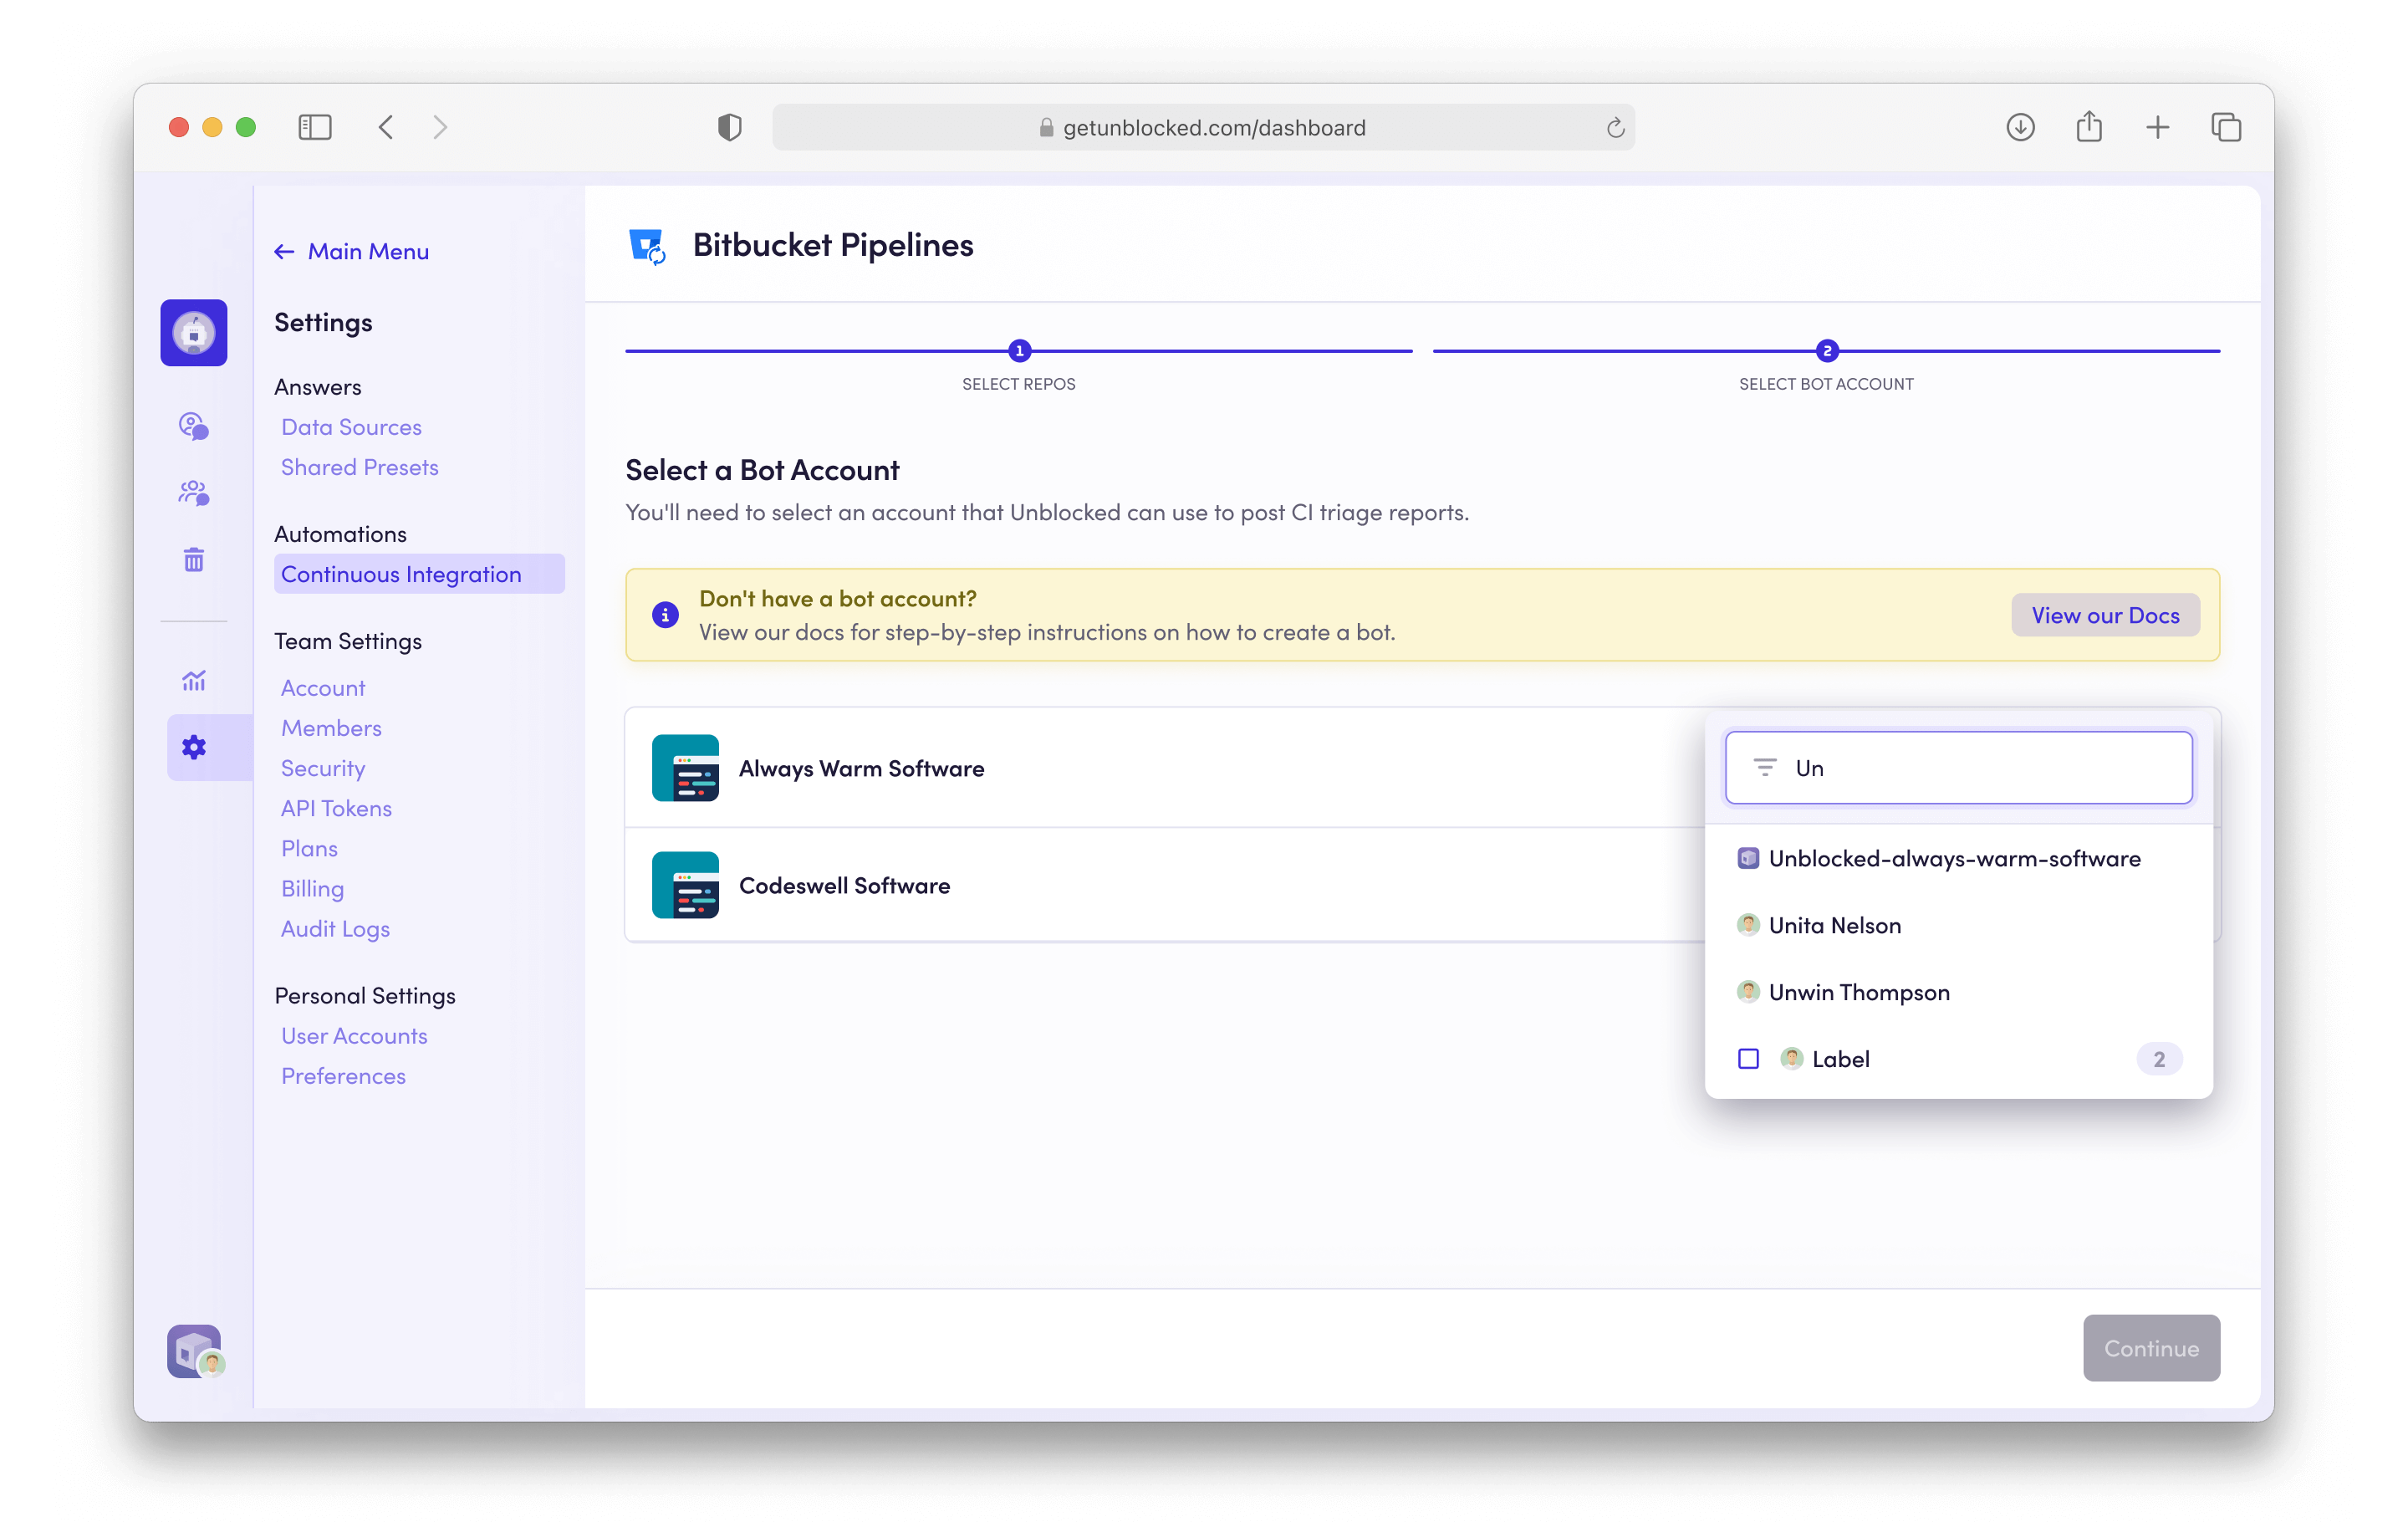
      <Step title="Select your Bot Account">
        Search for the Bot Account you just created and select it. You may be required
        to authorize this account with Unblocked. <img src="https://mintcdn.com/unblocked/yVsbHSyeiIZi1Xp1/img/ci/Bitbucket-Pipelines-selectBotAccount.png?fit=max&auto=format&n=yVsbHSyeiIZi1Xp1&q=85&s=66ee227de48771108c664eff93c10661" alt="CI Configure Bitbucket Pipelines" width="2880" height="1820" data-path="img/ci/Bitbucket-Pipelines-selectBotAccount.png" />
      </Step>

      <Step title="Done">
        Click **Save Settings** to apply your changes. Now Unblocked will analyze CI
        failures in the selected repositories and post reports to pull requests.
      </Step>
    </Steps>
  </Tab>

  <Tab title="BuildKite">
    ### Configuring Buildkite

    To connect Buildkite to Unblocked, follow these steps:

    <Steps>
      <Step title="Add CI Data Source">
        In the left sidebar, click on **Settings** and then **Continuous Integration**.
        Then click on **Add CI Provider**.
      </Step>

      <Step title="Connect Buildkite">
        Click on the **Buildkite** tile.

        <img src="https://mintcdn.com/unblocked/yVsbHSyeiIZi1Xp1/img/ci/Data-Sources-CI-Integrations.png?fit=max&auto=format&n=yVsbHSyeiIZi1Xp1&q=85&s=e6a299769b0a789f5a462d89d323603a" alt="CI Add" width="2880" height="1820" data-path="img/ci/Data-Sources-CI-Integrations.png" />
      </Step>

      <Step title="Authorize Your Buildkite Account">
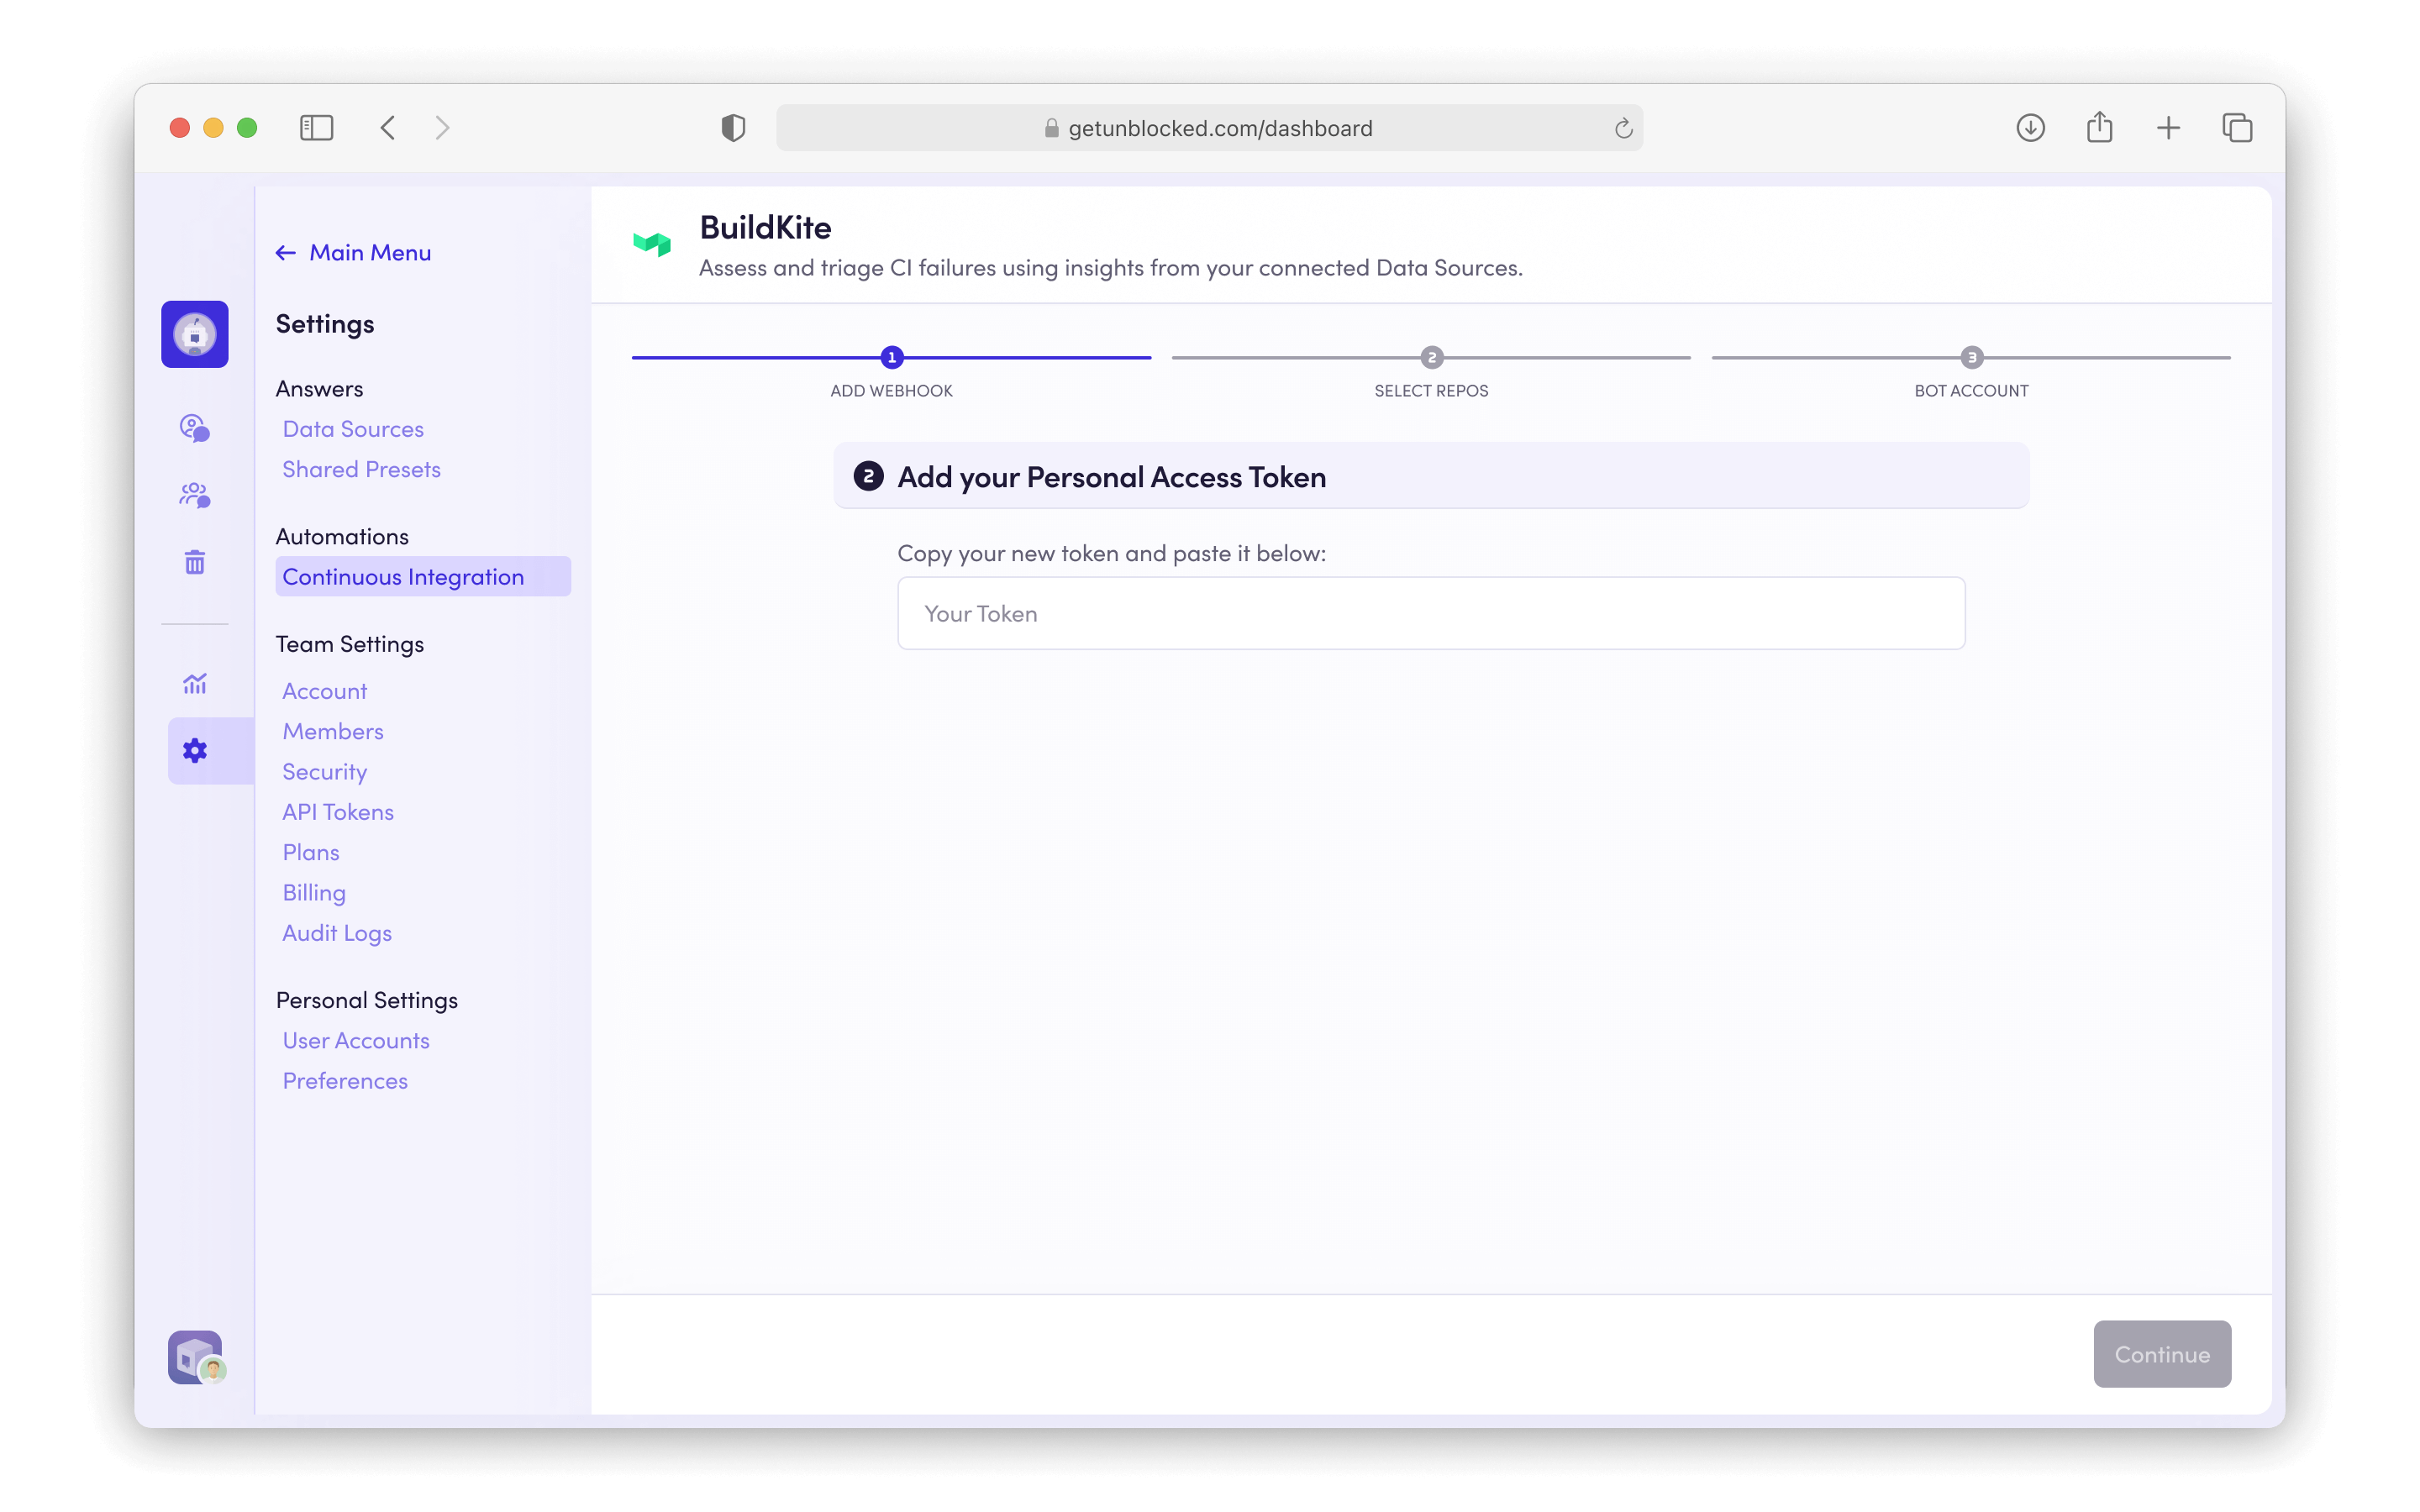
        * Create a new [API Access Token](https://buildkite.com/user/api-access-tokens) in Buildkite:

        * Enter "Unblocked" as the **Description**.

        * Choose the appropriate organization in **Organization Access**.

        * Select the following **REST API Scopes**:
          * `read_build_logs`
          * `read_builds`
          * `read_organizations`
          * `read_pipelines`
          * `read_user`

        * Copy the following CIDR ranges into **Allowed IP Addresses**:
          * `34.212.246.90/32`
          * `44.235.109.70/32`
          * `44.236.252.193/32`
          * `52.88.232.82/32`

        * Click **Create New API Access Token**.

                  <img src="https://mintcdn.com/unblocked/XfgrfEzBJgxcMSOE/img/ci/ci-buildkite-token.png?fit=max&auto=format&n=XfgrfEzBJgxcMSOE&q=85&s=81c8d9dbbd1f1ef821acd506b362ee2a" alt="Buildkite token" width="2880" height="1800" data-path="img/ci/ci-buildkite-token.png" />
      </Step>

      <Step title="Add a Buildkite Webhook">
        * Go to the [Notification Services](https://buildkite.com/organizations/-/services) page.

        * Click Add Webhook.

        * In the **description** field, enter "Unblocked".

        * Copy and Paste the **Webhook URL** and **Token** from Unblocked into the corresponding fields in
          Buildkite.

        * Select the following event:
          * `build-finished`

        * Ensure that **All Pipelines** are selected.

        * Leave **Branch filtering** blank.

        * Click **Add Webhook Notification**.
      </Step>

      <Step title="Select Repositories">
        Toggle the repositories you want to enable by selecting them.
      </Step>

      <Step title="Done">
        Click **Save Settings** to apply your changes.
        Now Unblocked will analyze Buildkite failures in the selected repositories and post reports to pull
        requests.
      </Step>
    </Steps>
  </Tab>

  <Tab title="CircleCI">
    ### Configuring CircleCI

    To connect CircleCI to Unblocked, follow these steps:

    <Steps>
      <Step title="Add CI Data Source">
        In the left sidebar, click on **Settings** and then **Continuous Integration**.
        Then click on **Add CI Provider**.
      </Step>

      <Step title="Connect CircleCI">
        Click on the **CircleCI** tile.

        <img src="https://mintcdn.com/unblocked/yVsbHSyeiIZi1Xp1/img/ci/Data-Sources-CI-Integrations.png?fit=max&auto=format&n=yVsbHSyeiIZi1Xp1&q=85&s=e6a299769b0a789f5a462d89d323603a" alt="CI Add" width="2880" height="1820" data-path="img/ci/Data-Sources-CI-Integrations.png" />
      </Step>

      <Step title="Authorize Your CircleCI Account">
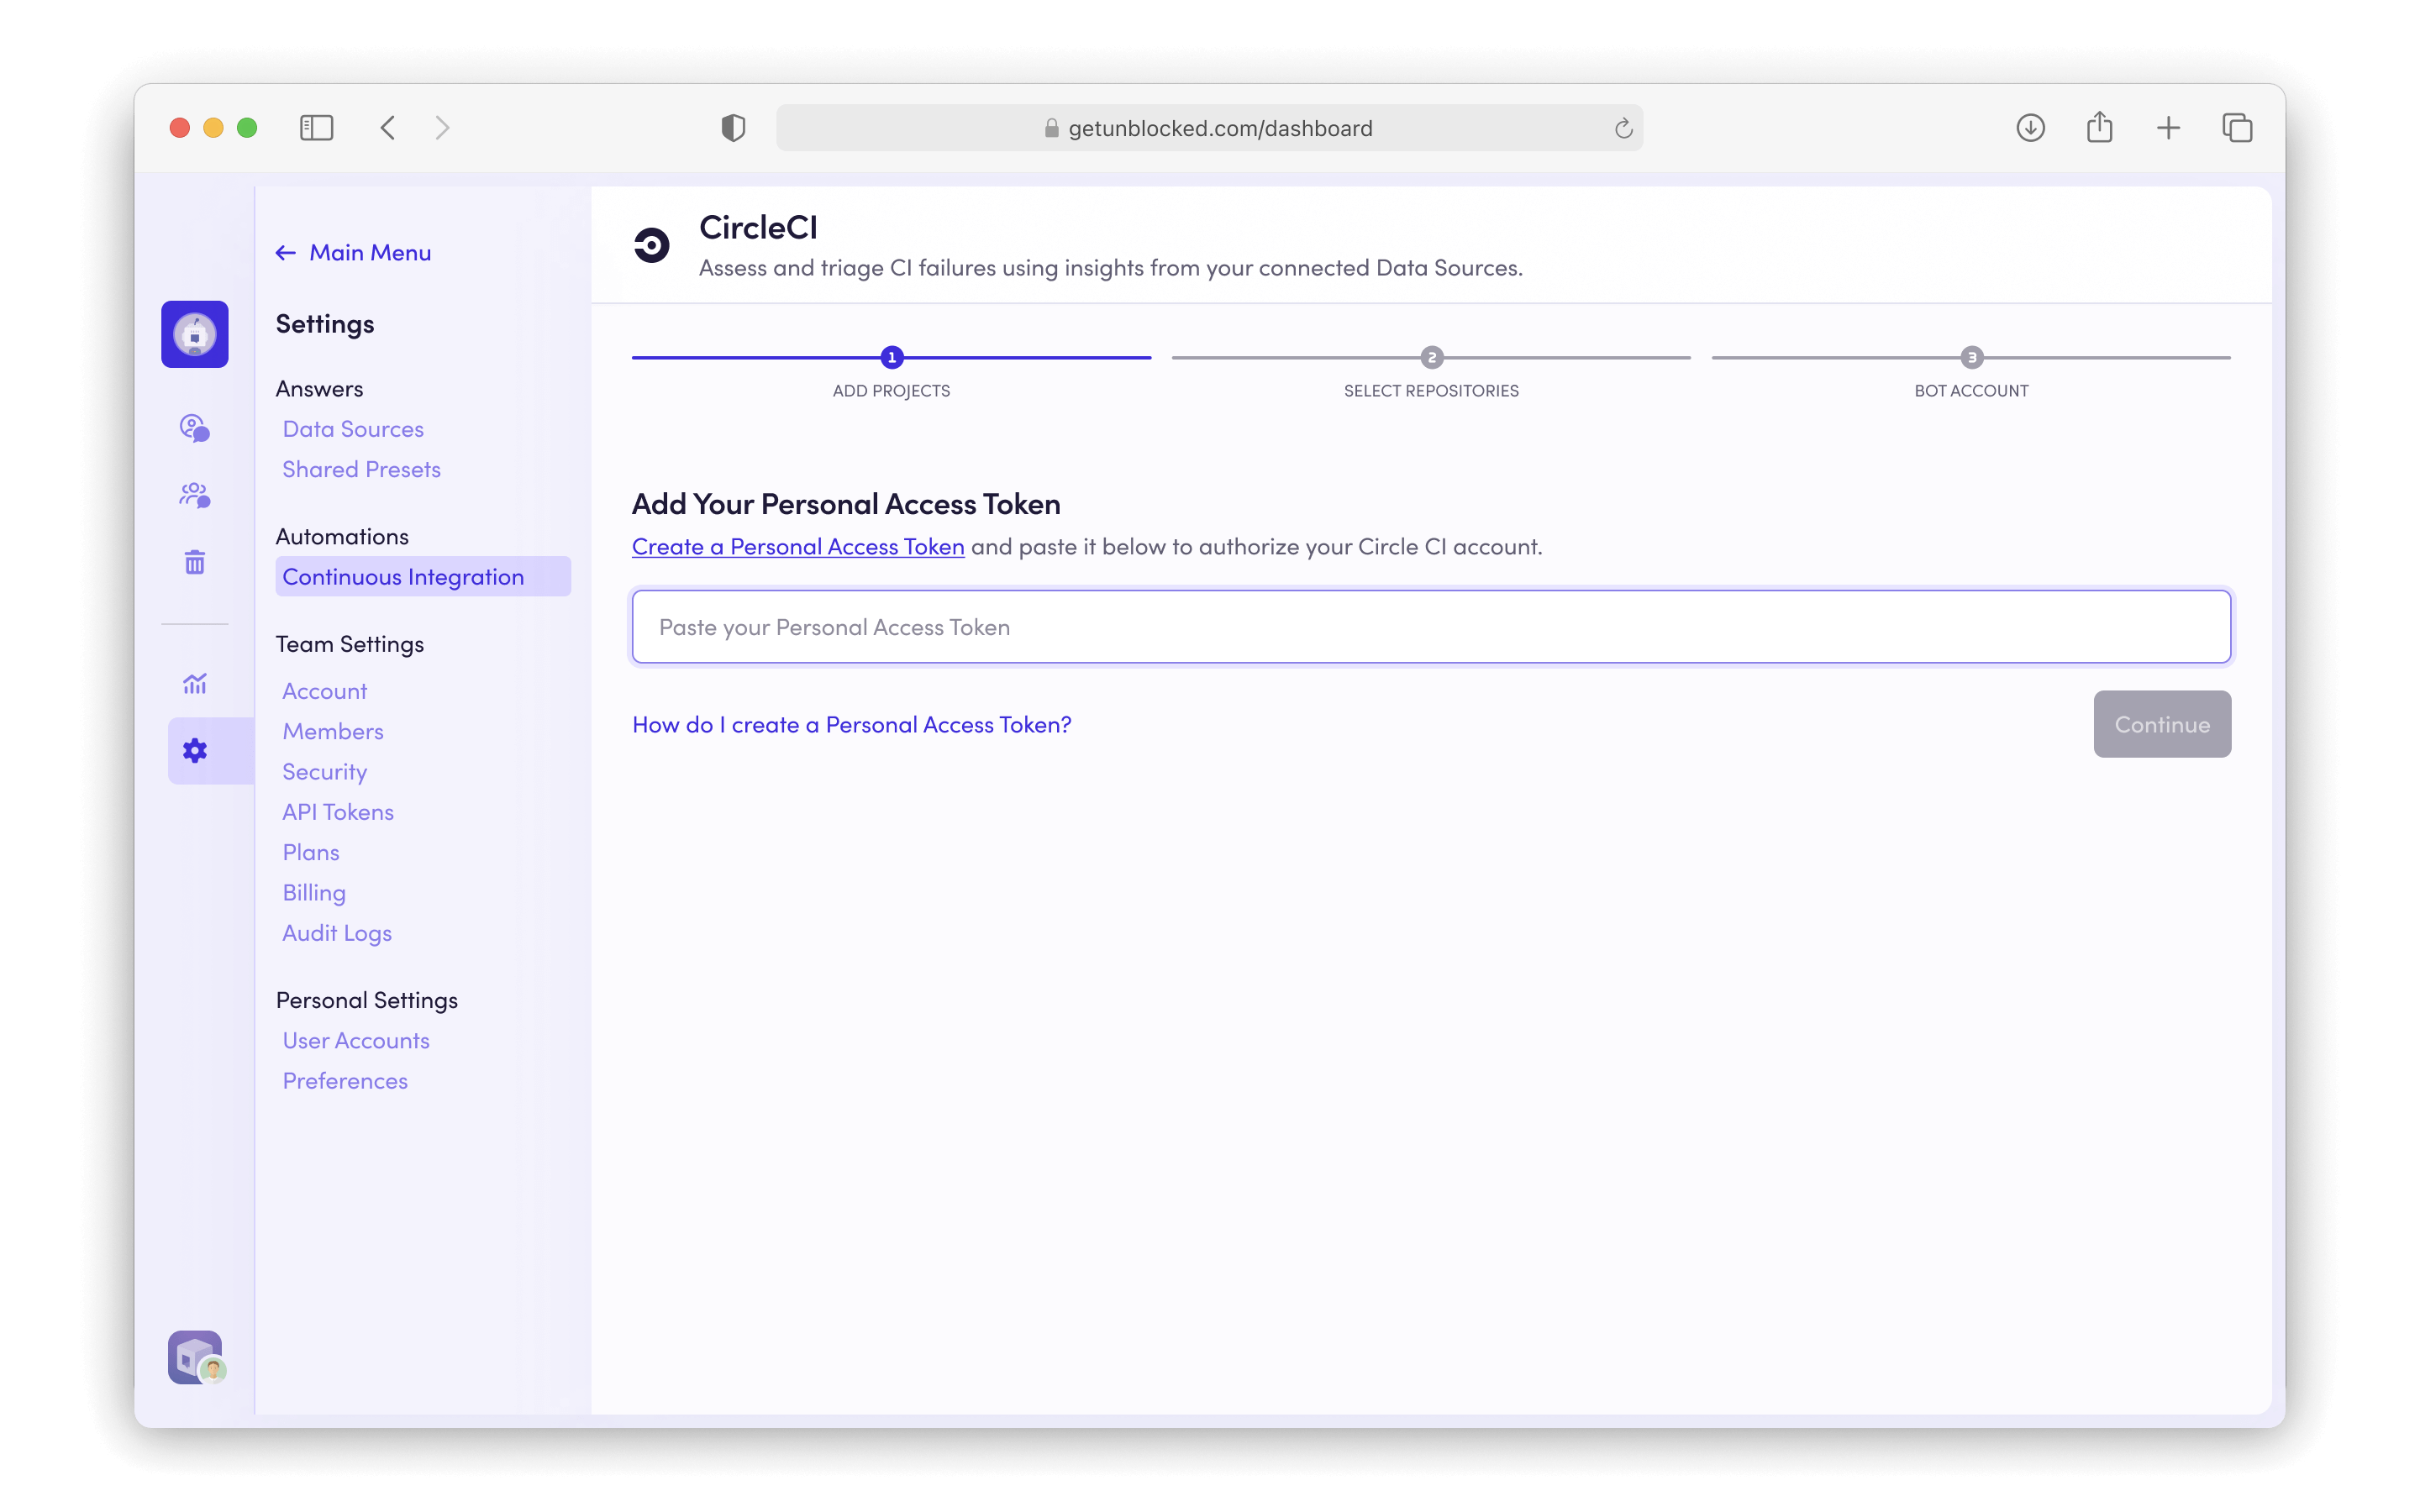
        * Create a new [Personal API Token](https://app.circleci.com/settings/user/tokens) in CircleCI:

        * Enter "Unblocked" as the **Description**.

        * Click **Add API Token**.

        * Paste the token into Unblocked.

                  <img src="https://mintcdn.com/unblocked/XfgrfEzBJgxcMSOE/img/ci/ci-circleci-token.png?fit=max&auto=format&n=XfgrfEzBJgxcMSOE&q=85&s=7ab6164d873d70f980ca46eb770789d1" alt="CircleCI token" width="2880" height="1800" data-path="img/ci/ci-circleci-token.png" />
      </Step>

      <Step title="Select Projects">
        Select the CircleCI projects you want to enable. Unblocked lists recently used projects and projects that
        you follow in CircleCI.

        If a project is not listed, you can add it by entering the project slug, which you can find in the
        project settings in CircleCI.

        Unblocked will automatically install an outgoing webhook in CircleCI for each project you select, so
        that it can receive notifications when builds fail.
      </Step>

      <Step title="Select Repositories">
        Toggle the repositories you want to enable by selecting them.
      </Step>

      <Step title="Done">
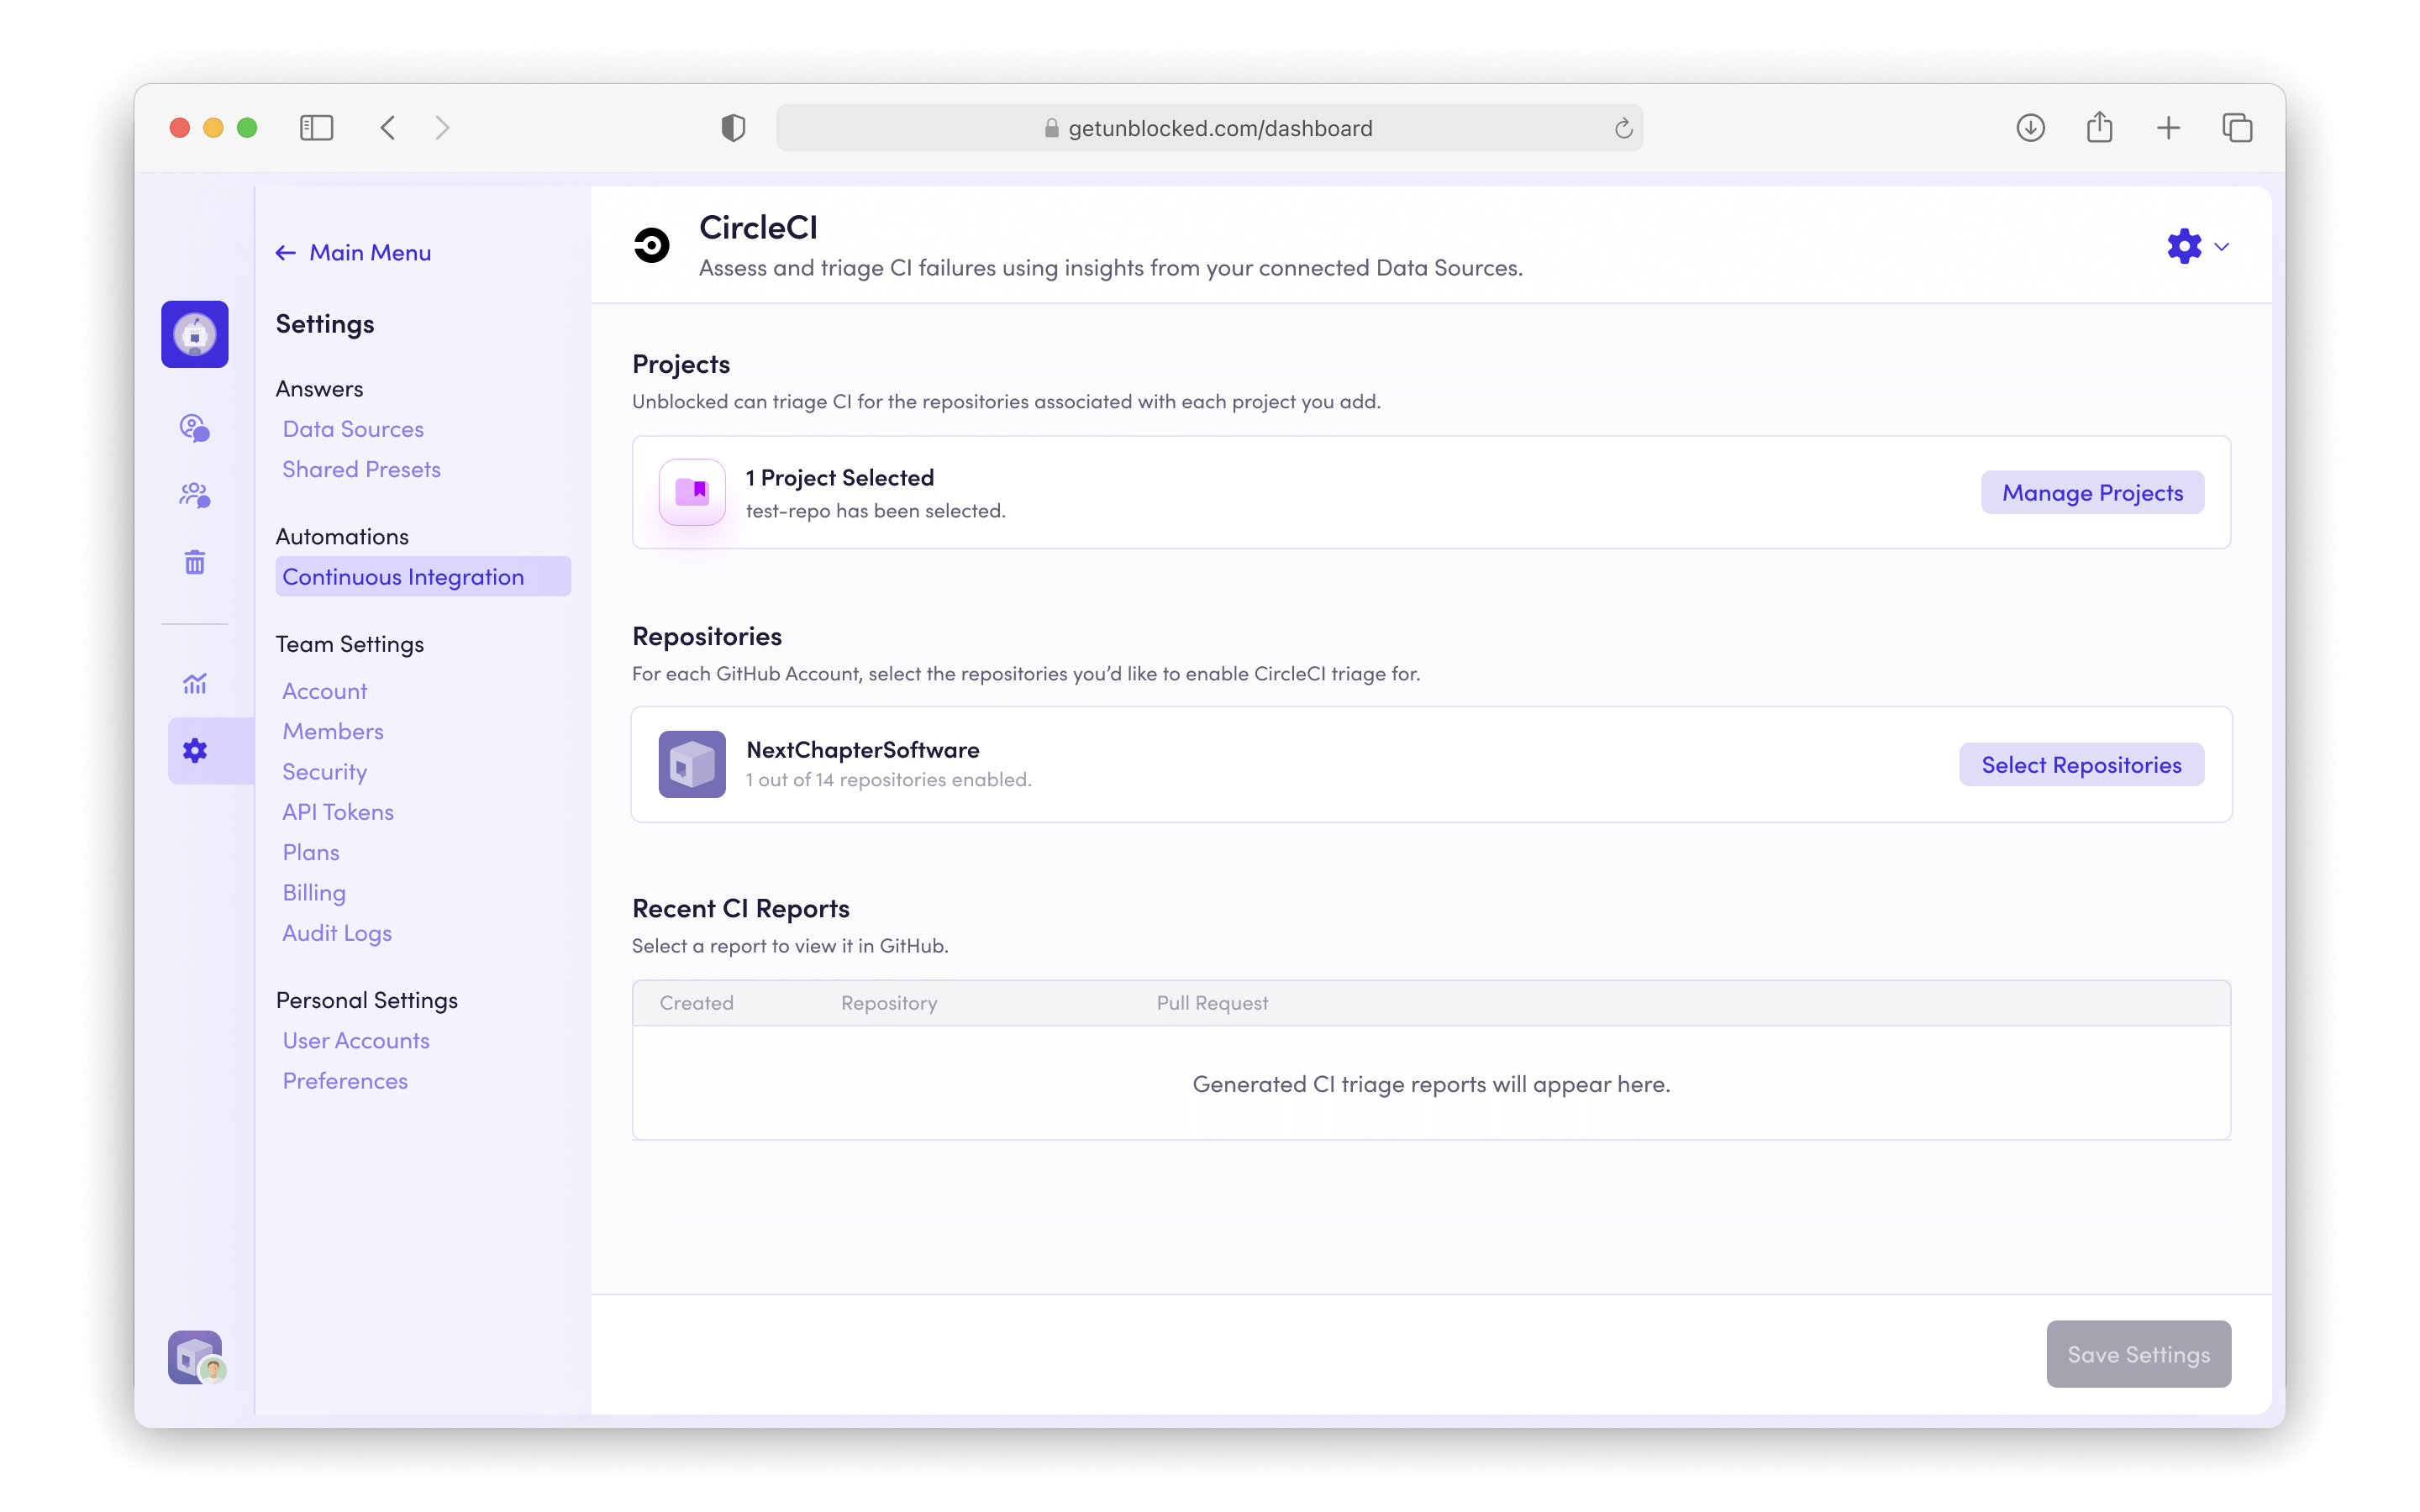
        Click **Save Settings** to apply your changes.
        Now Unblocked will analyze CircleCI failures in the selected repositories and post reports to pull
        requests.

        <img src="https://mintcdn.com/unblocked/XfgrfEzBJgxcMSOE/img/ci/ci-circleci-complete.png?fit=max&auto=format&n=XfgrfEzBJgxcMSOE&q=85&s=2fd88db2f001e035659f7b7388943525" alt="CircleCI token" width="2880" height="1800" data-path="img/ci/ci-circleci-complete.png" />
      </Step>
    </Steps>
  </Tab>

  <Tab title="Jenkins">
    ### Configuring Jenkins

    To connect Jenkins to Unblocked, follow these steps:

    <Steps>
      <Step title="Add CI Data Source">
        In the left sidebar, click on **Settings** and then **Continuous Integration**.
        Then click on **Add CI Provider**.
      </Step>

      <Step title="Connect Jenkins">
        Click on the **Jenkins** tile.

        <img src="https://mintcdn.com/unblocked/yVsbHSyeiIZi1Xp1/img/ci/Data-Sources-CI-Integrations.png?fit=max&auto=format&n=yVsbHSyeiIZi1Xp1&q=85&s=e6a299769b0a789f5a462d89d323603a" alt="CI Add" width="2880" height="1820" data-path="img/ci/Data-Sources-CI-Integrations.png" />
      </Step>

      <Step title="Verify Jenkins Server">
        Enter your Jenkins server hostname or URL, and click **verify**.

        <Note>
          If you have restricted network access to your host, you may need to [allow Unblocked to access it](/data-sources/ip-range).
        </Note>
      </Step>

      <Step title="Configure Jenkins Server">
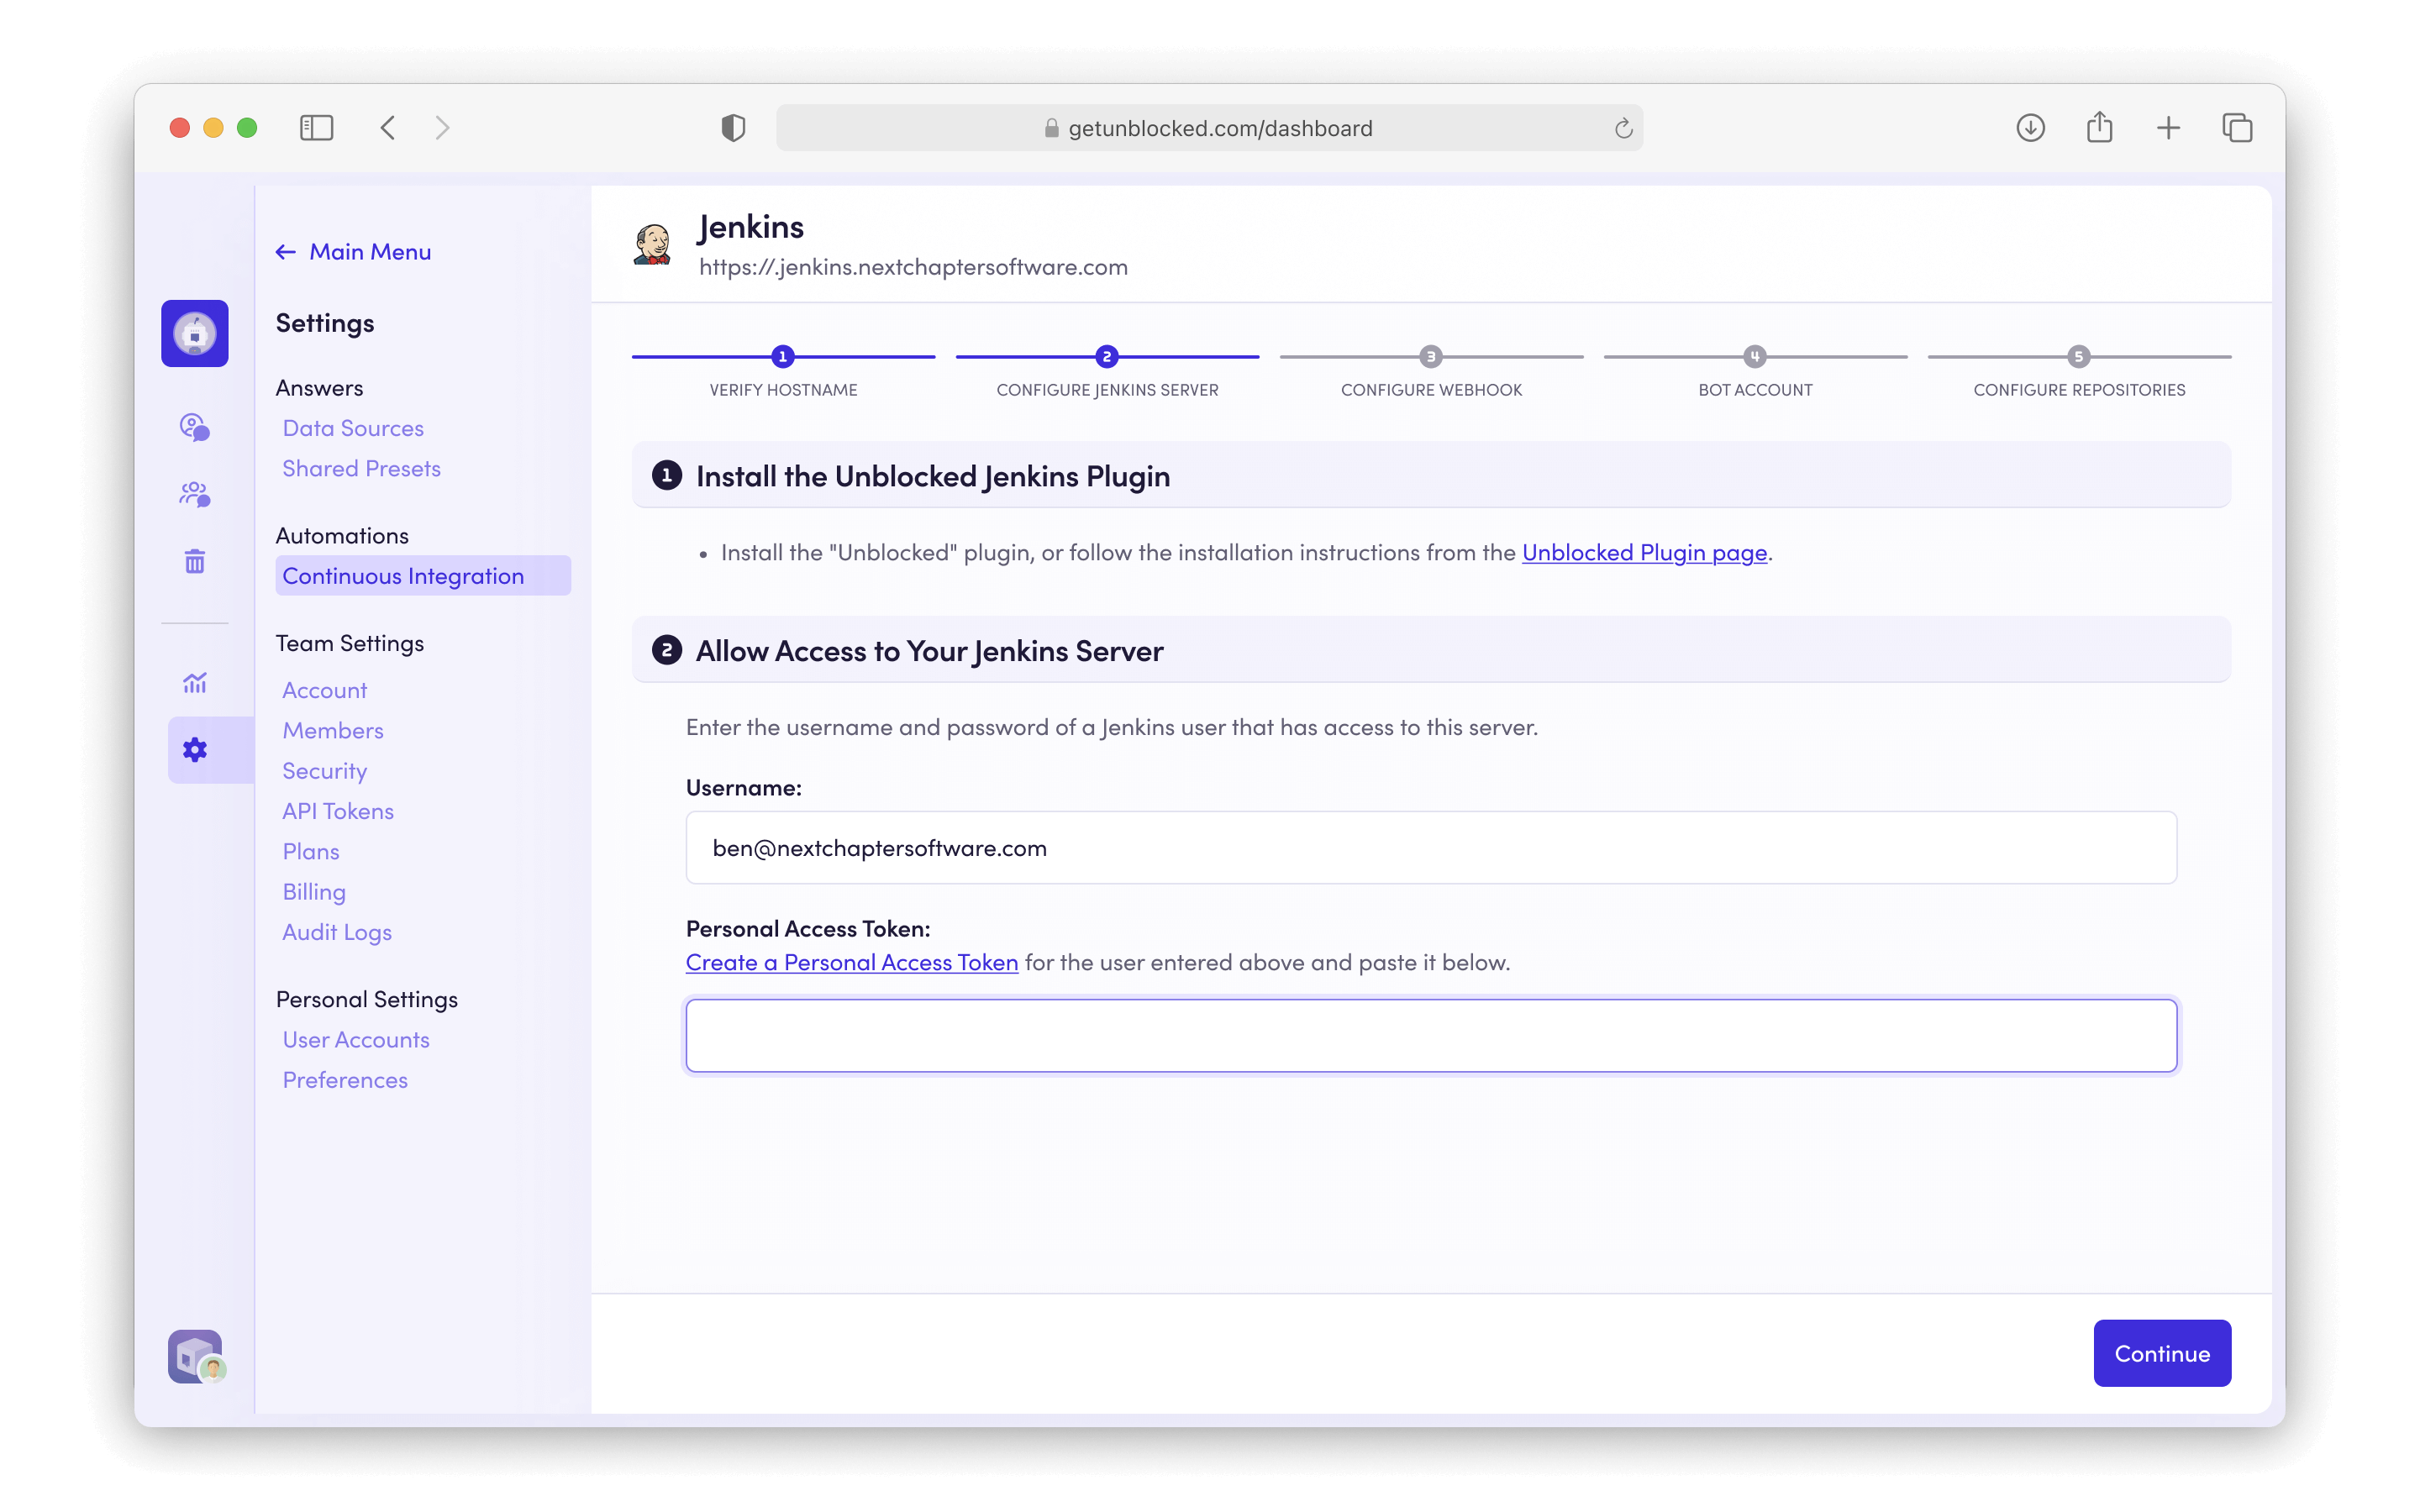
        On your Jenkins server, first:

        * Install the "Unblocked" plugin using the provided link, or follow the installation instructions from the [Unblocked Plugin page](https://plugins.jenkins.io/unblocked).

        * Enter a Jenkins **Username**, and create a new **Personal Access Token** using the provided link. Paste it into the Personal Access Token field.

                  <img src="https://mintcdn.com/unblocked/Ww8qFn7dDid1G4pF/img/ci/jenkins-configure-server.png?fit=max&auto=format&n=Ww8qFn7dDid1G4pF&q=85&s=7b68b69c4b1d90a146958f28f666f8bc" alt="CI Add" width="2880" height="1800" data-path="img/ci/jenkins-configure-server.png" />
      </Step>

      <Step title="Select Repositories">
        Toggle the repositories you want to enable by selecting them.
      </Step>

      <Step title="Done">
        Click **Save Settings** to apply your changes.
        Now Unblocked will analyze Jenkins failures in the selected repositories and post reports to pull requests.
      </Step>
    </Steps>
  </Tab>

  <Tab title="GitHub Actions">
    ### Configuring GitHub Actions

    To connect GitHub Actions to Unblocked, follow these steps:

    <Steps>
      <Step title="Add CI Data Source">
        In the left sidebar, click on **Settings** and then **Continuous Integration**.
        Then click on **Add CI Provider**.
      </Step>

      <Step title="Connect GitHub Actions">
        Click on the **GitHub Actions** tile. <img src="https://mintcdn.com/unblocked/yVsbHSyeiIZi1Xp1/img/ci/Data-Sources-CI-Integrations.png?fit=max&auto=format&n=yVsbHSyeiIZi1Xp1&q=85&s=e6a299769b0a789f5a462d89d323603a" alt="CI Add" width="2880" height="1820" data-path="img/ci/Data-Sources-CI-Integrations.png" />
      </Step>

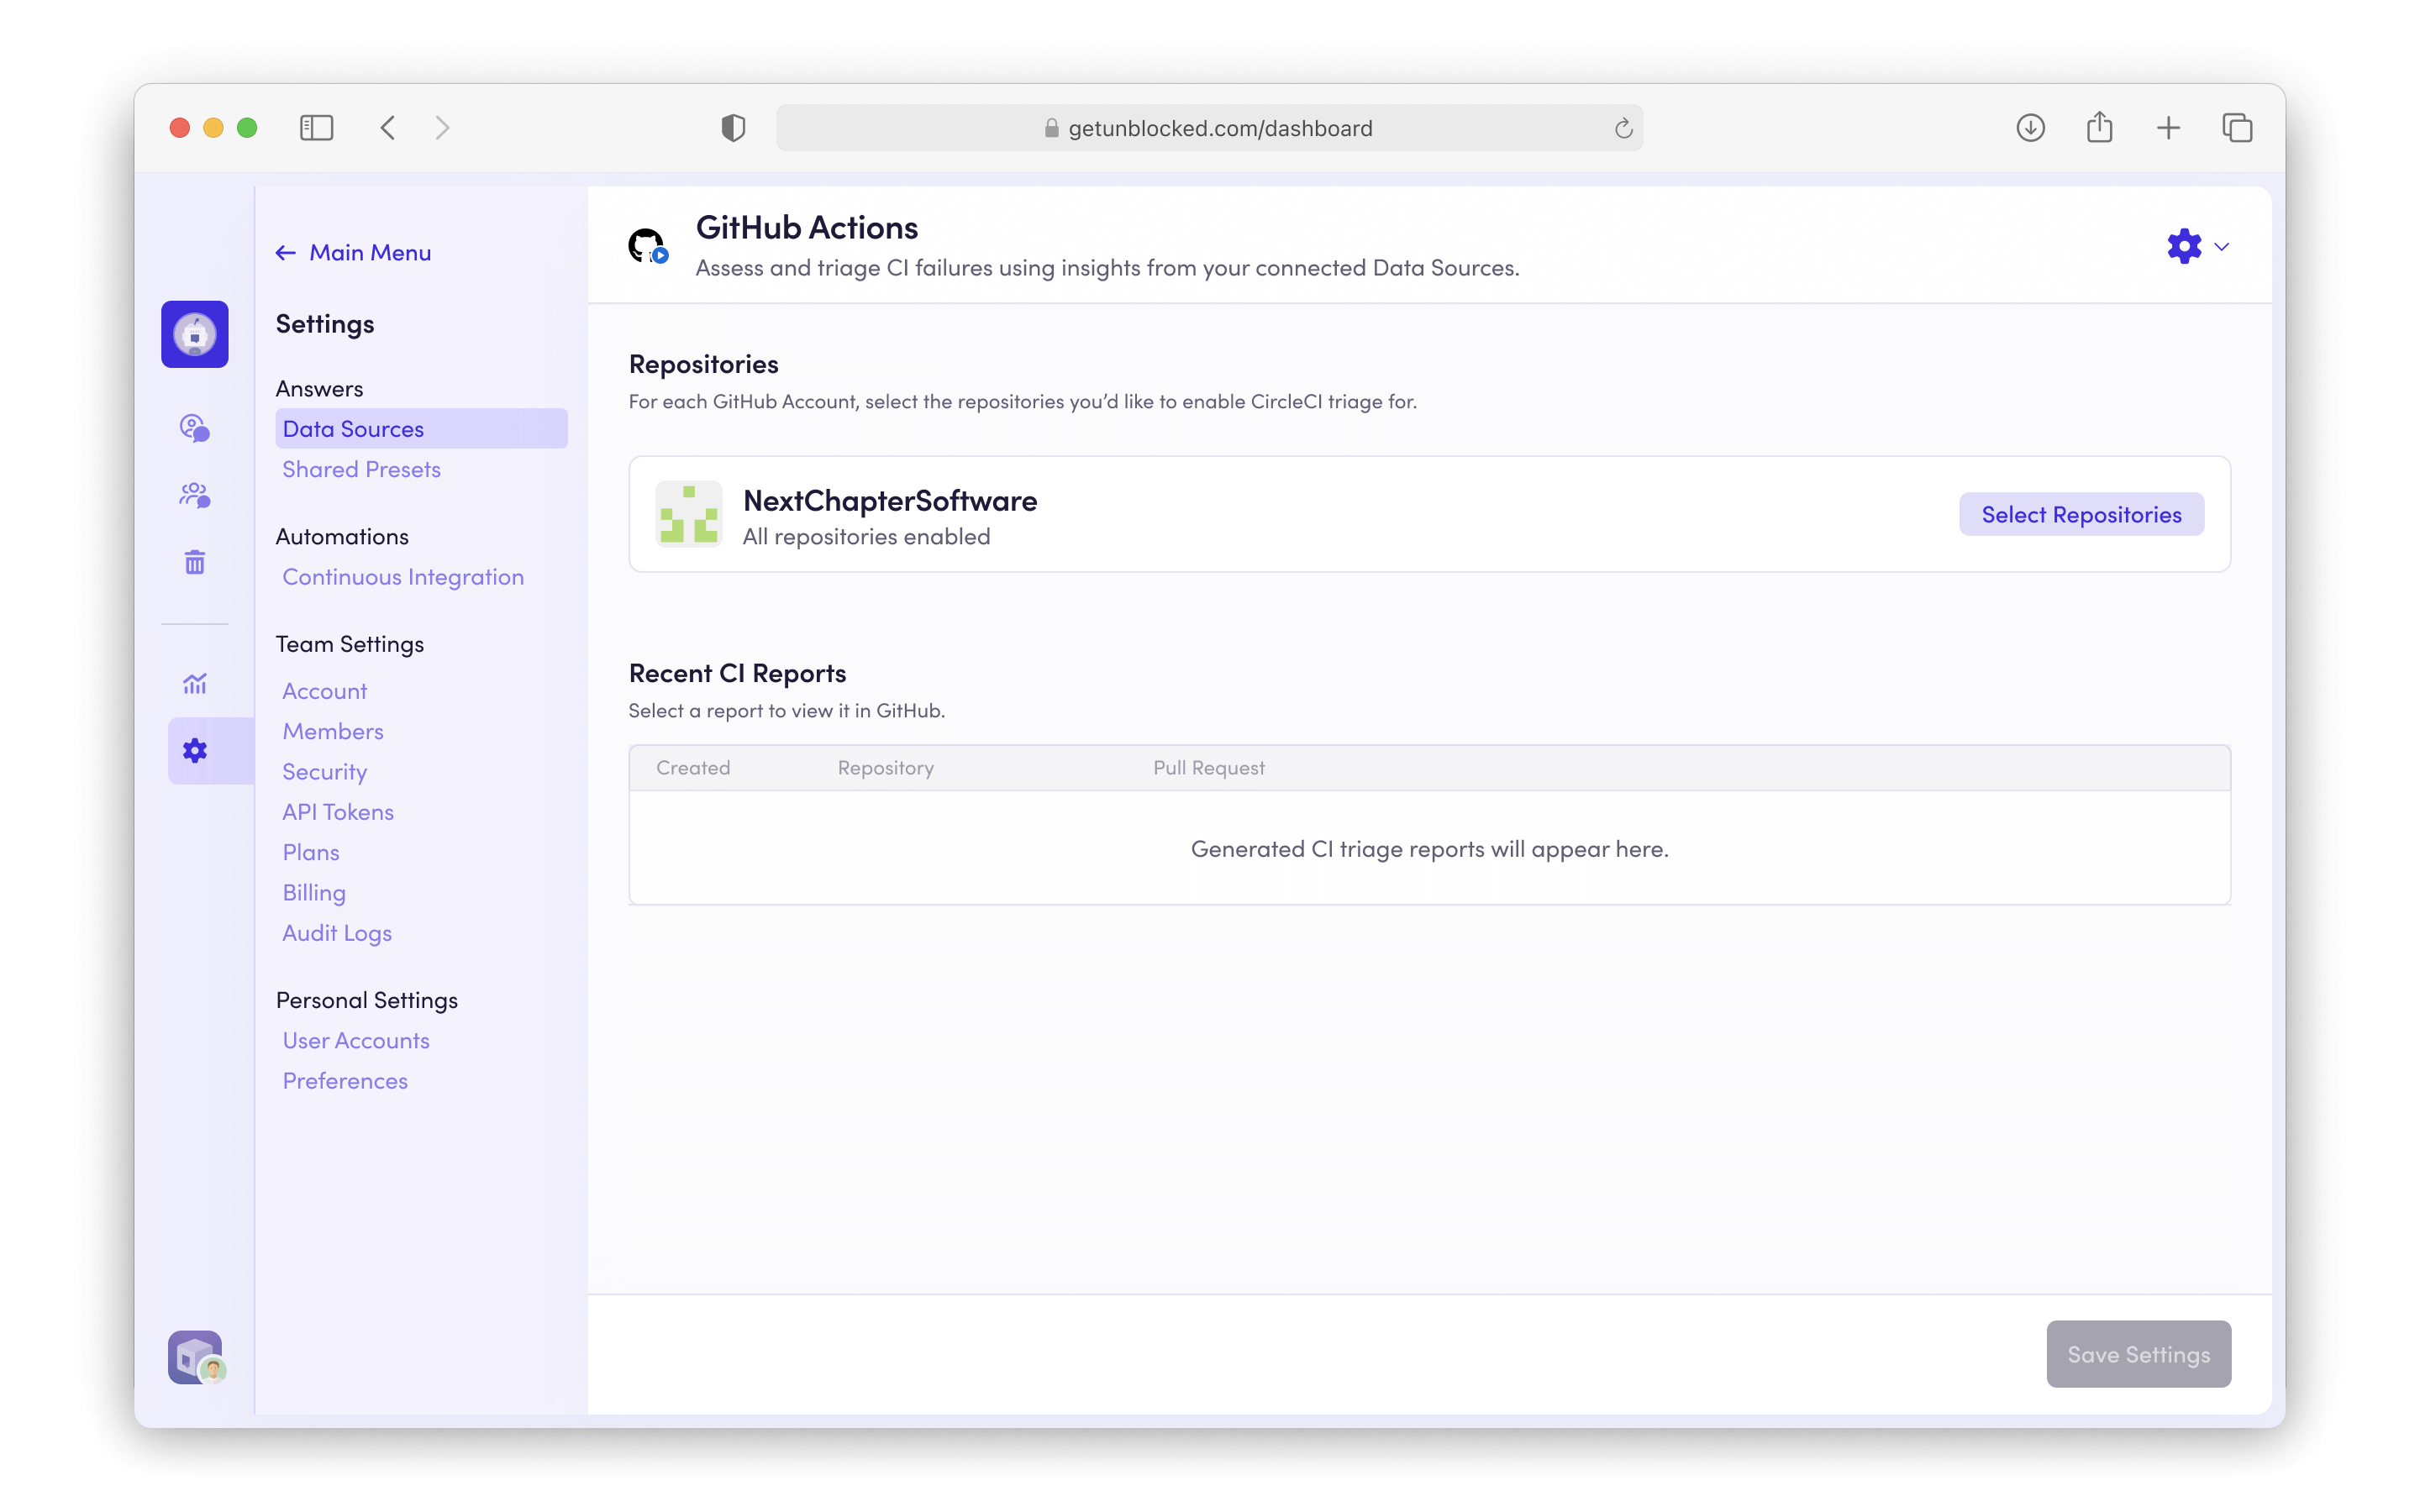
      <Step title="Configure GitHub Actions">
        You may be prompted to accept additional permissions in GitHub if you
        haven't already. Click **Select Repositories** to choose the repositories
        you want to enable CI Failure Agent on. <img src="https://mintcdn.com/unblocked/XfgrfEzBJgxcMSOE/img/ci/ci-configure-github-actions.png?fit=max&auto=format&n=XfgrfEzBJgxcMSOE&q=85&s=0c025a3b09d85ce42fed21c2901f7bdb" alt="CI Configure GitHub
        Actions" width="2880" height="1800" data-path="img/ci/ci-configure-github-actions.png" />
      </Step>

      <Step title="Select Repositories">
        Toggle the repositories you want to enable by selecting them.
      </Step>

      <Step title="Done">
        Click **Save Settings** to apply your changes. Now Unblocked will analyze
        GitHub Actions failures in the selected repositories and post reports to
        pull requests.
      </Step>
    </Steps>
  </Tab>

  <Tab title="GitLab Pipelines">
    ### Configuring GitLab Pipelines

    To connect GitLab Pipelines to Unblocked, follow these steps:

    <Steps>
      <Step title="Add a CI Provider">
        In the left sidebar, click on **Settings**, then **Continuous Integration**.
        Then click on **Add a CI platform**.
      </Step>

      <Step title="Connect GitLab Pipelines">
        Click on the **GitLab Pipelines** tile. <img src="https://mintcdn.com/unblocked/yVsbHSyeiIZi1Xp1/img/ci/Data-Sources-CI-Integrations.png?fit=max&auto=format&n=yVsbHSyeiIZi1Xp1&q=85&s=e6a299769b0a789f5a462d89d323603a" alt="CI Add" width="2880" height="1820" data-path="img/ci/Data-Sources-CI-Integrations.png" />
      </Step>

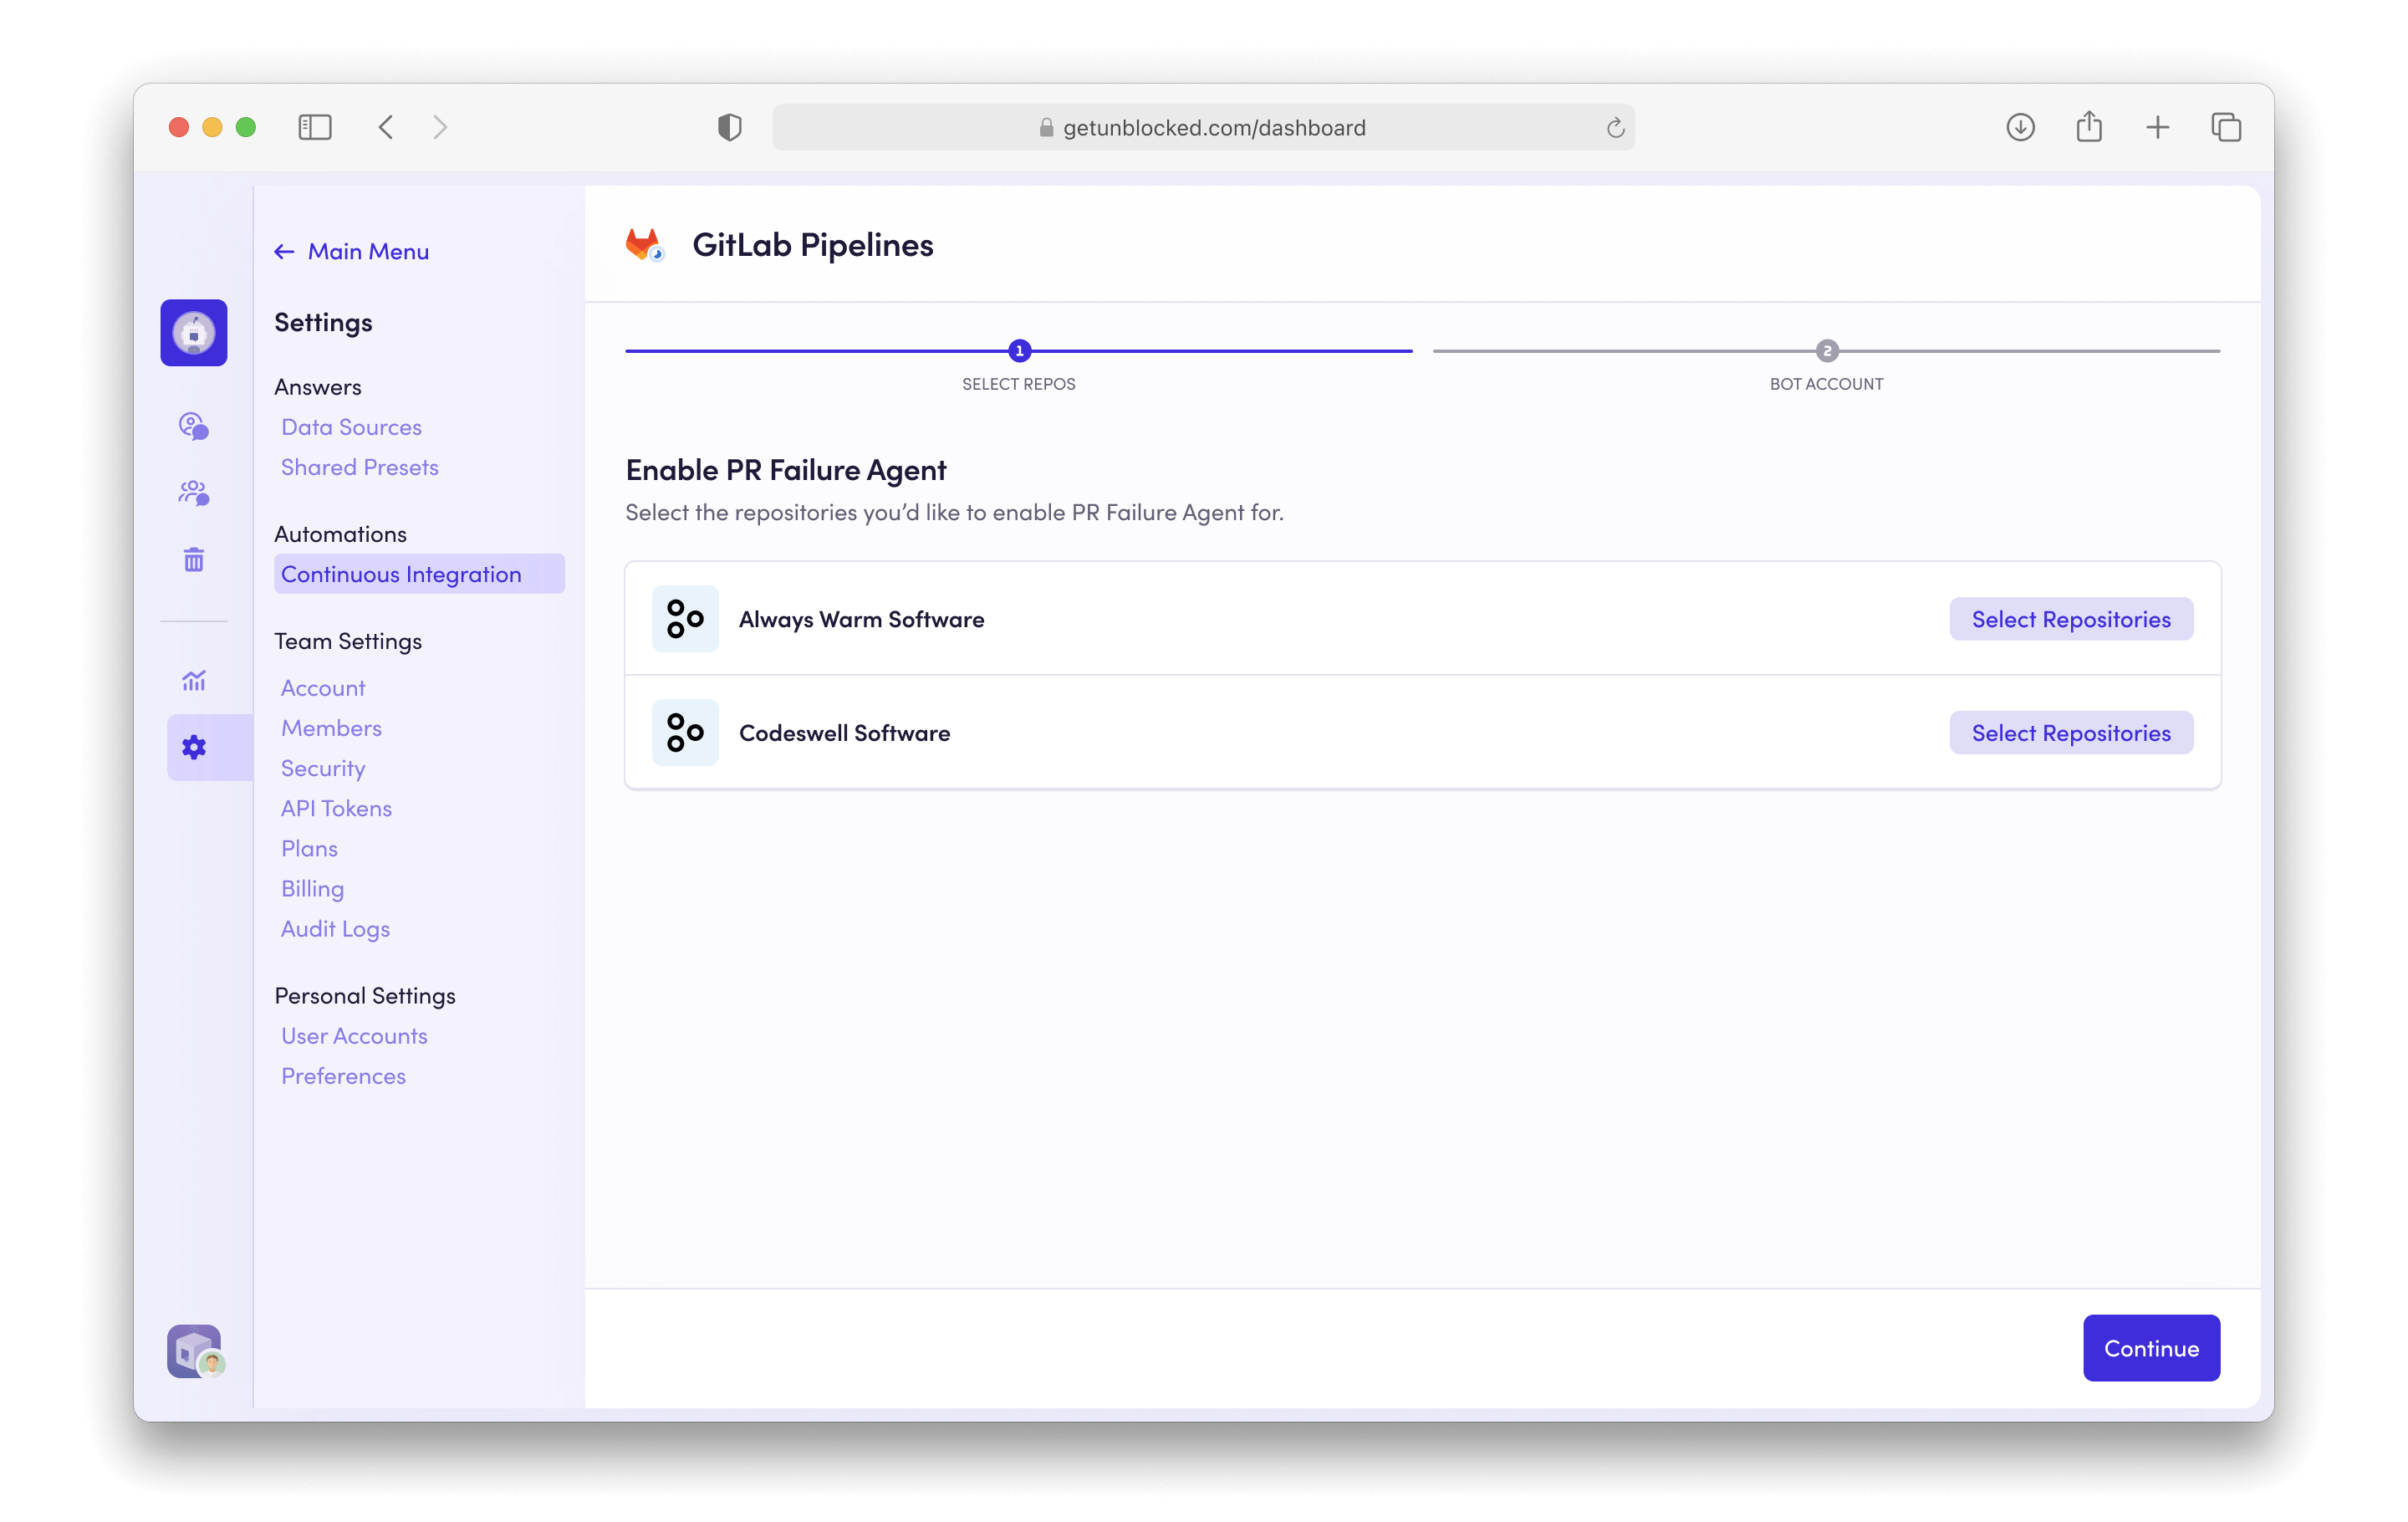
      <Step title="Enable CI Failure Agent">
        Click **Select Repositories** to choose the repositories
        you want to enable the CI Failure Agent on. <img src="https://mintcdn.com/unblocked/yVsbHSyeiIZi1Xp1/img/ci/Gitlab-Pipelines-selectRepos.png?fit=max&auto=format&n=yVsbHSyeiIZi1Xp1&q=85&s=101fa5f56719ca363a2c5a47c2b965a6" alt="CI Configure GitLab Pipelines" width="2880" height="1820" data-path="img/ci/Gitlab-Pipelines-selectRepos.png" />
      </Step>

      <Step title="Select Repositories">
        Toggle the repositories you want to enable by selecting them.
      </Step>

      <Step title="Create a Bot Account">
        CI analysis reports need to be posted on behalf of a GitLab user account. We recommend
        creating an Unblocked bot account for this specific purpose.

        <Note>
          <h4>Already have a bot account?</h4>

          <p>
            Some teams already have a bot account they use for posting automated messages. If you already have a bot account that you can repurpose for posting CI
            analysis reports, select it and skip to the next step.
          </p>
        </Note>

        * [Create a new account](https://gitlab.com/users/sign_up) in GitLab.

        * Click on your avatar in the top left, and click **Edit Profile**.

        * Change the following information:
          * **Name:** Unblocked
          * **Avatar:** download and use the Unblocked logo below

                    <img src="https://mintcdn.com/unblocked/soZi90zJ9_abJhu-/img/Unblocked-logo-with-bg.png?fit=max&auto=format&n=soZi90zJ9_abJhu-&q=85&s=4254a1a1add3321511dfe55c842cf890" alt="Unblocked logo" width="160" noZoom data-path="img/Unblocked-logo-with-bg.png" />

                    <a href="/img/Unblocked-logo-with-bg.png" download="Unblocked-logo.png">
                      Download PNG
                    </a>

        * **Sign out** of your GitLab bot account.

        * **Sign in** as a Group admin for your GitLab Group and navigate to it.

        * Click **Manage** in the left navigation and select **Members**.

        * Click **Invite members**

        * Set the role as "**Planner**" or above and click "**Invite**".
      </Step>

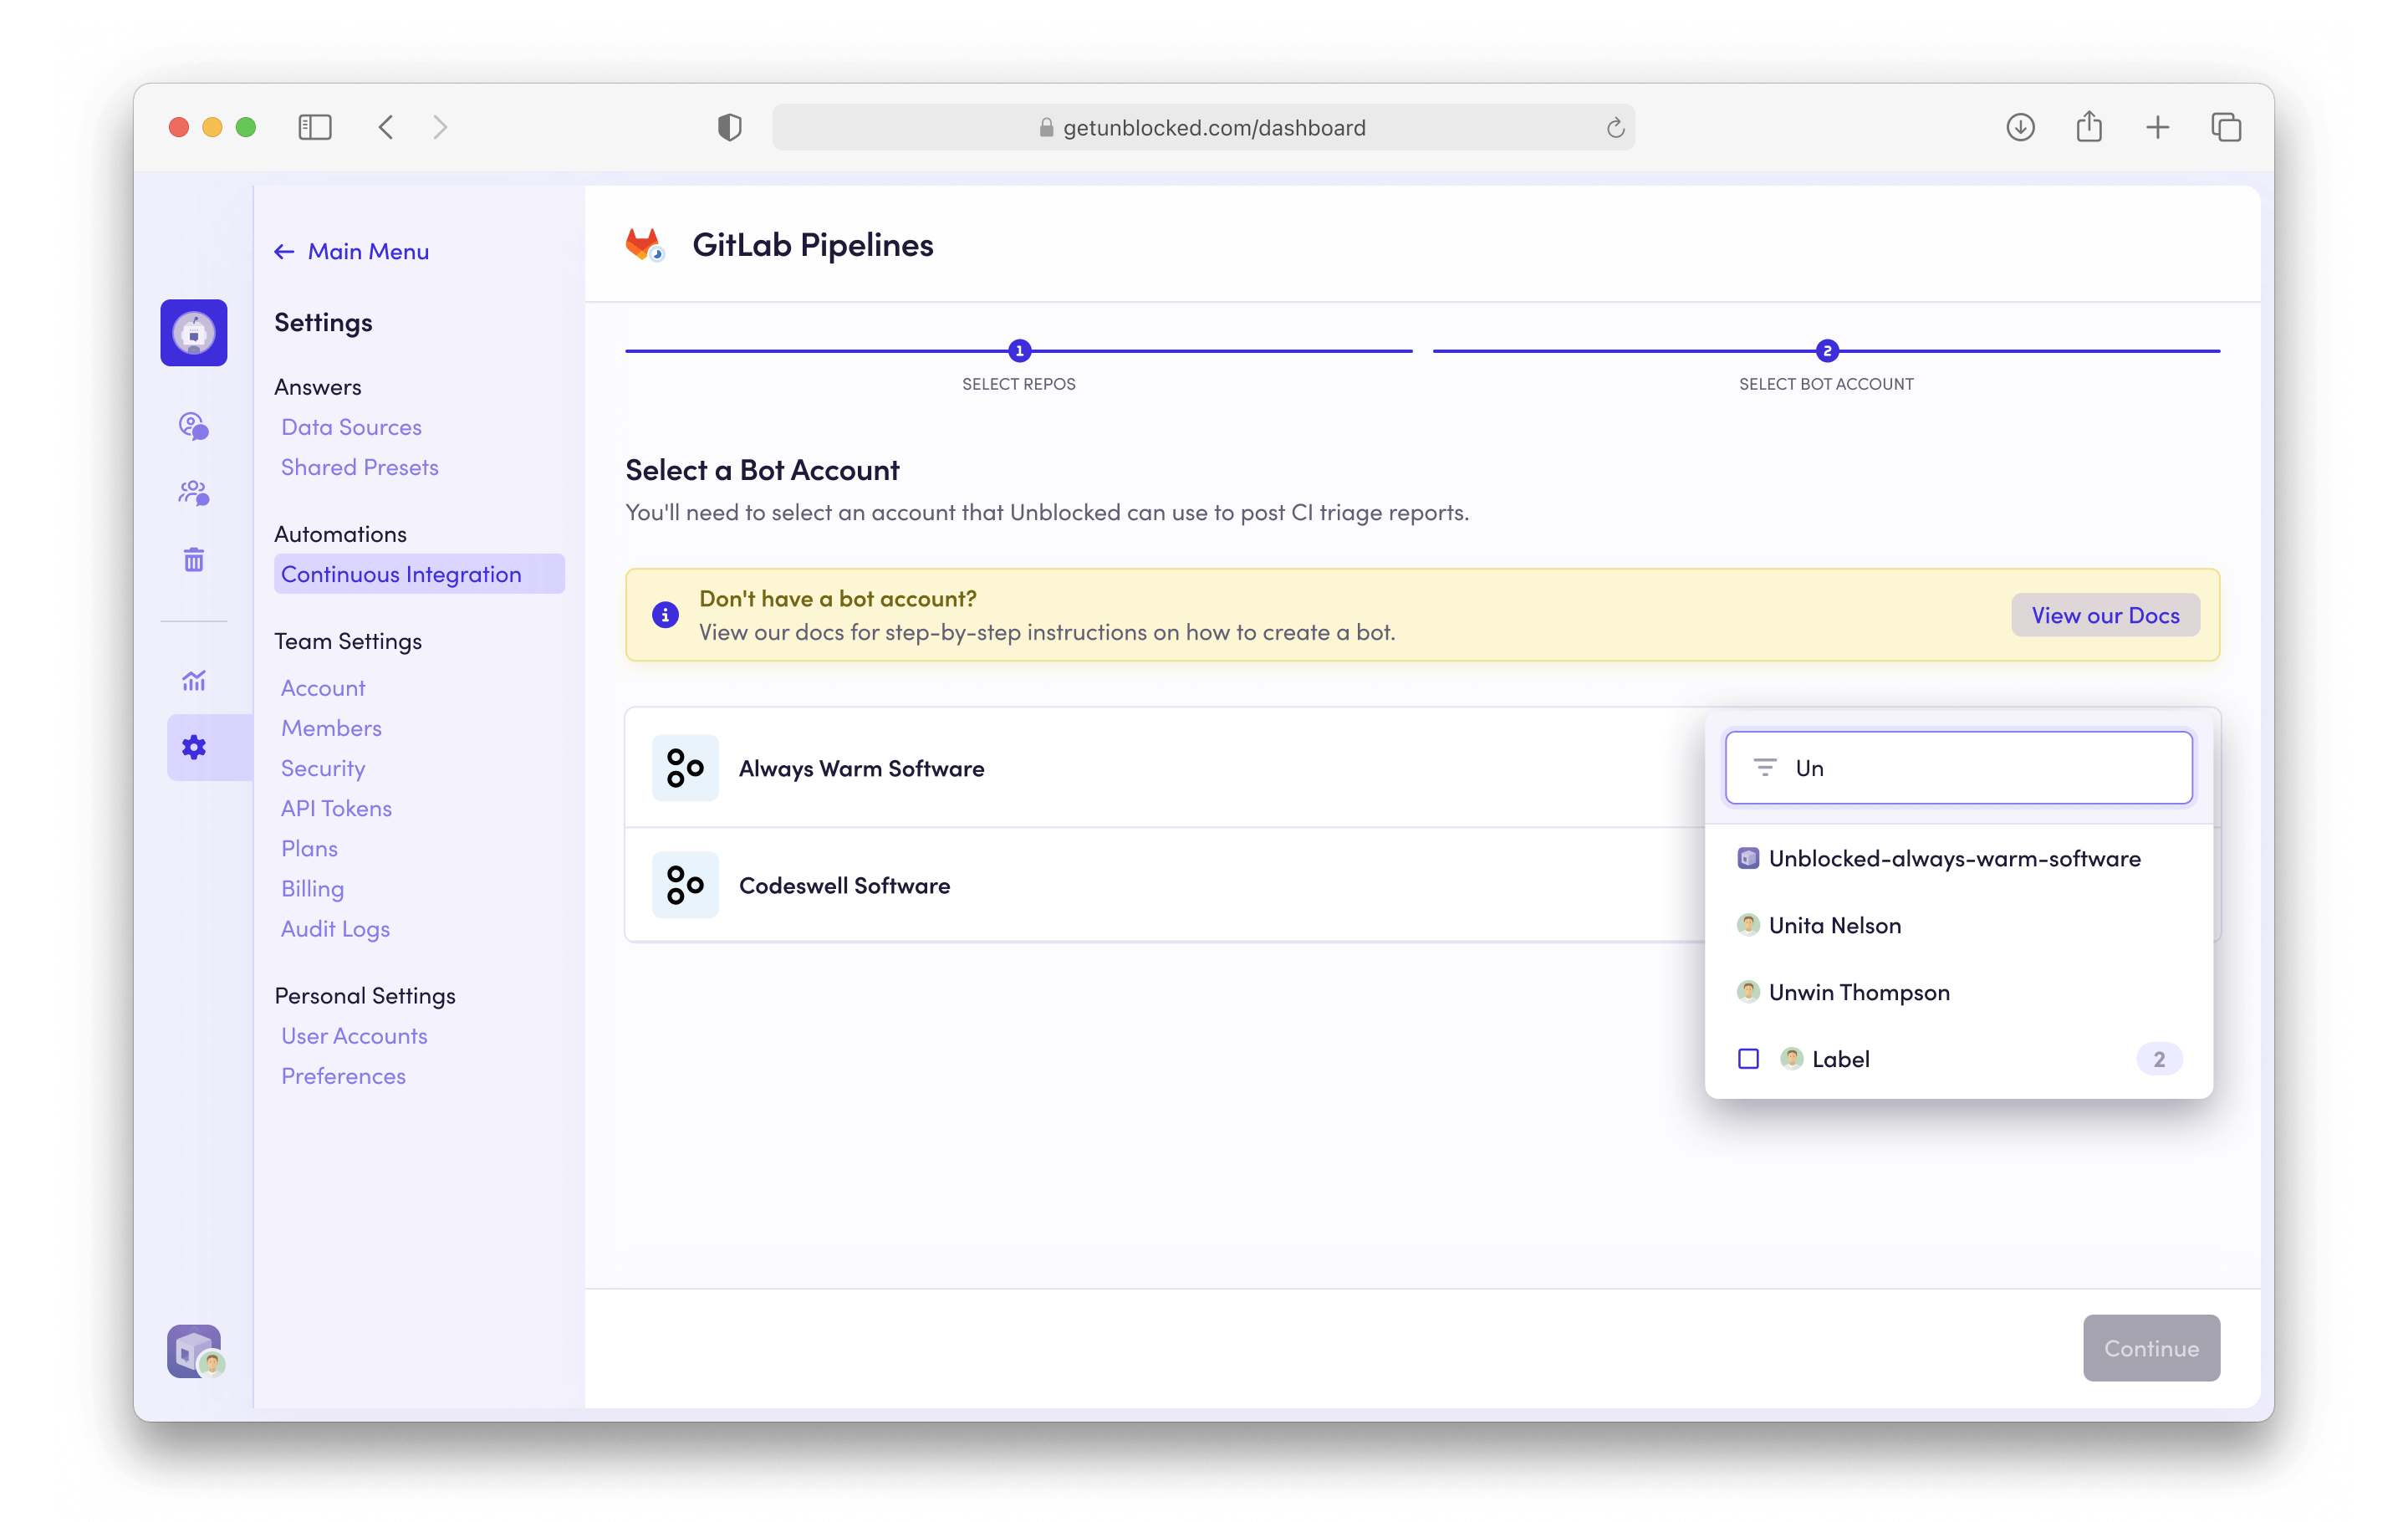
      <Step title="Select your Bot Account">
        Search for the Bot Account you just created and select it. You may be required
        to authorize this account with Unblocked.

        <Warning>
          In order to successfully authorize your bot account, you need to be logged in with that account in GitLab.
        </Warning>

        <img src="https://mintcdn.com/unblocked/yVsbHSyeiIZi1Xp1/img/ci/Gitlab-Pipelines-selectBotAccount.png?fit=max&auto=format&n=yVsbHSyeiIZi1Xp1&q=85&s=2f01ce753c3ce965ee6e584f1a0094e2" alt="CI Configure GitLab Pipelines" width="2880" height="1820" data-path="img/ci/Gitlab-Pipelines-selectBotAccount.png" />
      </Step>

      <Step title="Done">
        Click **Save Settings** to apply your changes. Now Unblocked will analyze CI
        failures in the selected repositories and post reports to pull requests.
      </Step>
    </Steps>
  </Tab>
</Tabs>

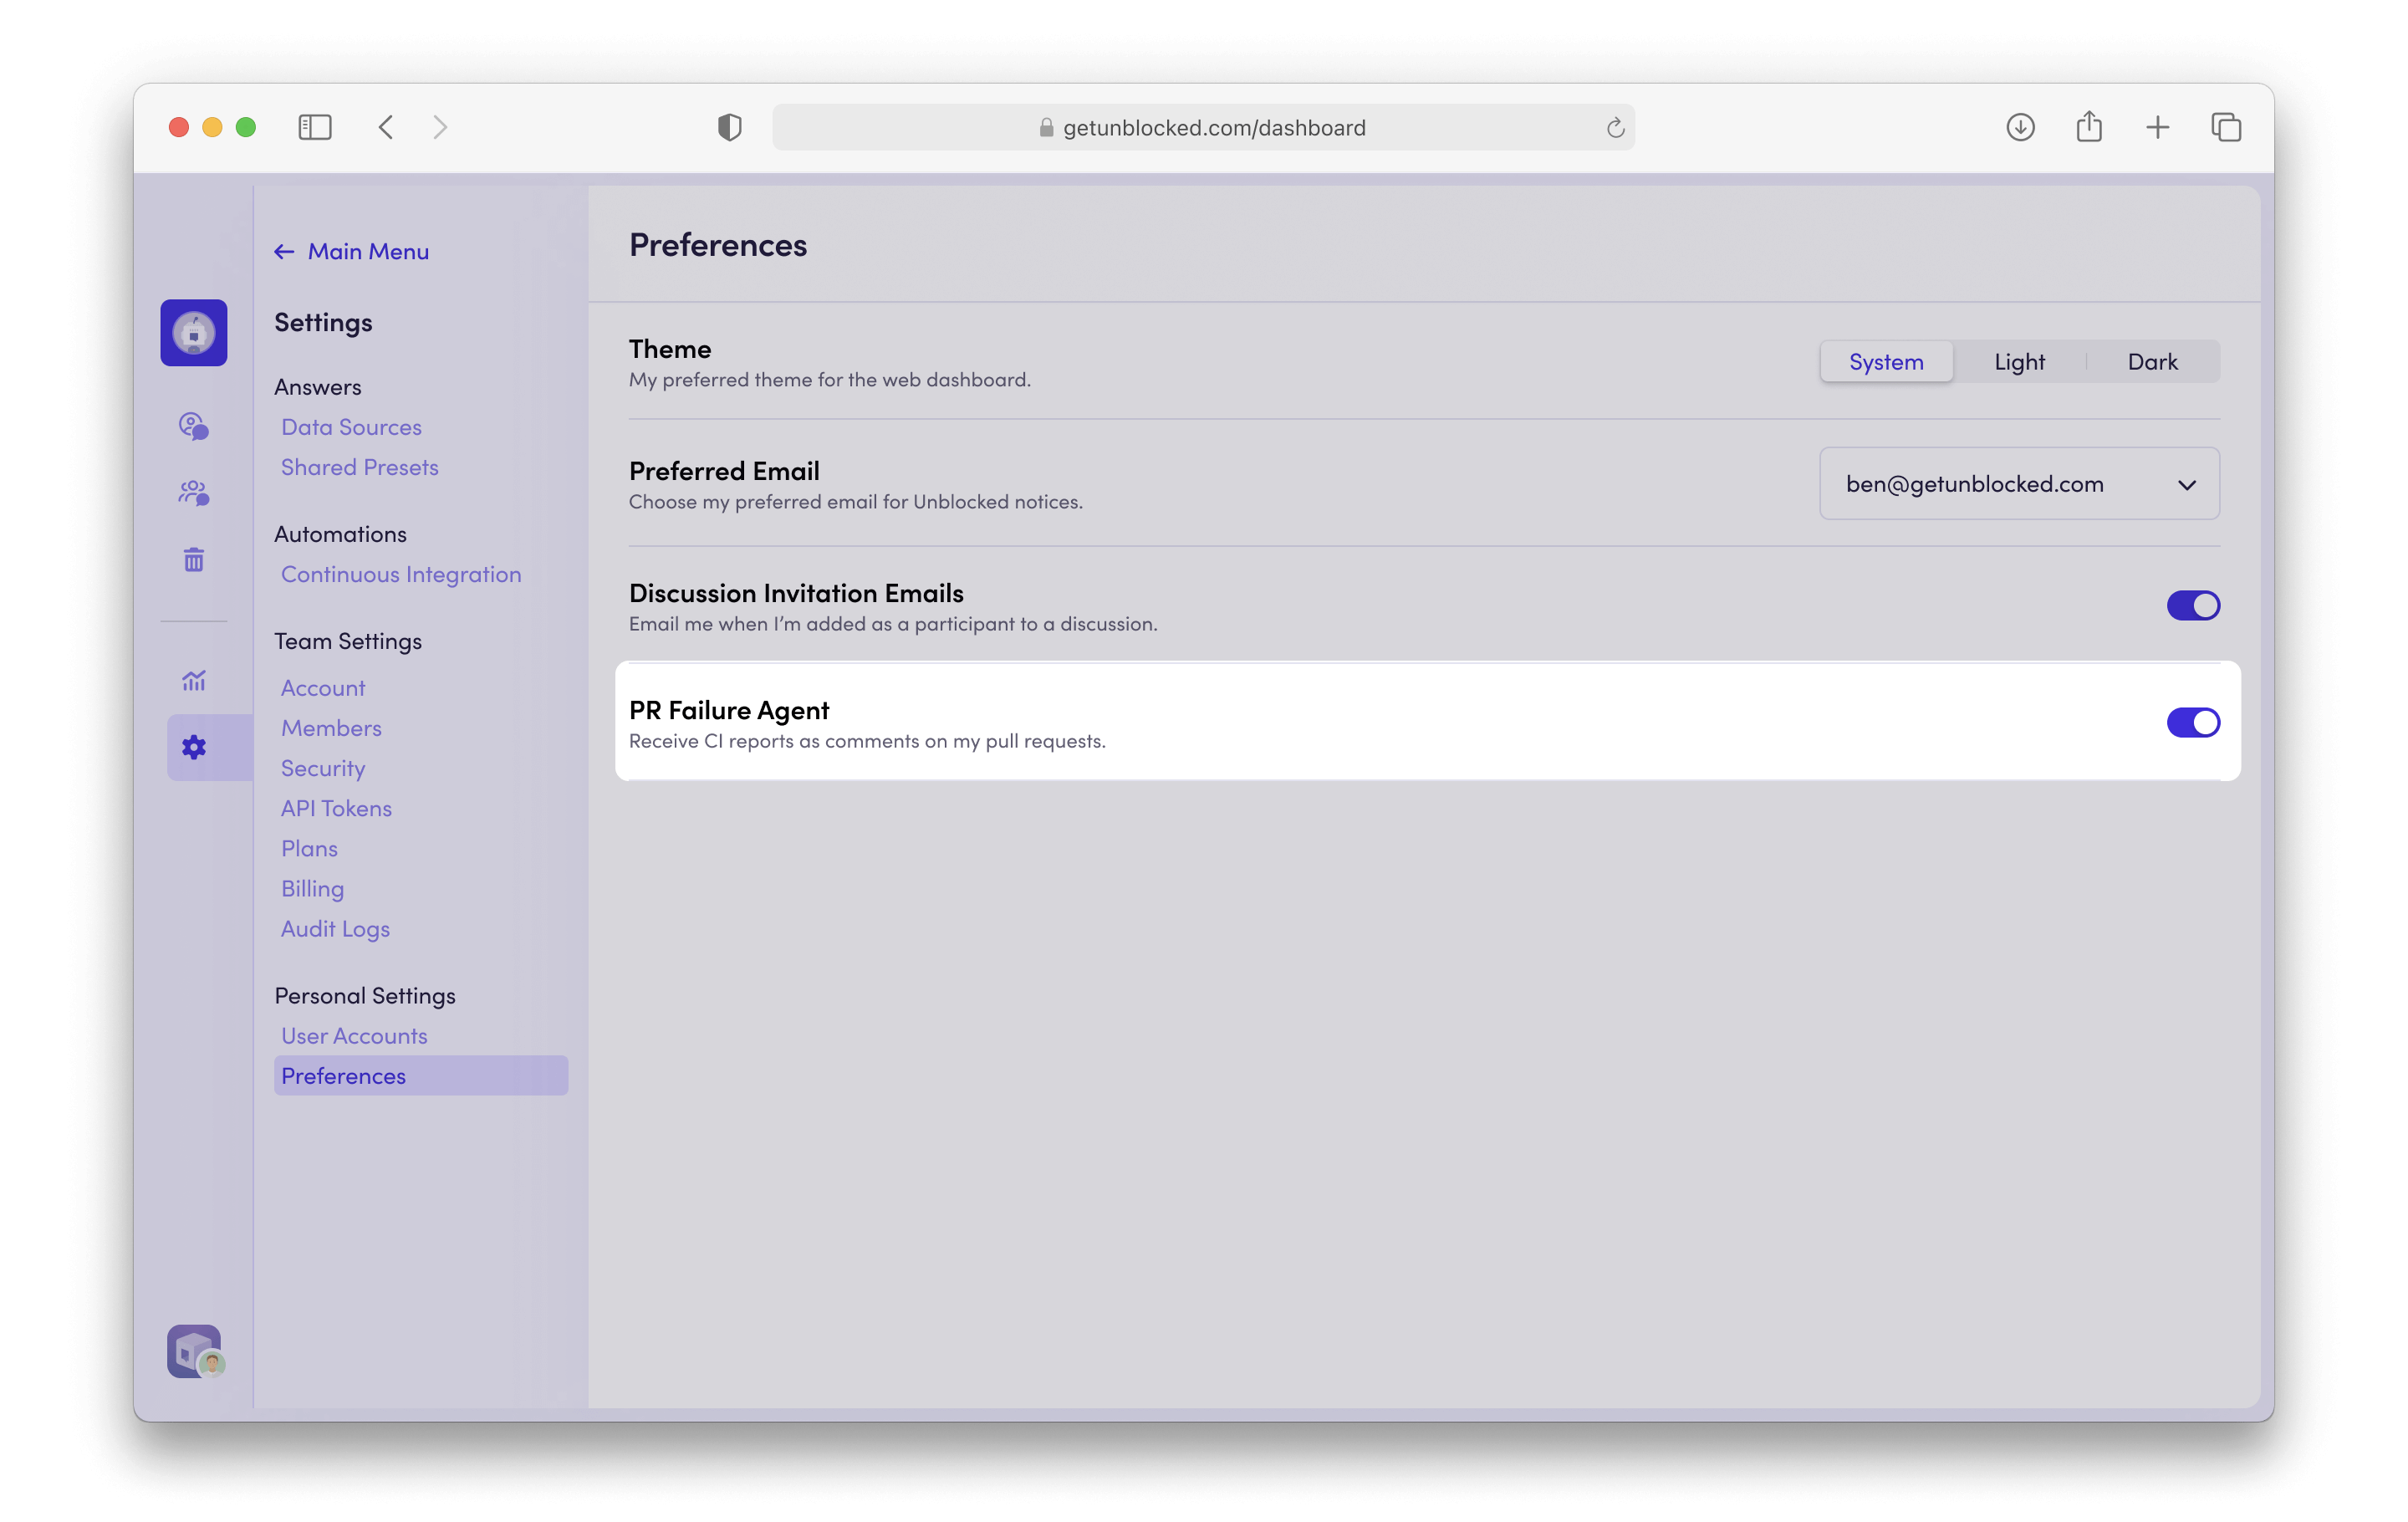
## Configuring CI Failure Agent reports in personal settings

By default, Unblocked will post reports for all developers in your organization when it has high confidence in the root cause of a CI failure.
As a developer, you can control this behavior for your pull requests:

1. Navigate to **Settings** in your Unblocked dashboard
2. Select **Preferences** under the Personal Settings section
3. Locate the **CI Failure Agent** toggle and set it according to your preference

This setting applies only to your pull requests, allowing you to customize your workflow while respecting team preferences.

<img src="https://mintcdn.com/unblocked/Ww8qFn7dDid1G4pF/img/ci/ci-user-toggle.png?fit=max&auto=format&n=Ww8qFn7dDid1G4pF&q=85&s=697be1995c9c51eb49c9254012ca3a3c" alt="CI User Toggle" width="2880" height="1820" data-path="img/ci/ci-user-toggle.png" />