> ## Documentation Index
> Fetch the complete documentation index at: https://docs.getunblocked.com/llms.txt
> Use this file to discover all available pages before exploring further.
# Other SAML Providers
> How to set up any SAML 2.0 compliant identity provider with Unblocked
This article covers the general steps for configuring SAML with any SAML 2.0 compliant identity provider.
For specific detailed instructions for popular identity providers, see articles for
[Okta](/team-settings/sso/okta),
[PingOne](/team-settings/sso/ping-one),
[Microsoft Entra ID](/team-settings/sso/entra-id),
[Google Workspace](/team-settings/sso/google-workspace),
and [AWS Identity Center](/team-settings/sso/aws-identity-center) instead.
## Configure Single Sign-On
To connect Unblocked with your SSO provider:
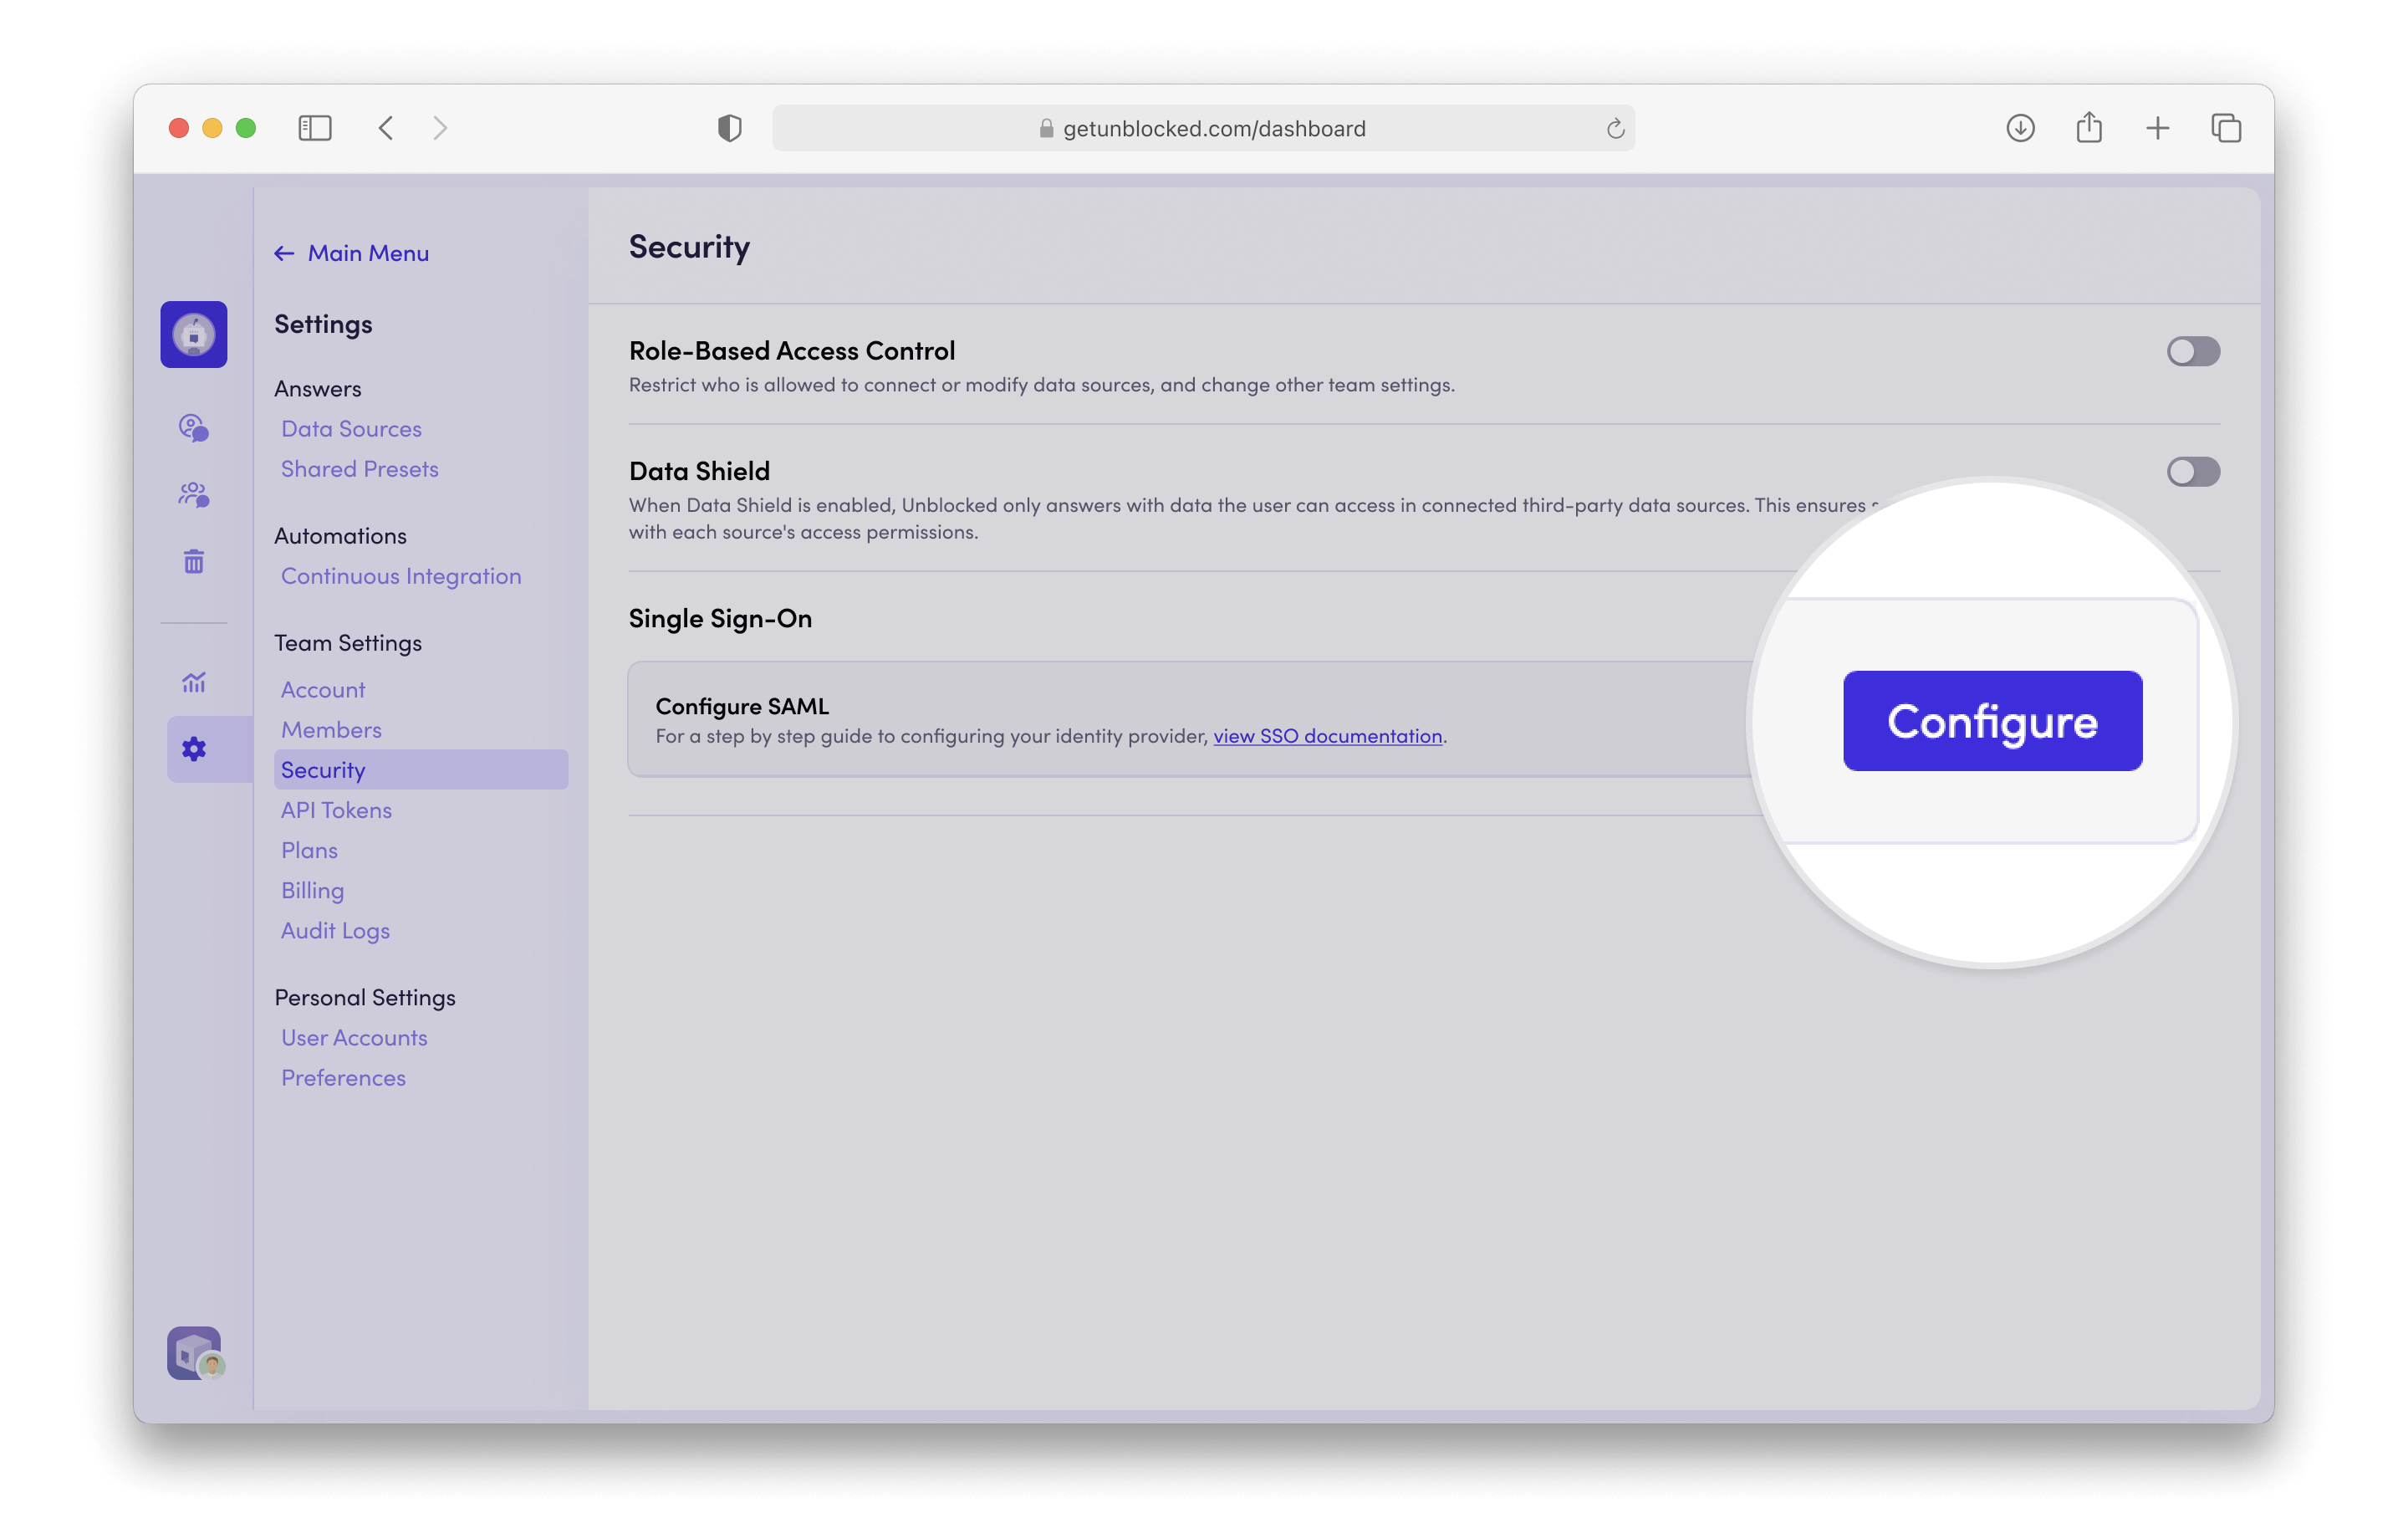
1. Navigate to the **Settings** section of the Unblocked web app.
2. Under Team Settings, select **Security**.
3. Locate the Single Sign-On section and click **Configure**.
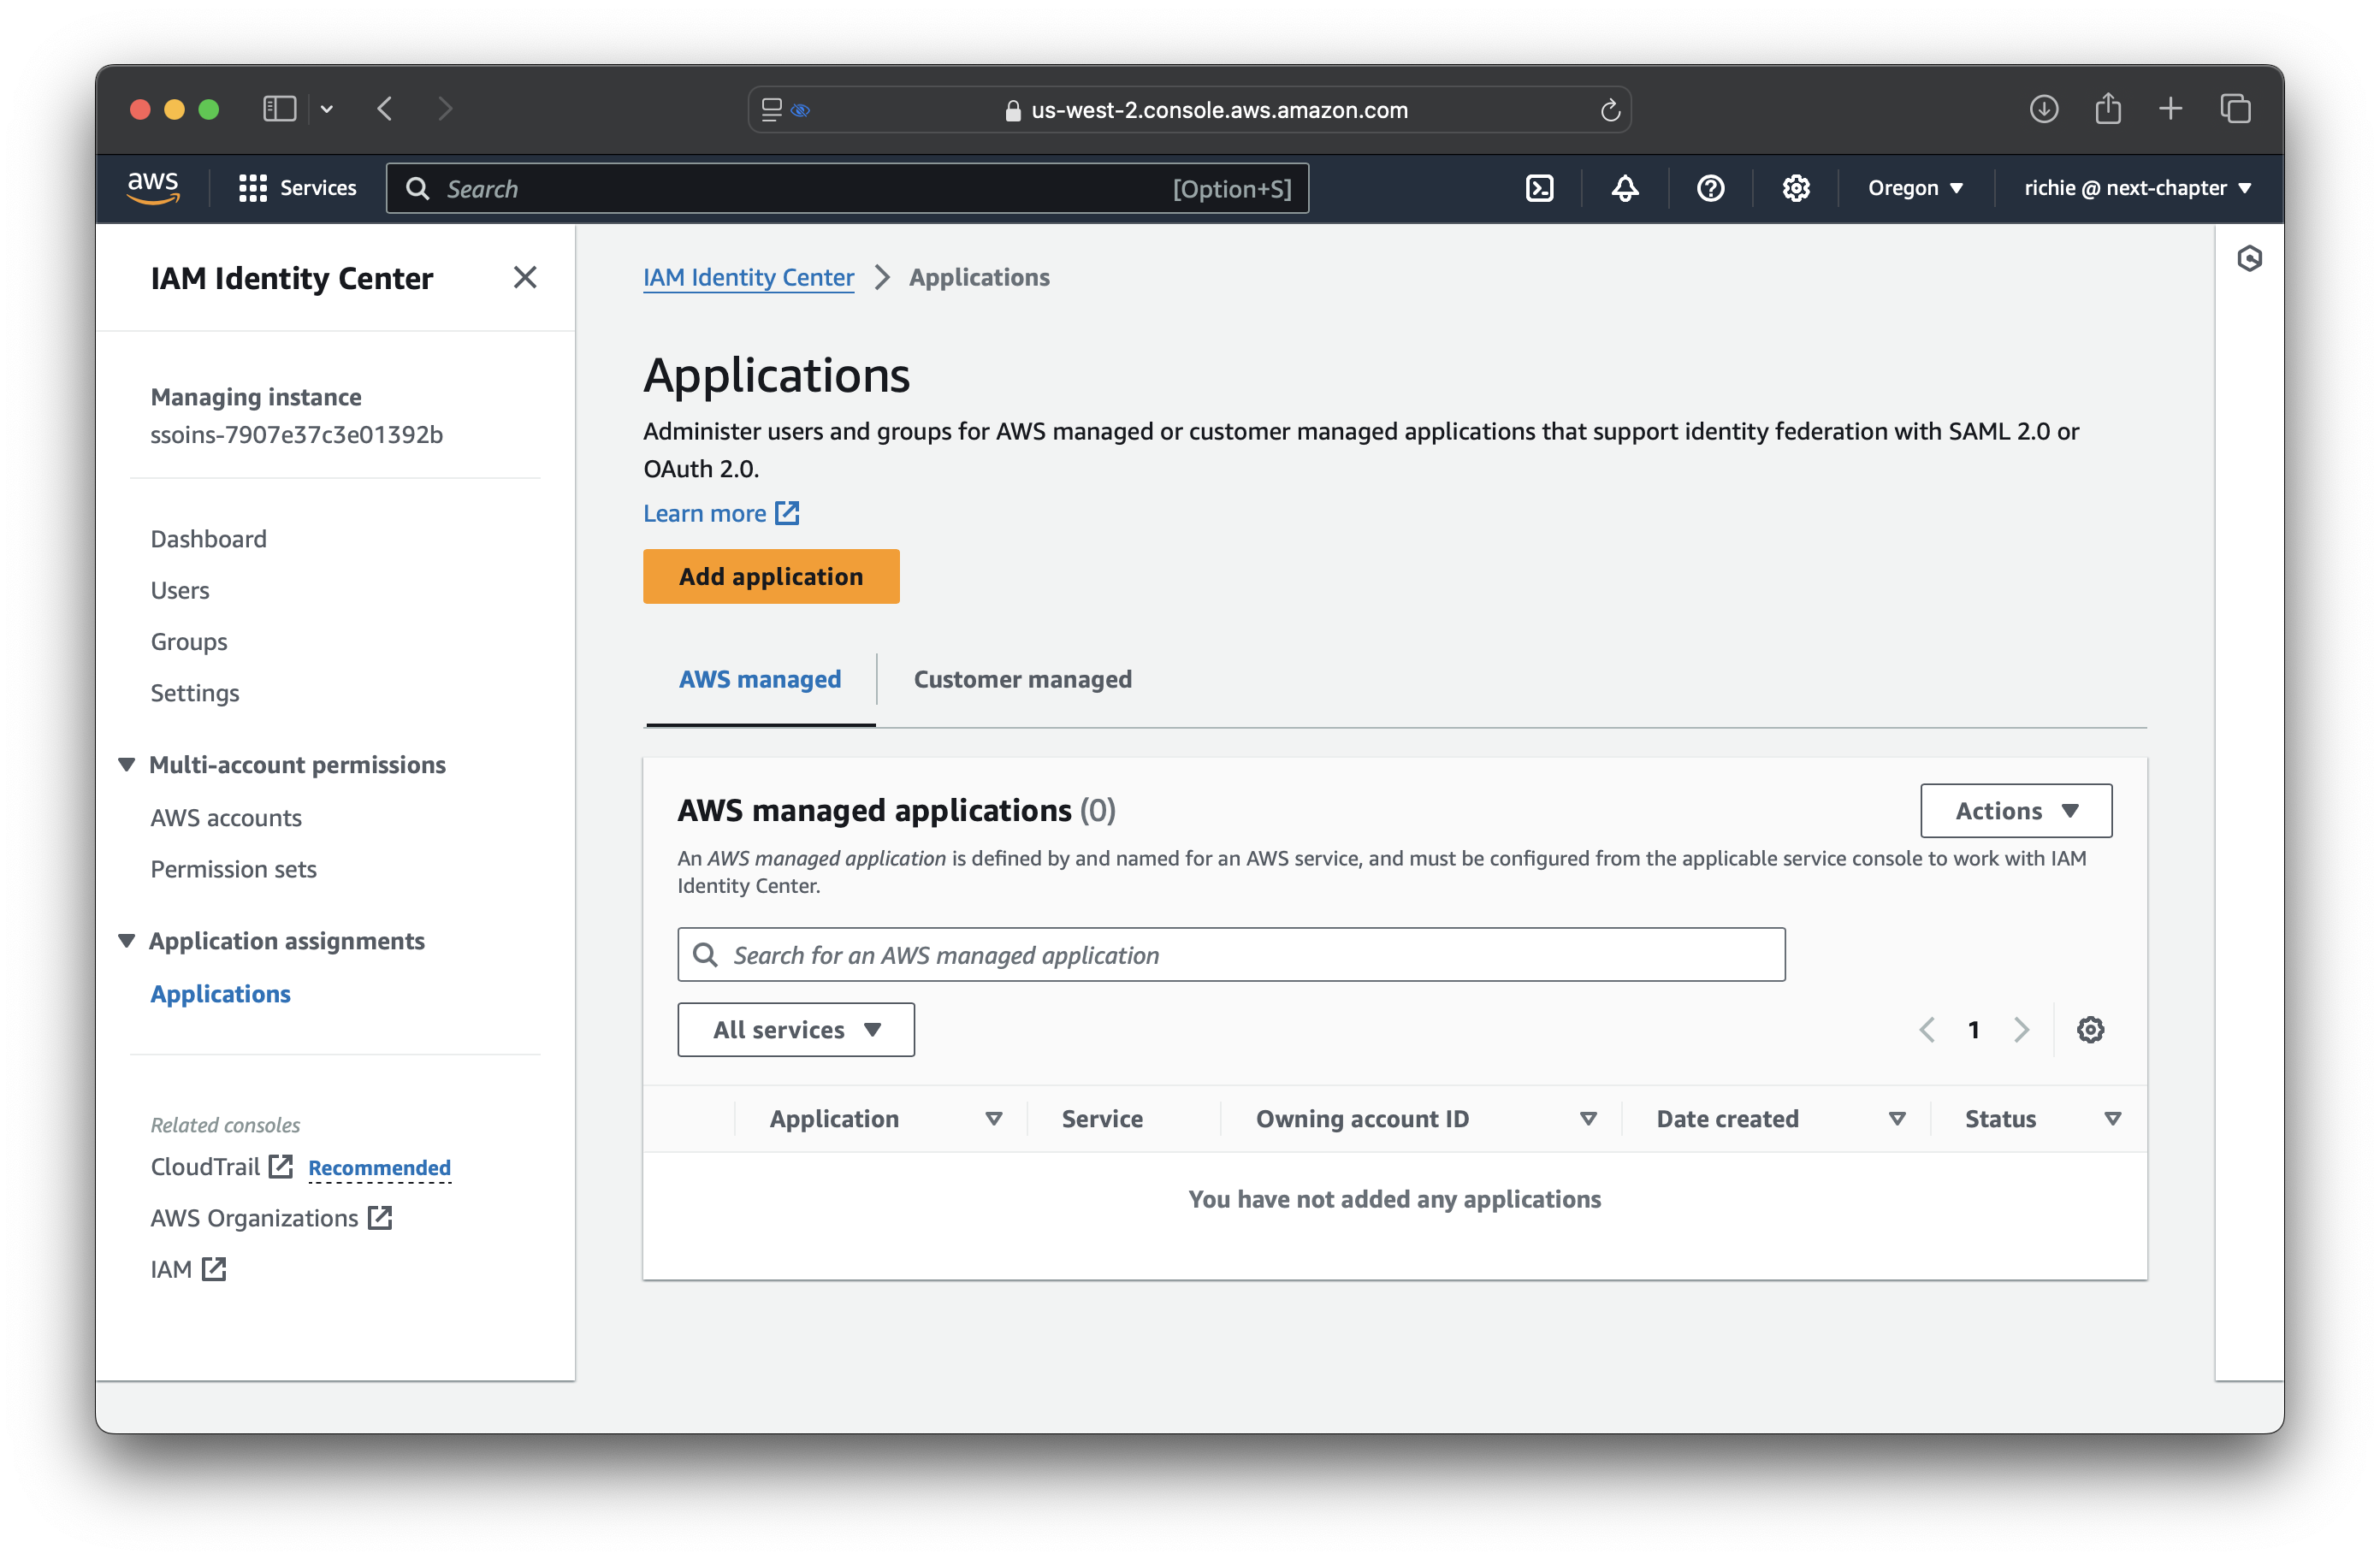
 From IAM Identity Center, navigate to the **Applications** tab, and click **Add application**.
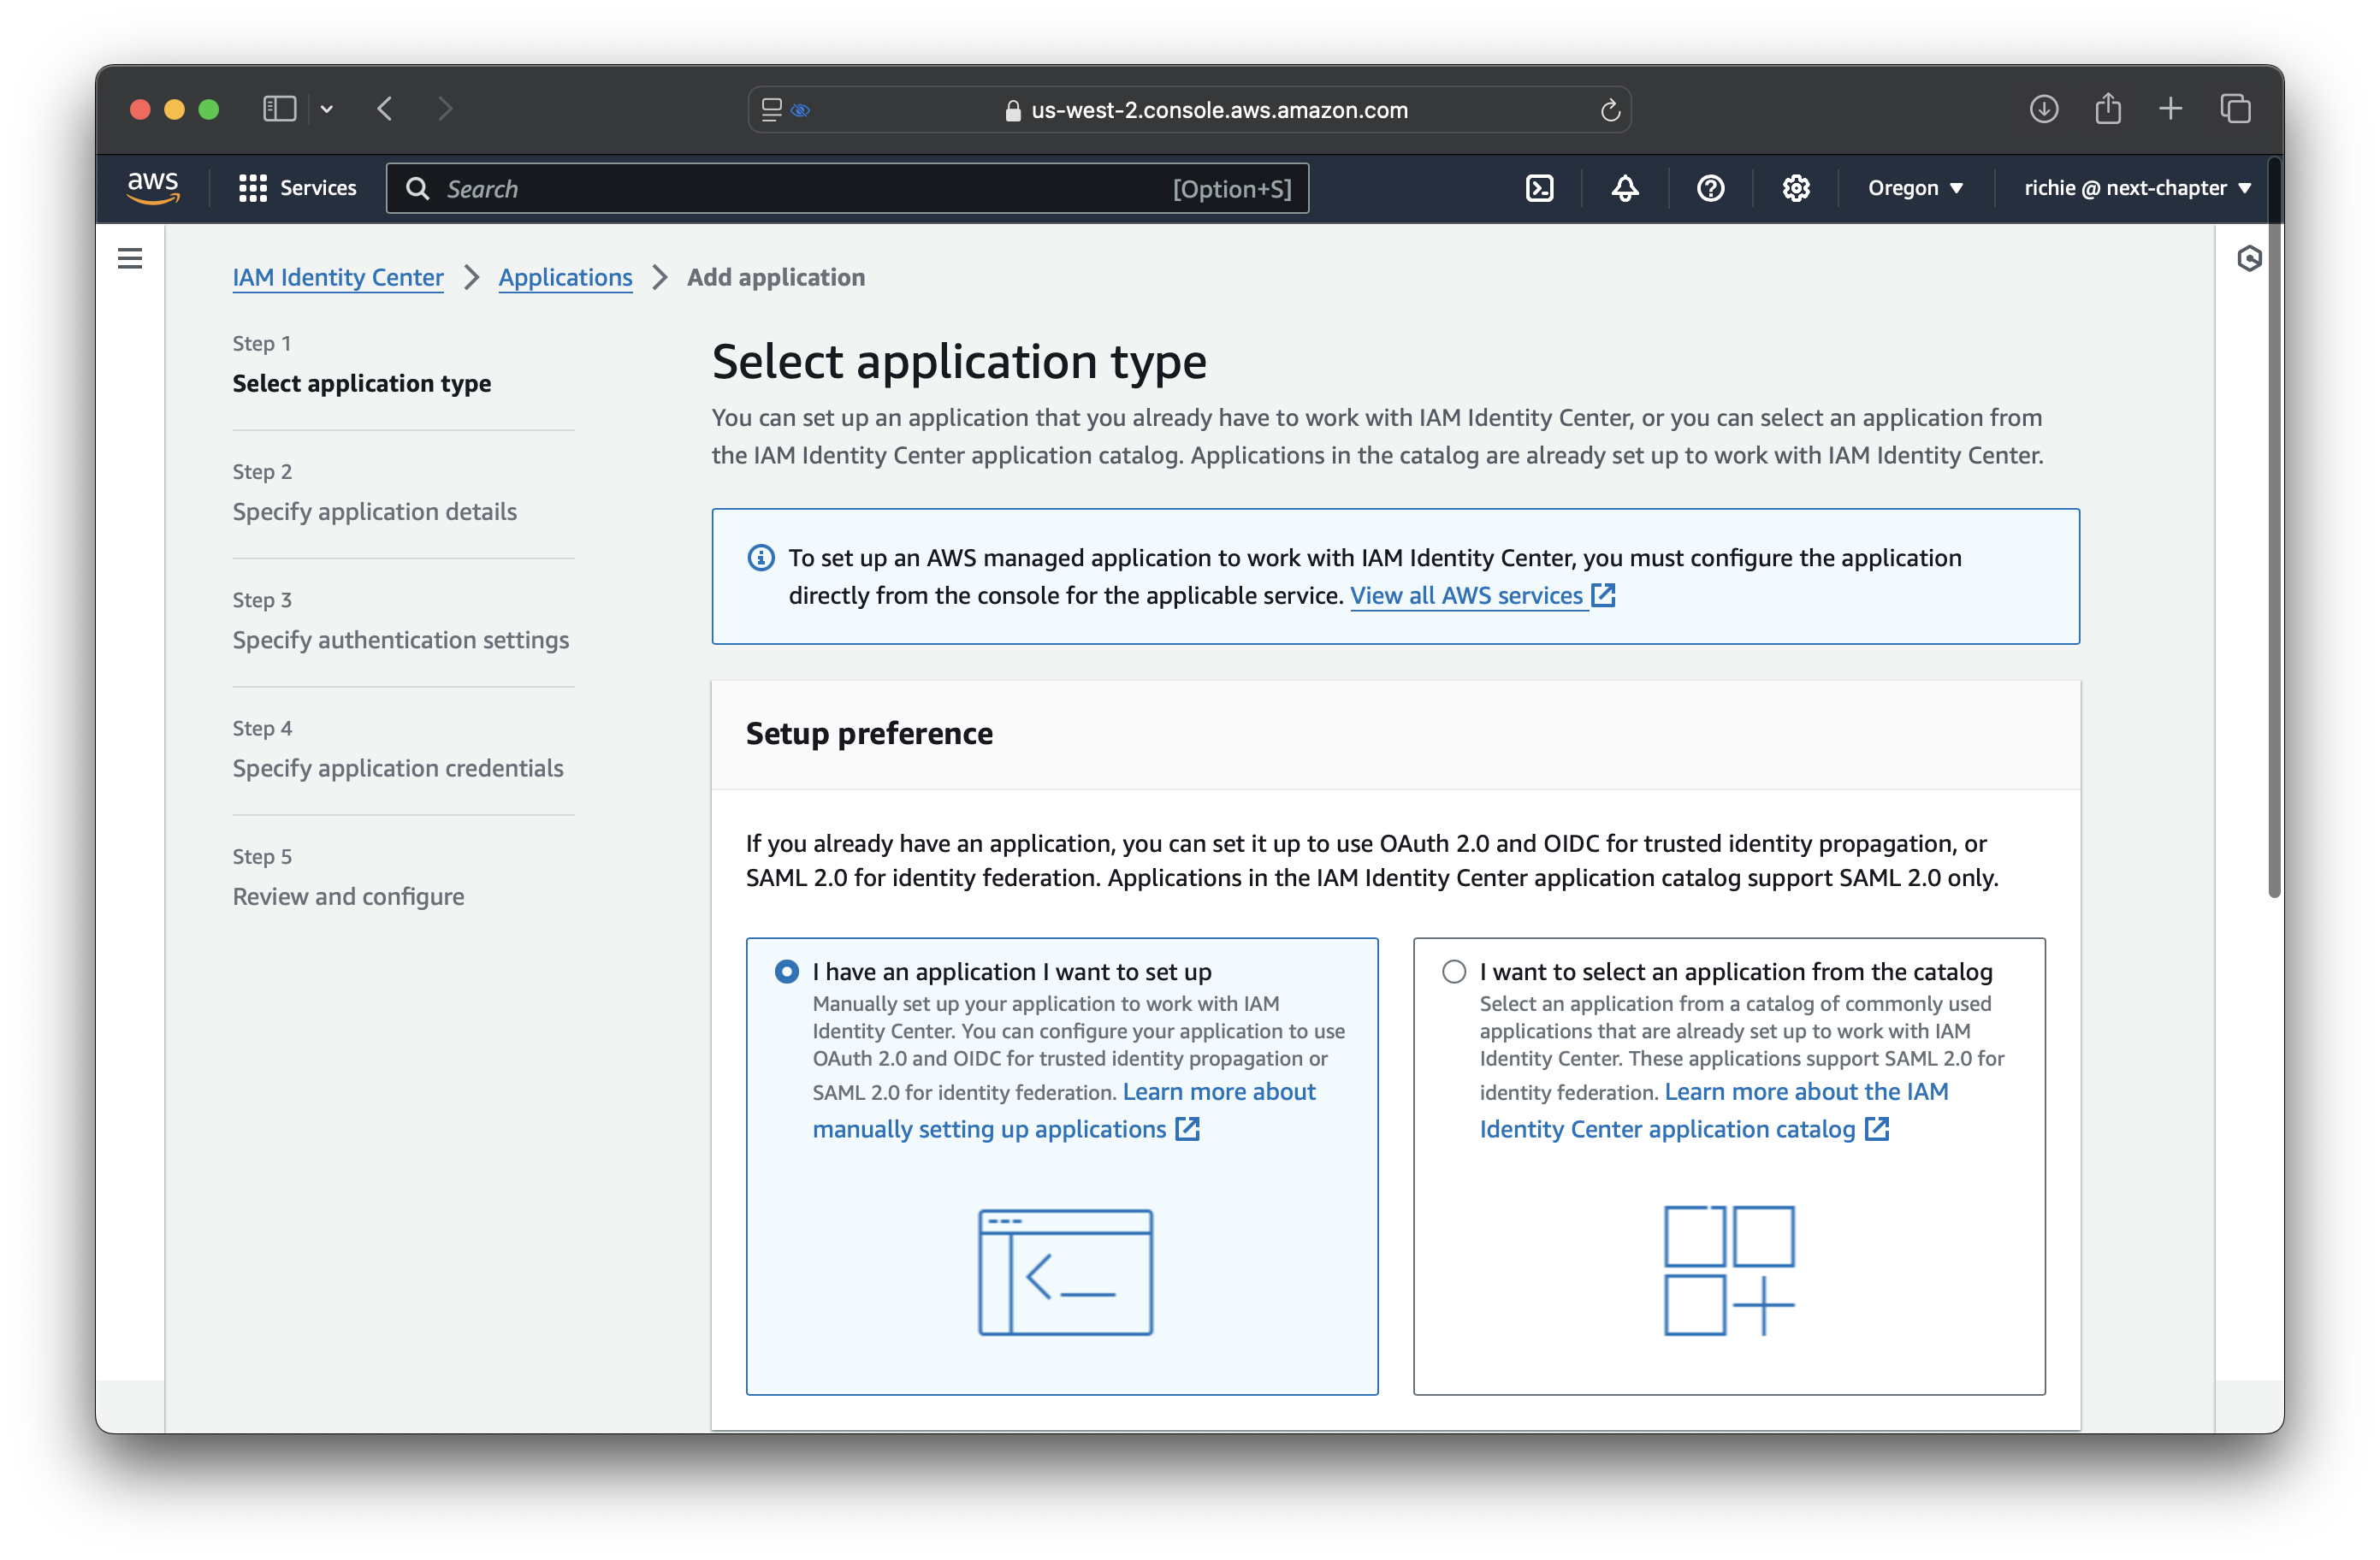
 Under **Setup preference**, select **I have an application I want to set up**.
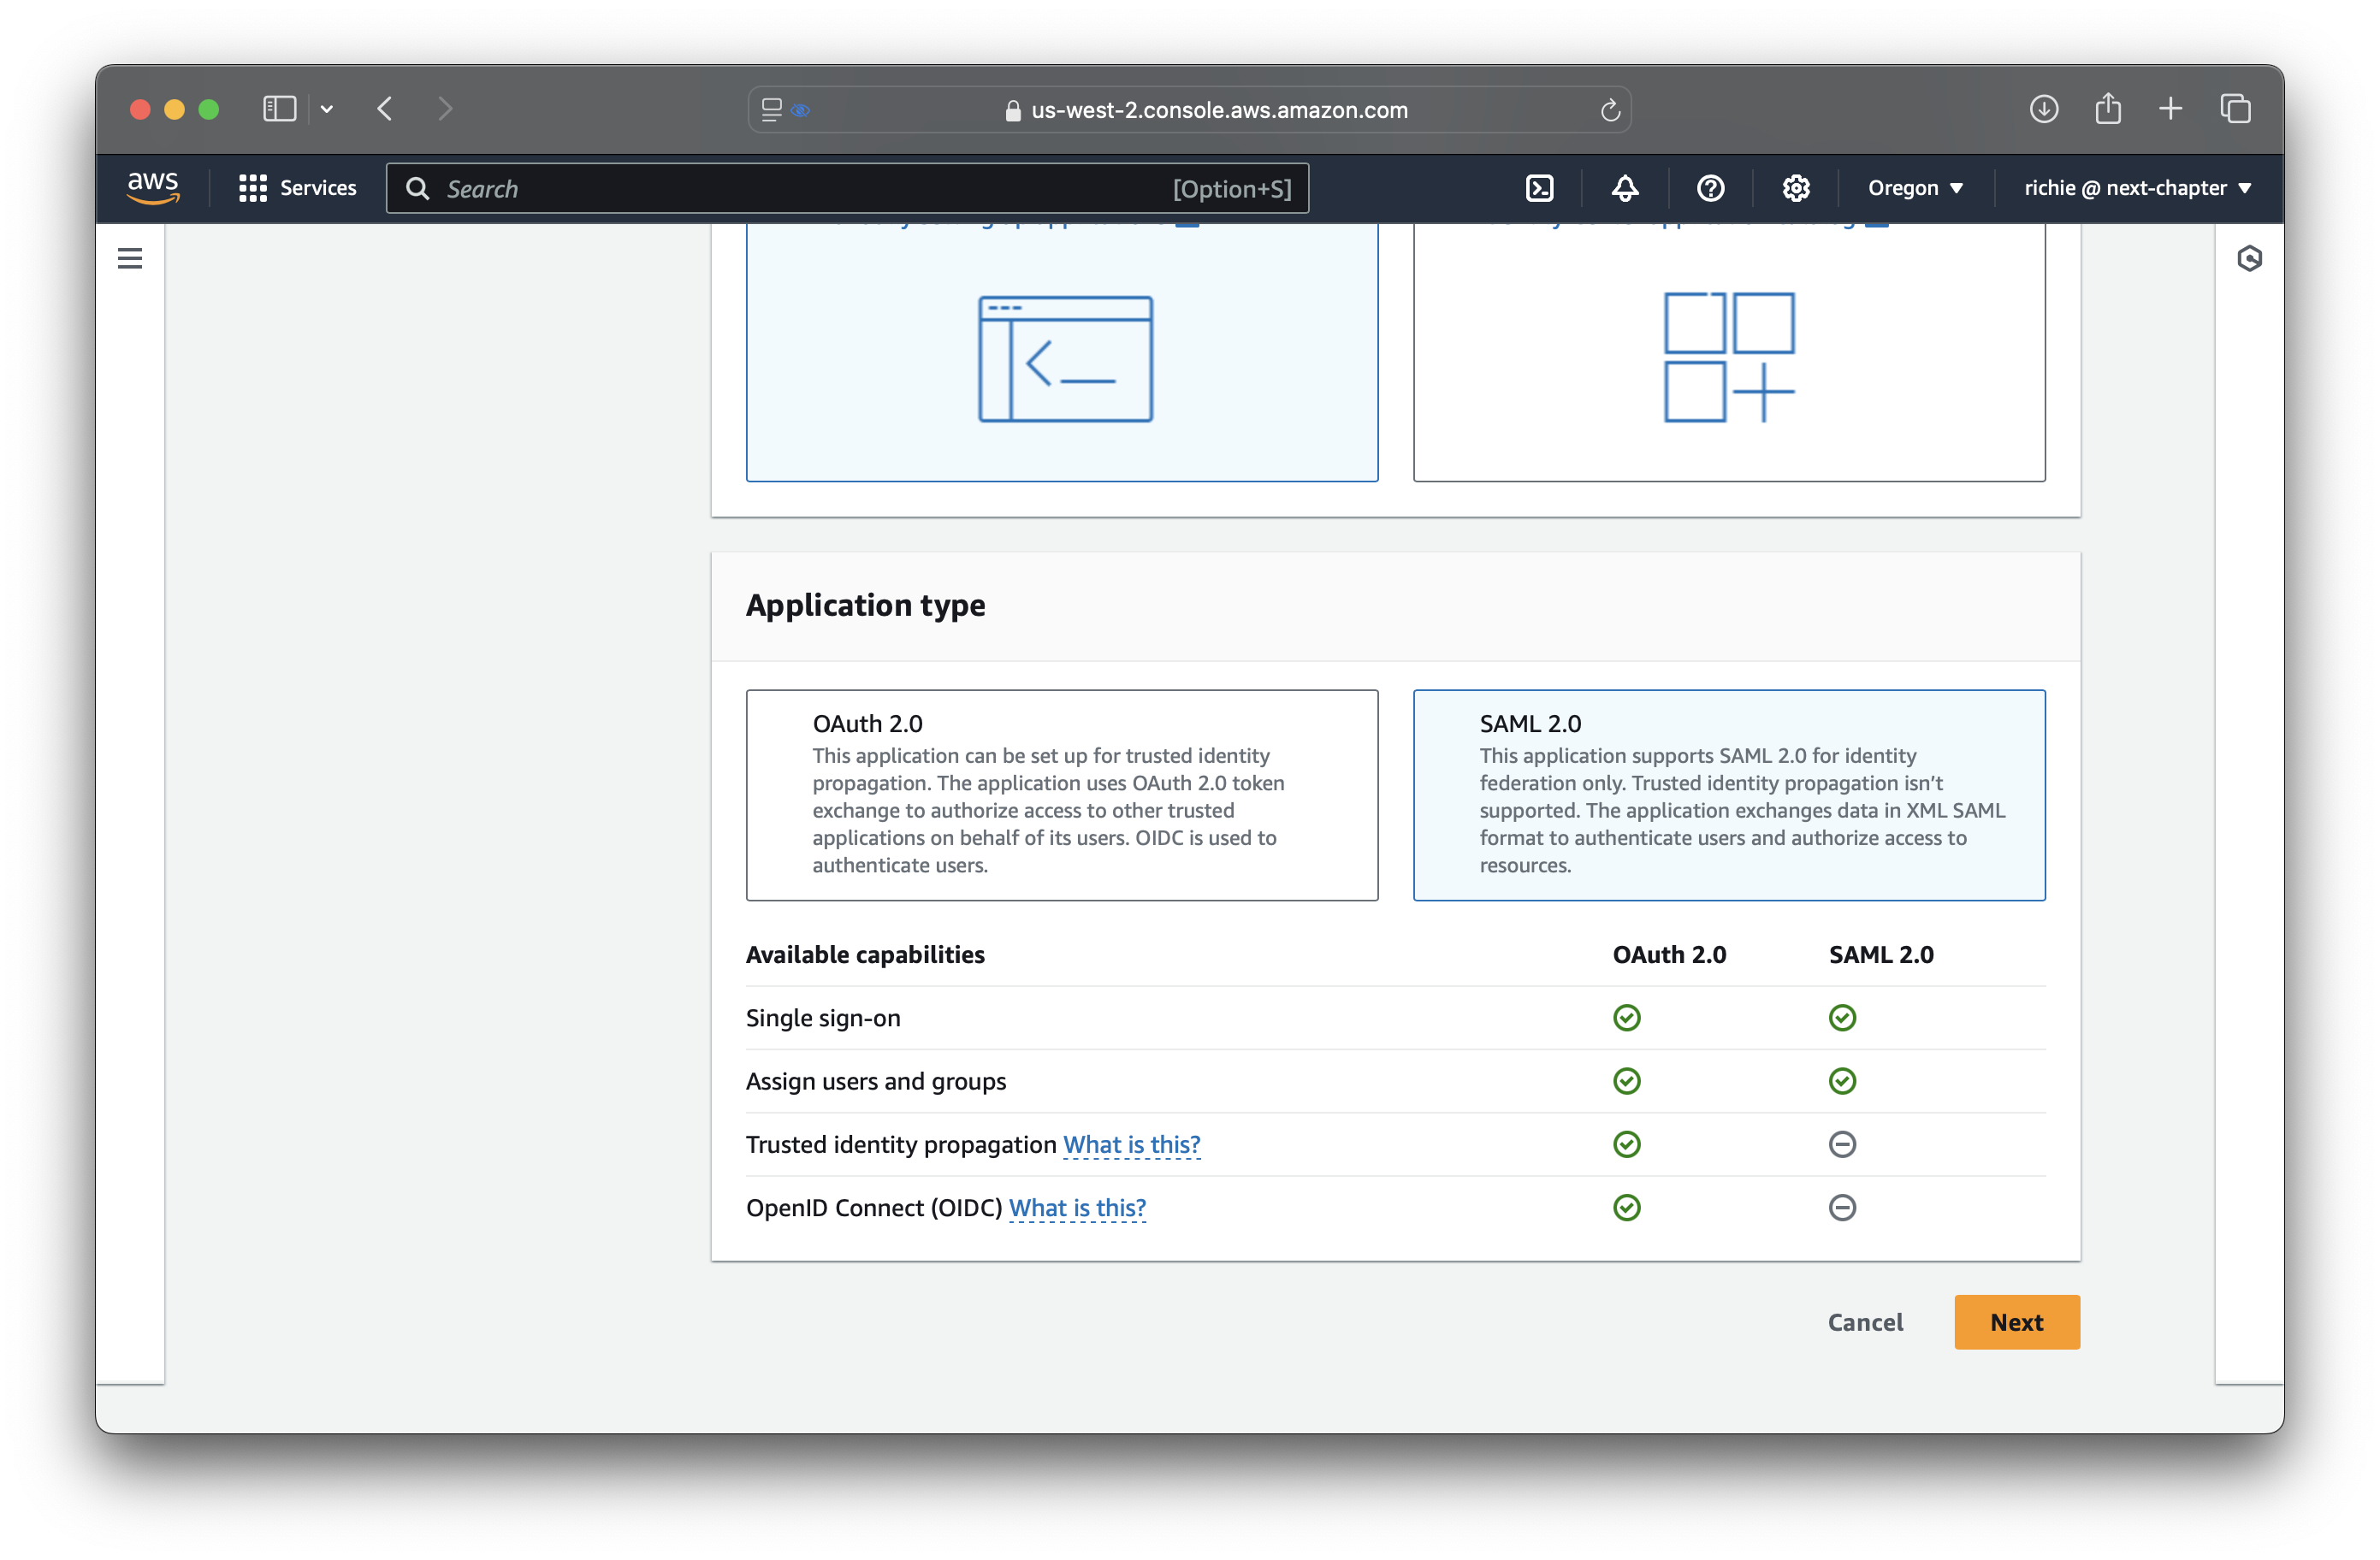
 Under **Application type**, select **SAML 2.0**.
 Click **Next** and enter **Unblocked** as the application name.
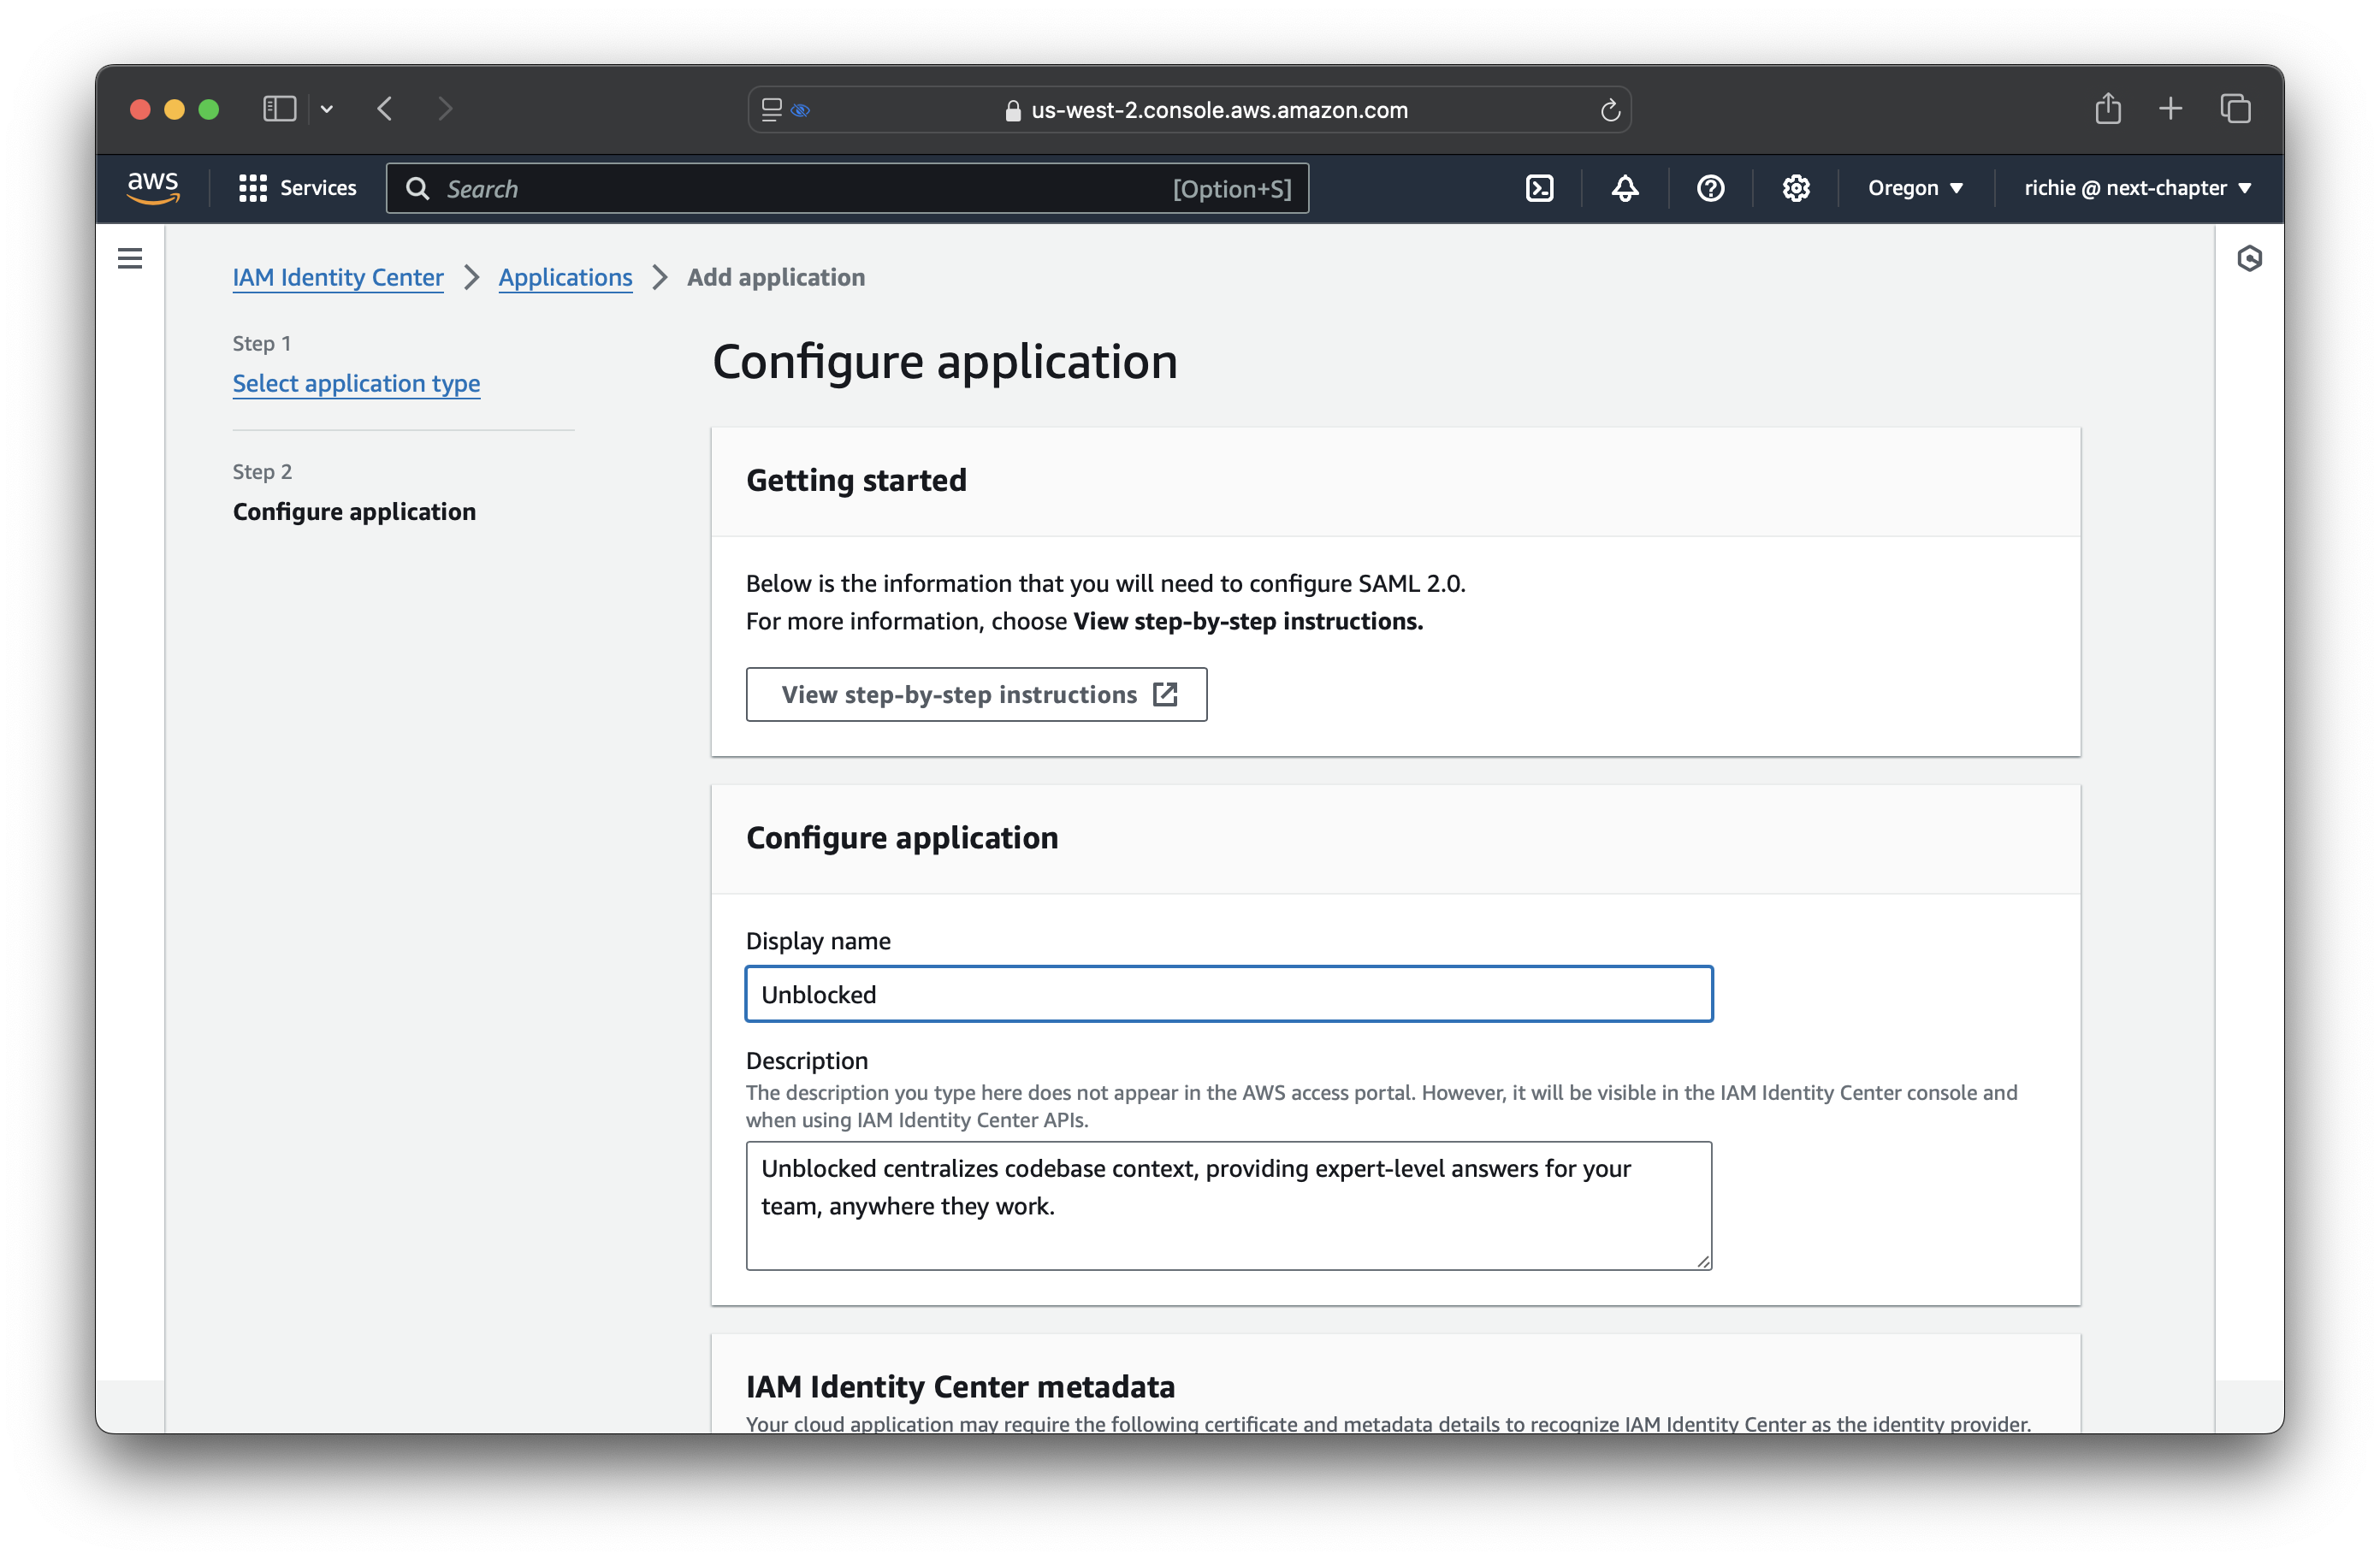 Copy the following information from the **IAM Identity Center metadata** section
and paste it into Unblocked.
* IAM Identity Center sign-in URL
* IAM Identity Center SAML issuer URL
* IAM Identity Center Certificate
Copy the following information from the **IAM Identity Center metadata** section
and paste it into Unblocked.
* IAM Identity Center sign-in URL
* IAM Identity Center SAML issuer URL
* IAM Identity Center Certificate
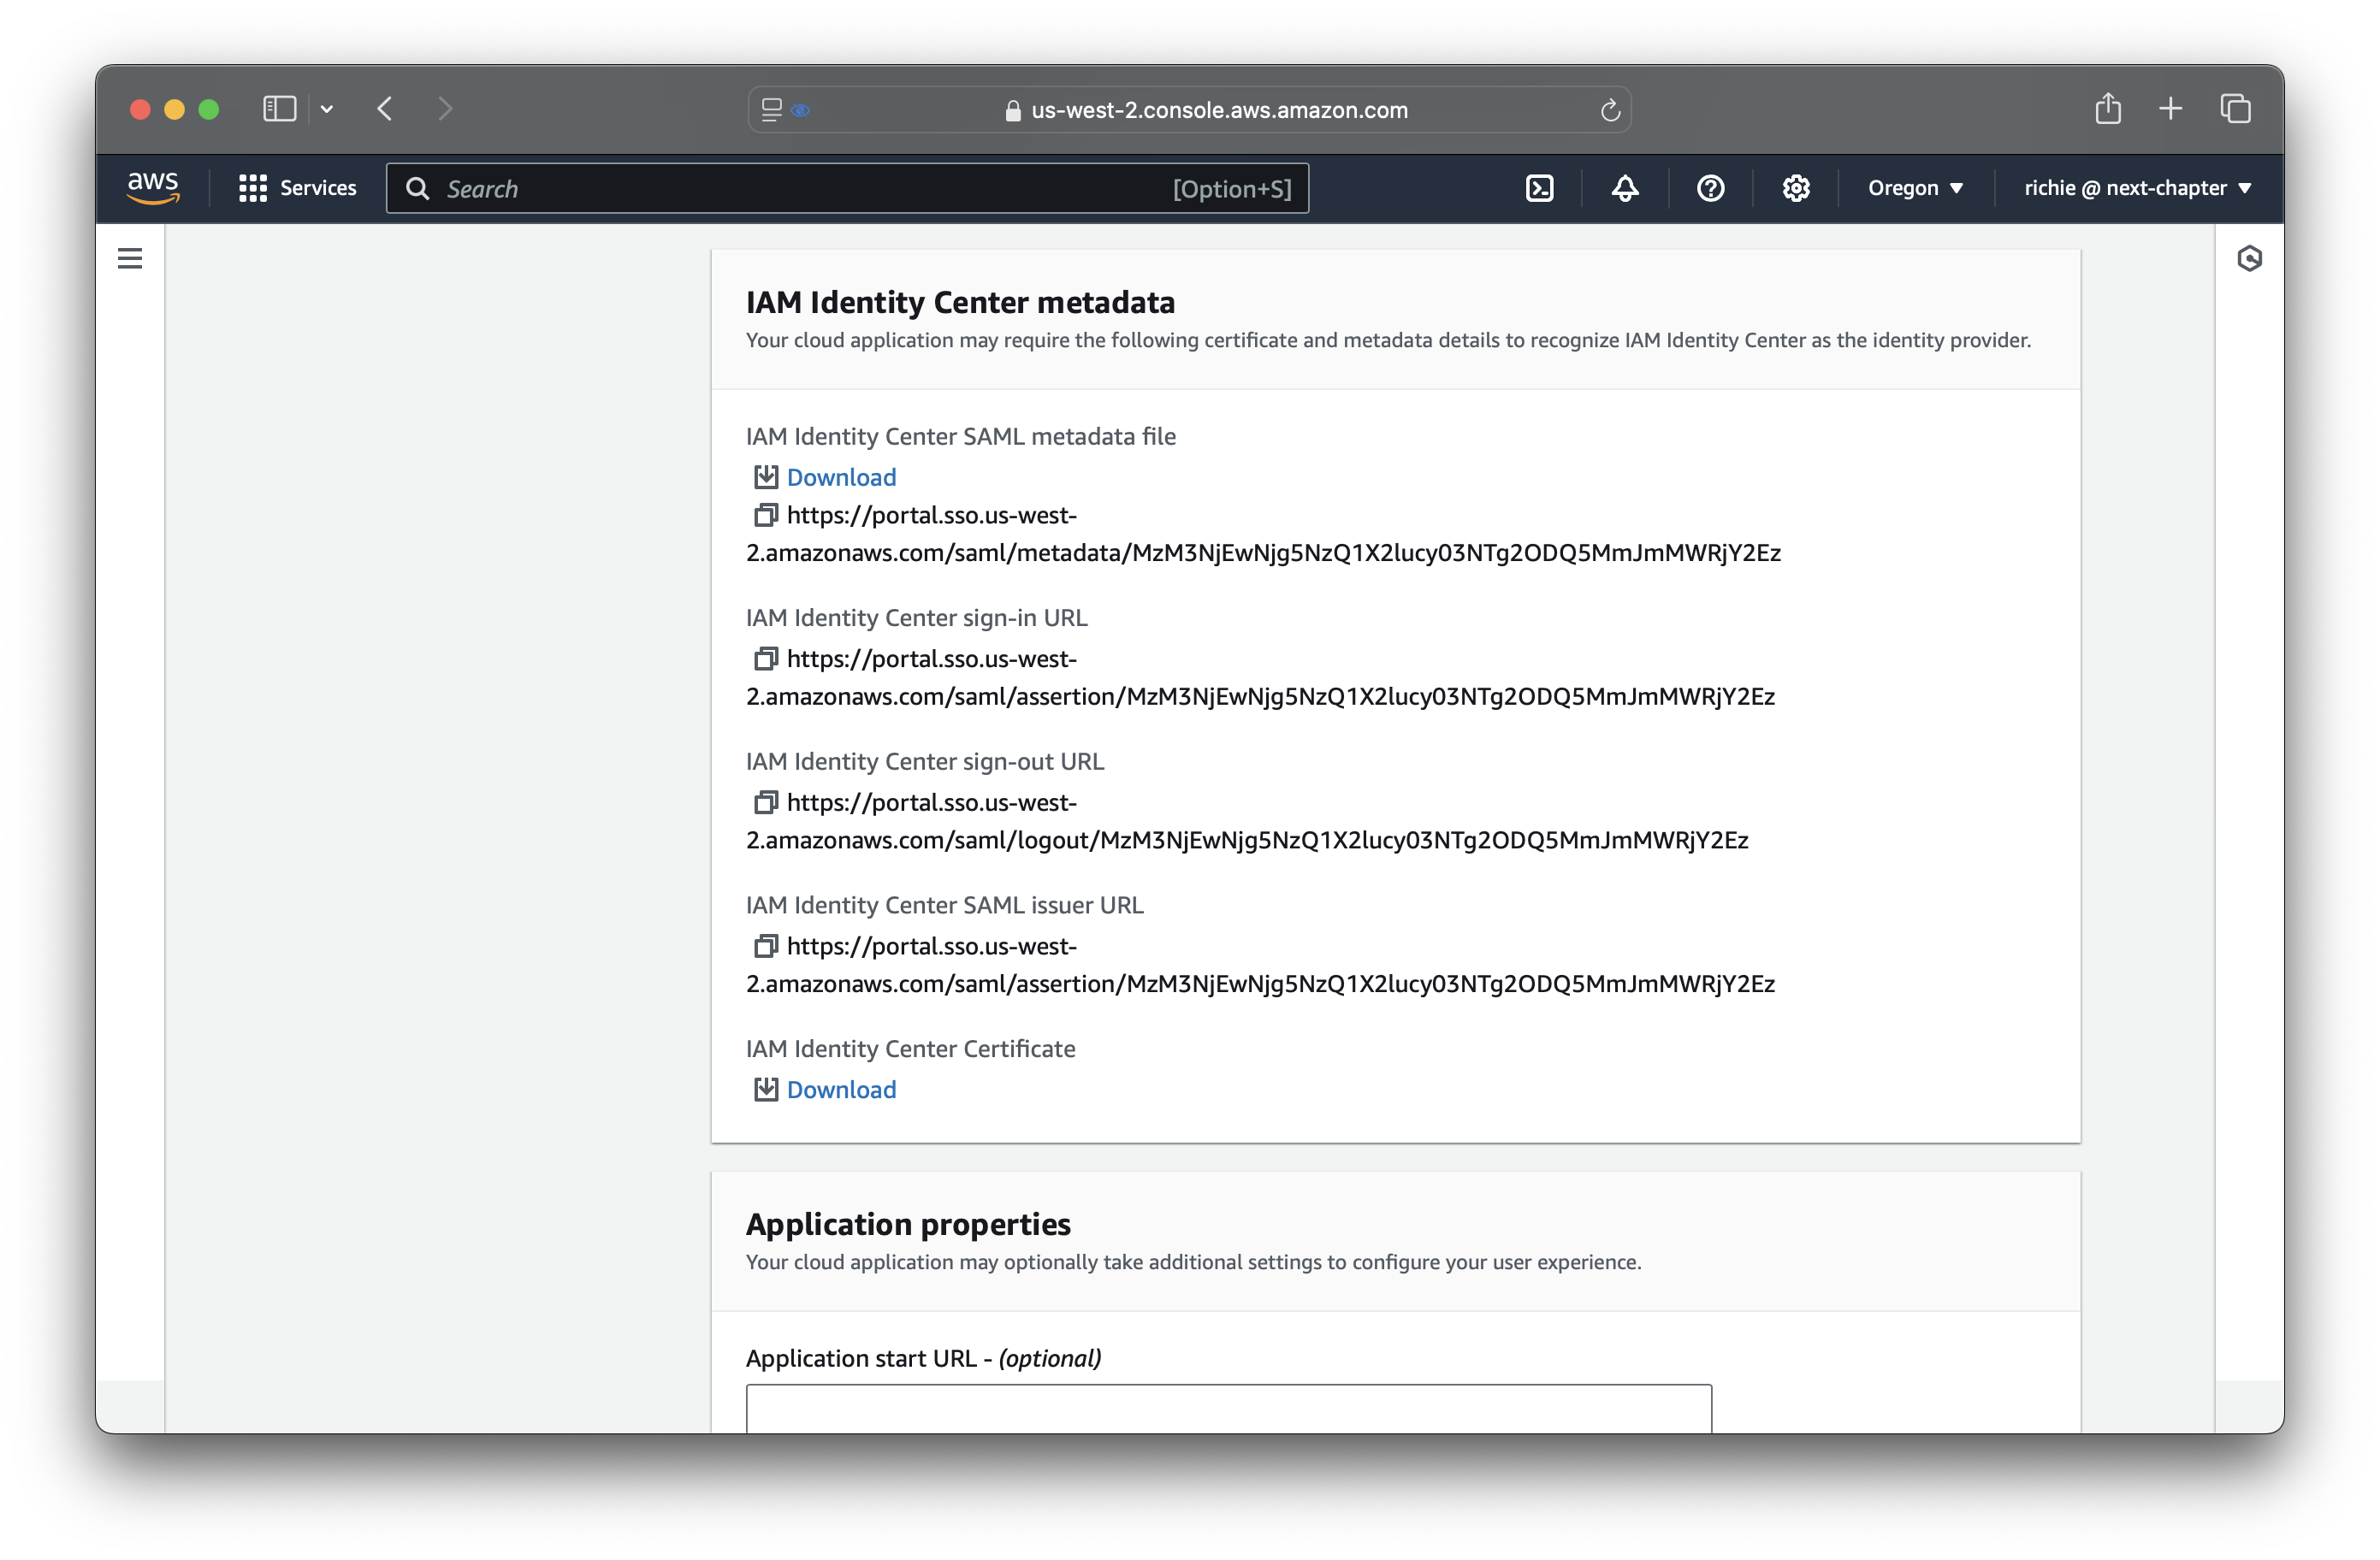 Leave the **Application properties** section in AWS blank.
Copy the following values from Unblocked into the **Application metadata** section in AWS identity center:
* **Application ACS URL**
* **Application SAML audience**
From the **Actions** menu, select **Edit attribute mappings**.
Leave the **Application properties** section in AWS blank.
Copy the following values from Unblocked into the **Application metadata** section in AWS identity center:
* **Application ACS URL**
* **Application SAML audience**
From the **Actions** menu, select **Edit attribute mappings**.
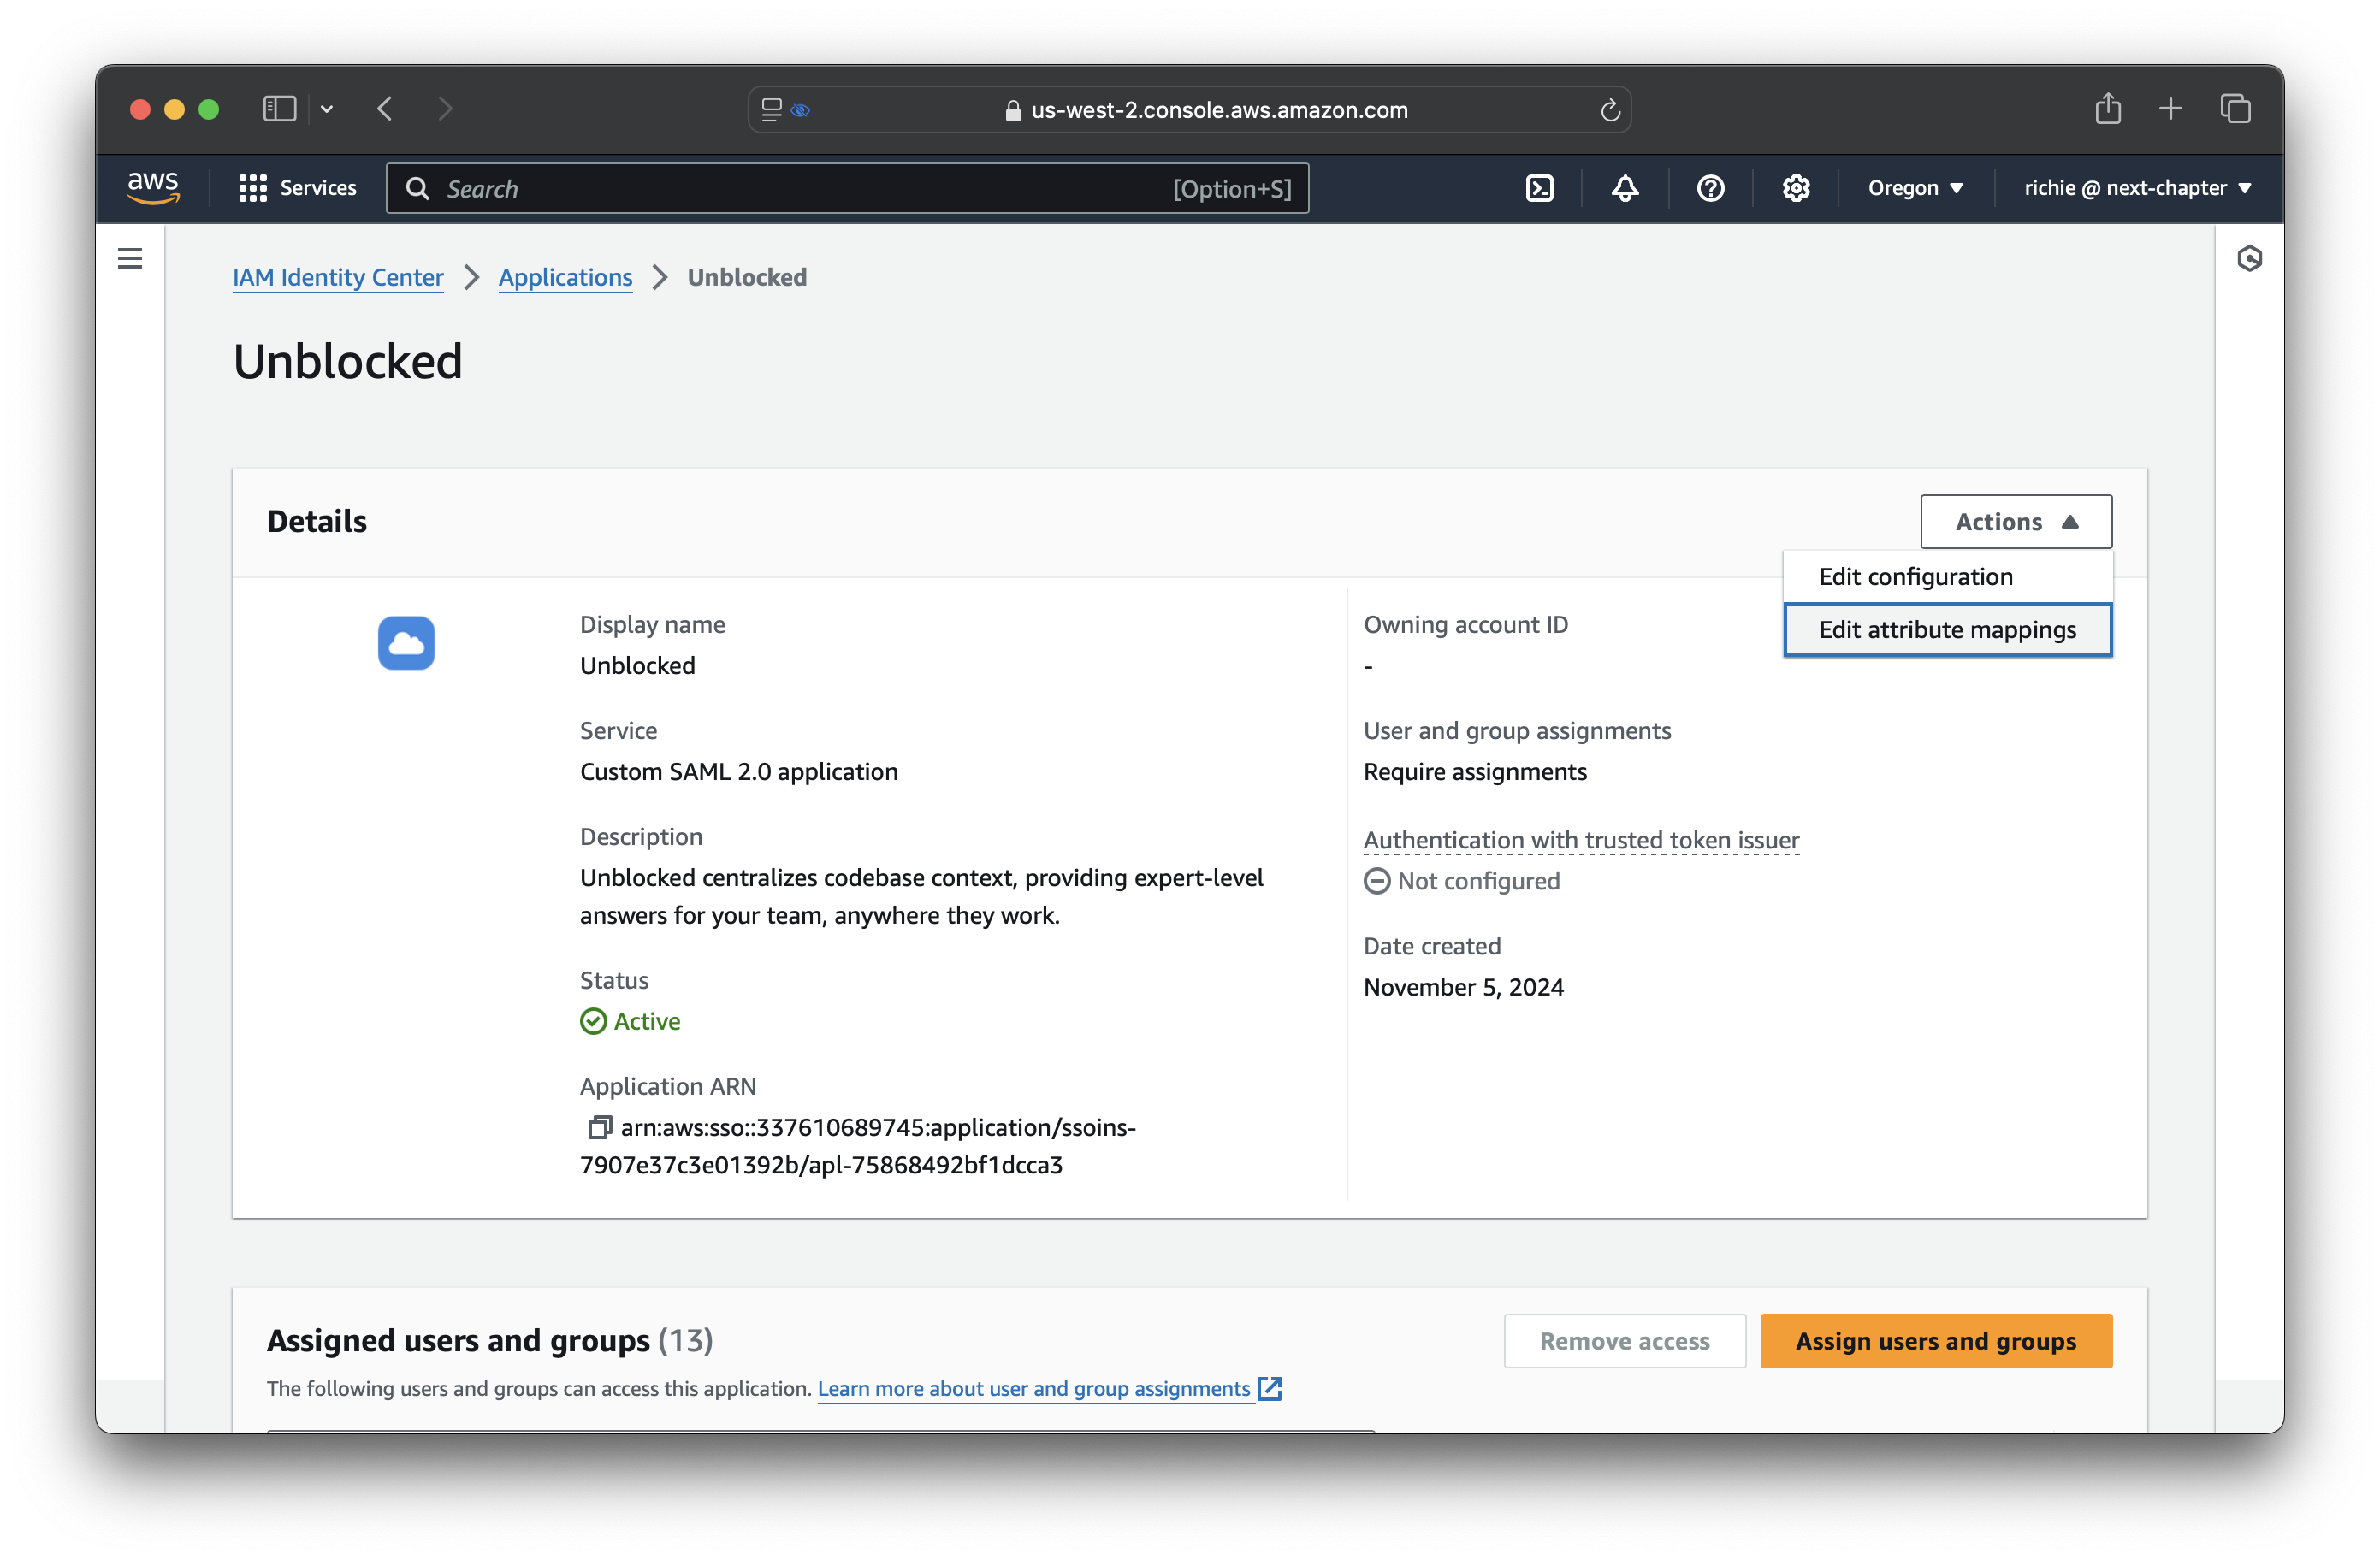 Then enter the following mappings:
| User attribute in Unblocked | User attribute in Identity Center | Format |
| :-------------------------- | :-------------------------------- | :------------- |
| `Subject` | `${user.email}` | `emailAddress` |
| `givenName` | `${user.givenName}` | `basic` |
| `familyName` | `${user.familyName}` | `basic` |
Then enter the following mappings:
| User attribute in Unblocked | User attribute in Identity Center | Format |
| :-------------------------- | :-------------------------------- | :------------- |
| `Subject` | `${user.email}` | `emailAddress` |
| `givenName` | `${user.givenName}` | `basic` |
| `familyName` | `${user.familyName}` | `basic` |
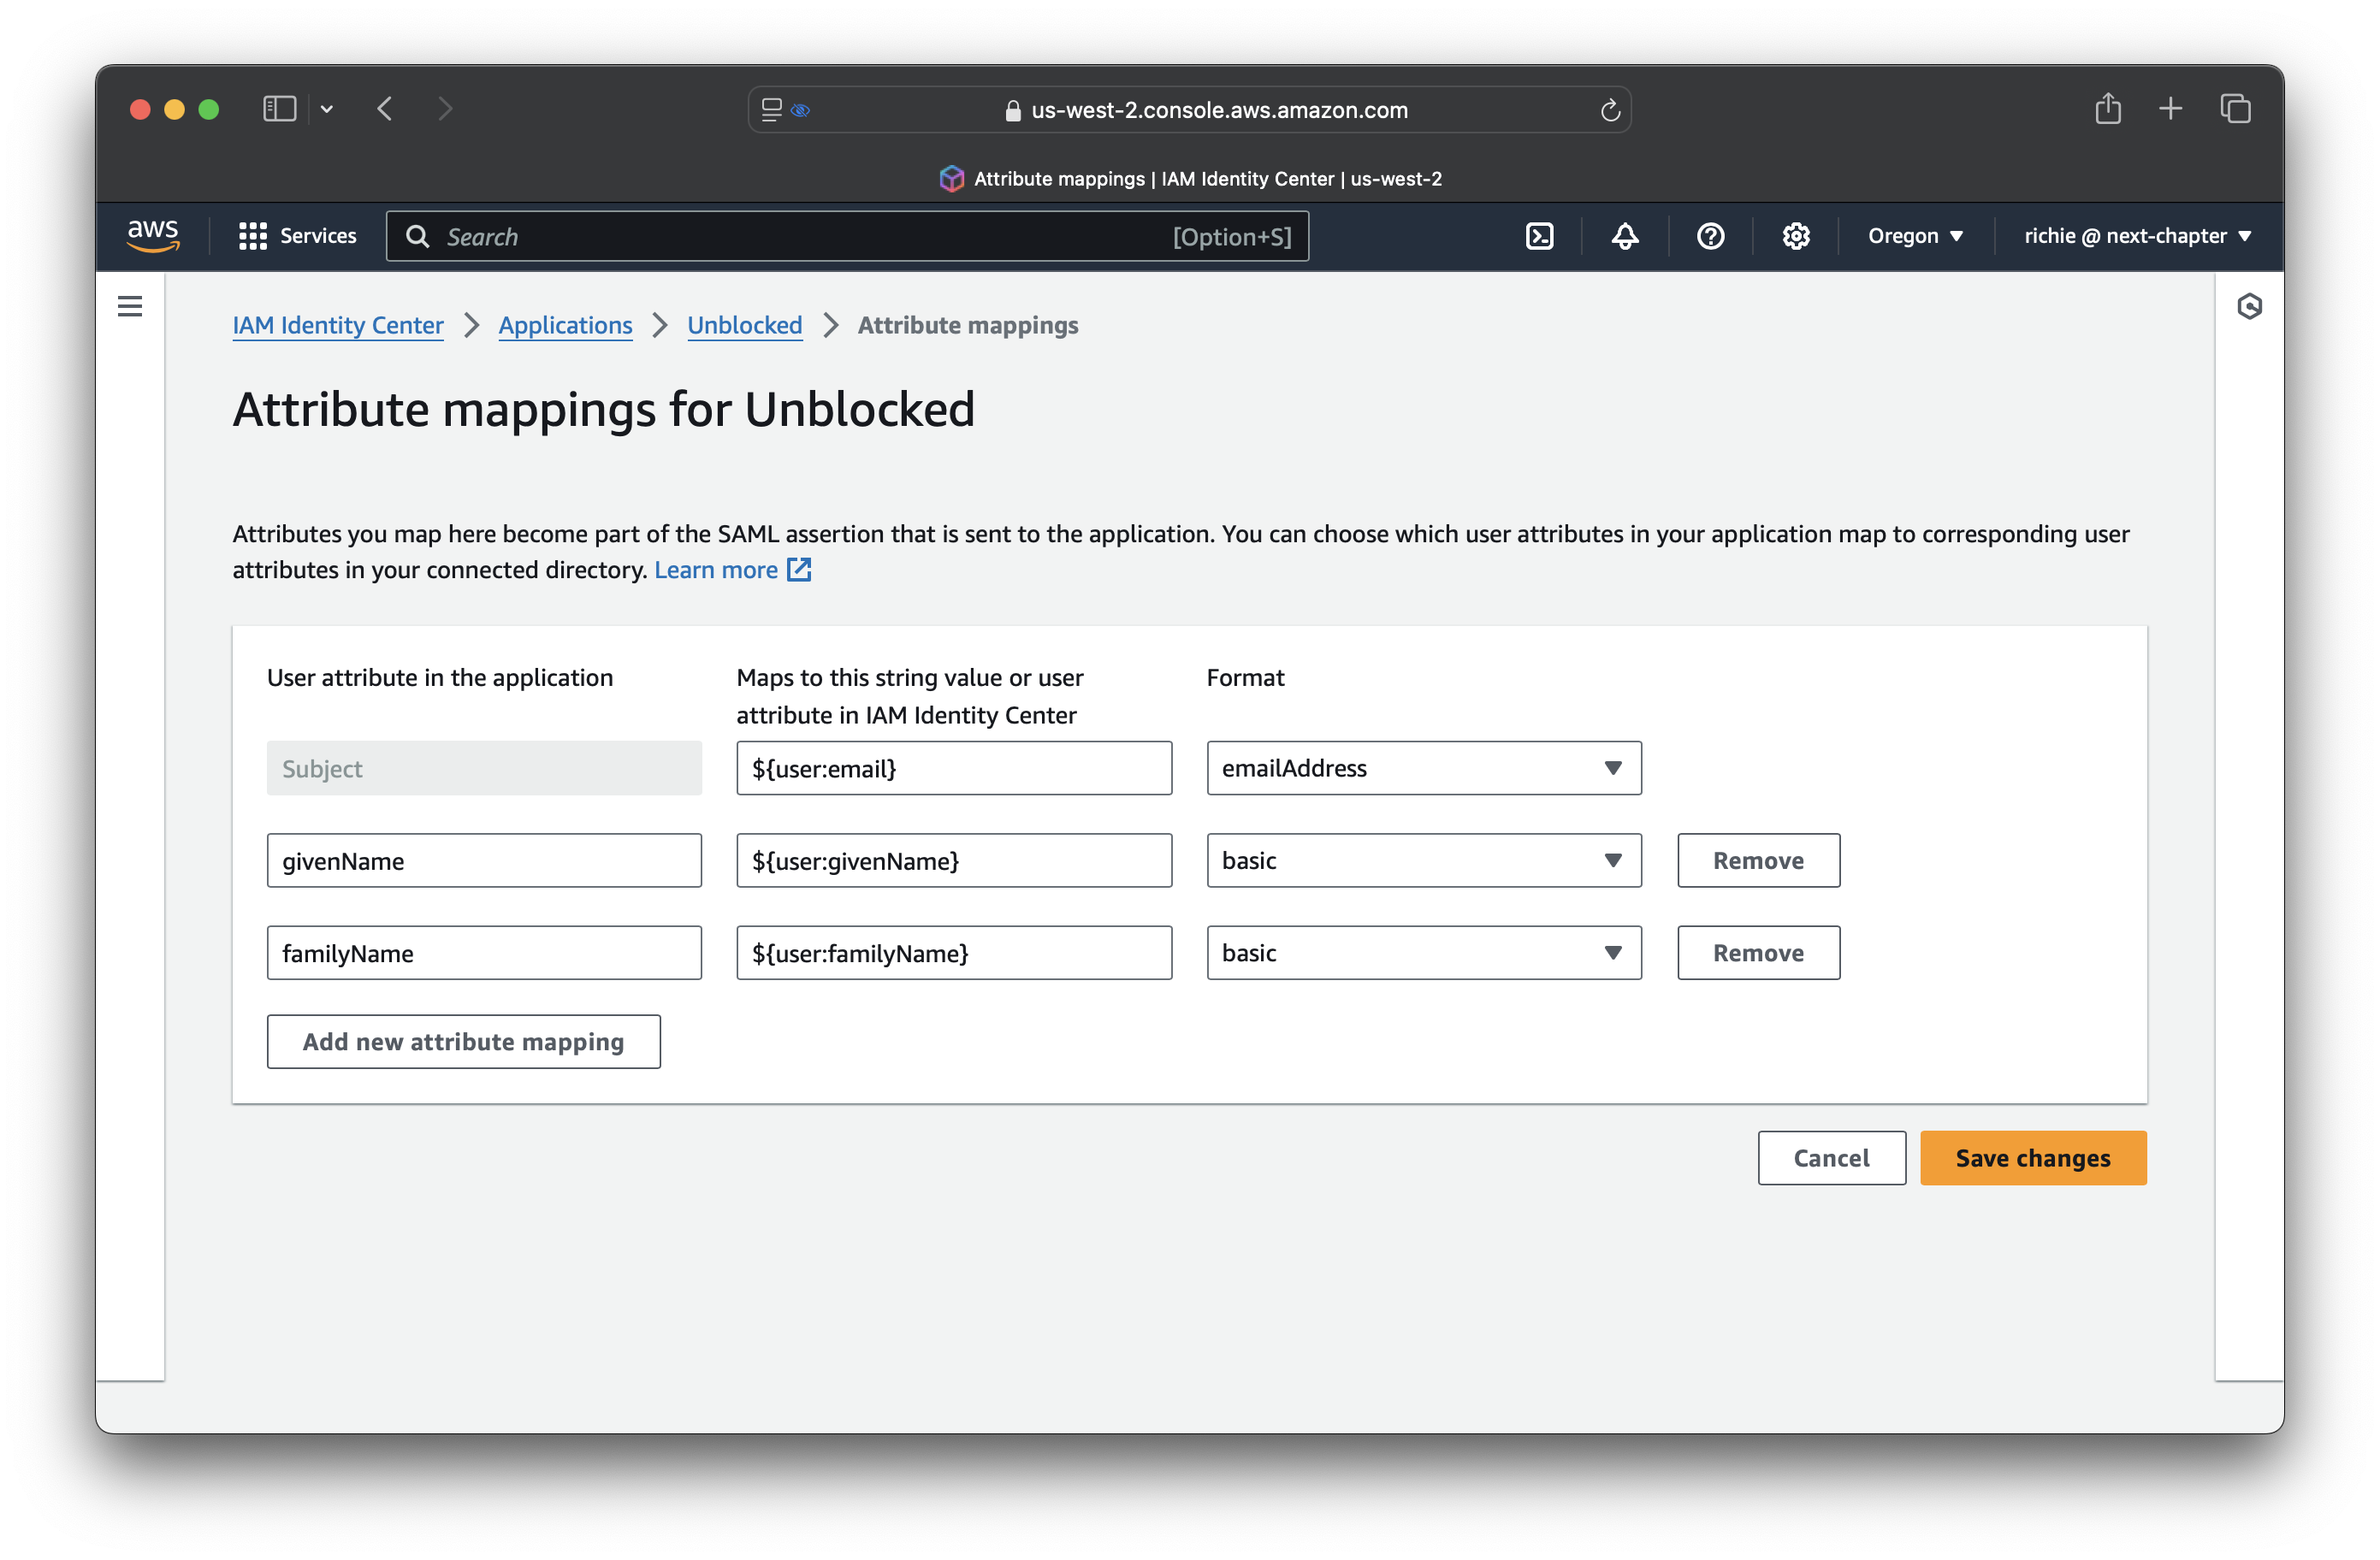 Assign users and groups to your AWS Identity Center application to grant them access to Unblocked.
## User and Group Provisioning
Once you've configured SSO, you can enable user and group provisioning to automatically manage user access to Unblocked.
This feature allows you to automatically create, update, and deactivate users in Unblocked based on changes in your identity provider.
Unblocked is a fully compliant SCIM 2.0 service provider and supports user and group provisioning from any SCIM-compliant identity provider.
To configure SCIM provisioning from your identity provider to Unblocked, you'll need to generate a SCIM API token in Unblocked, then follow the instructions for your identity provider.
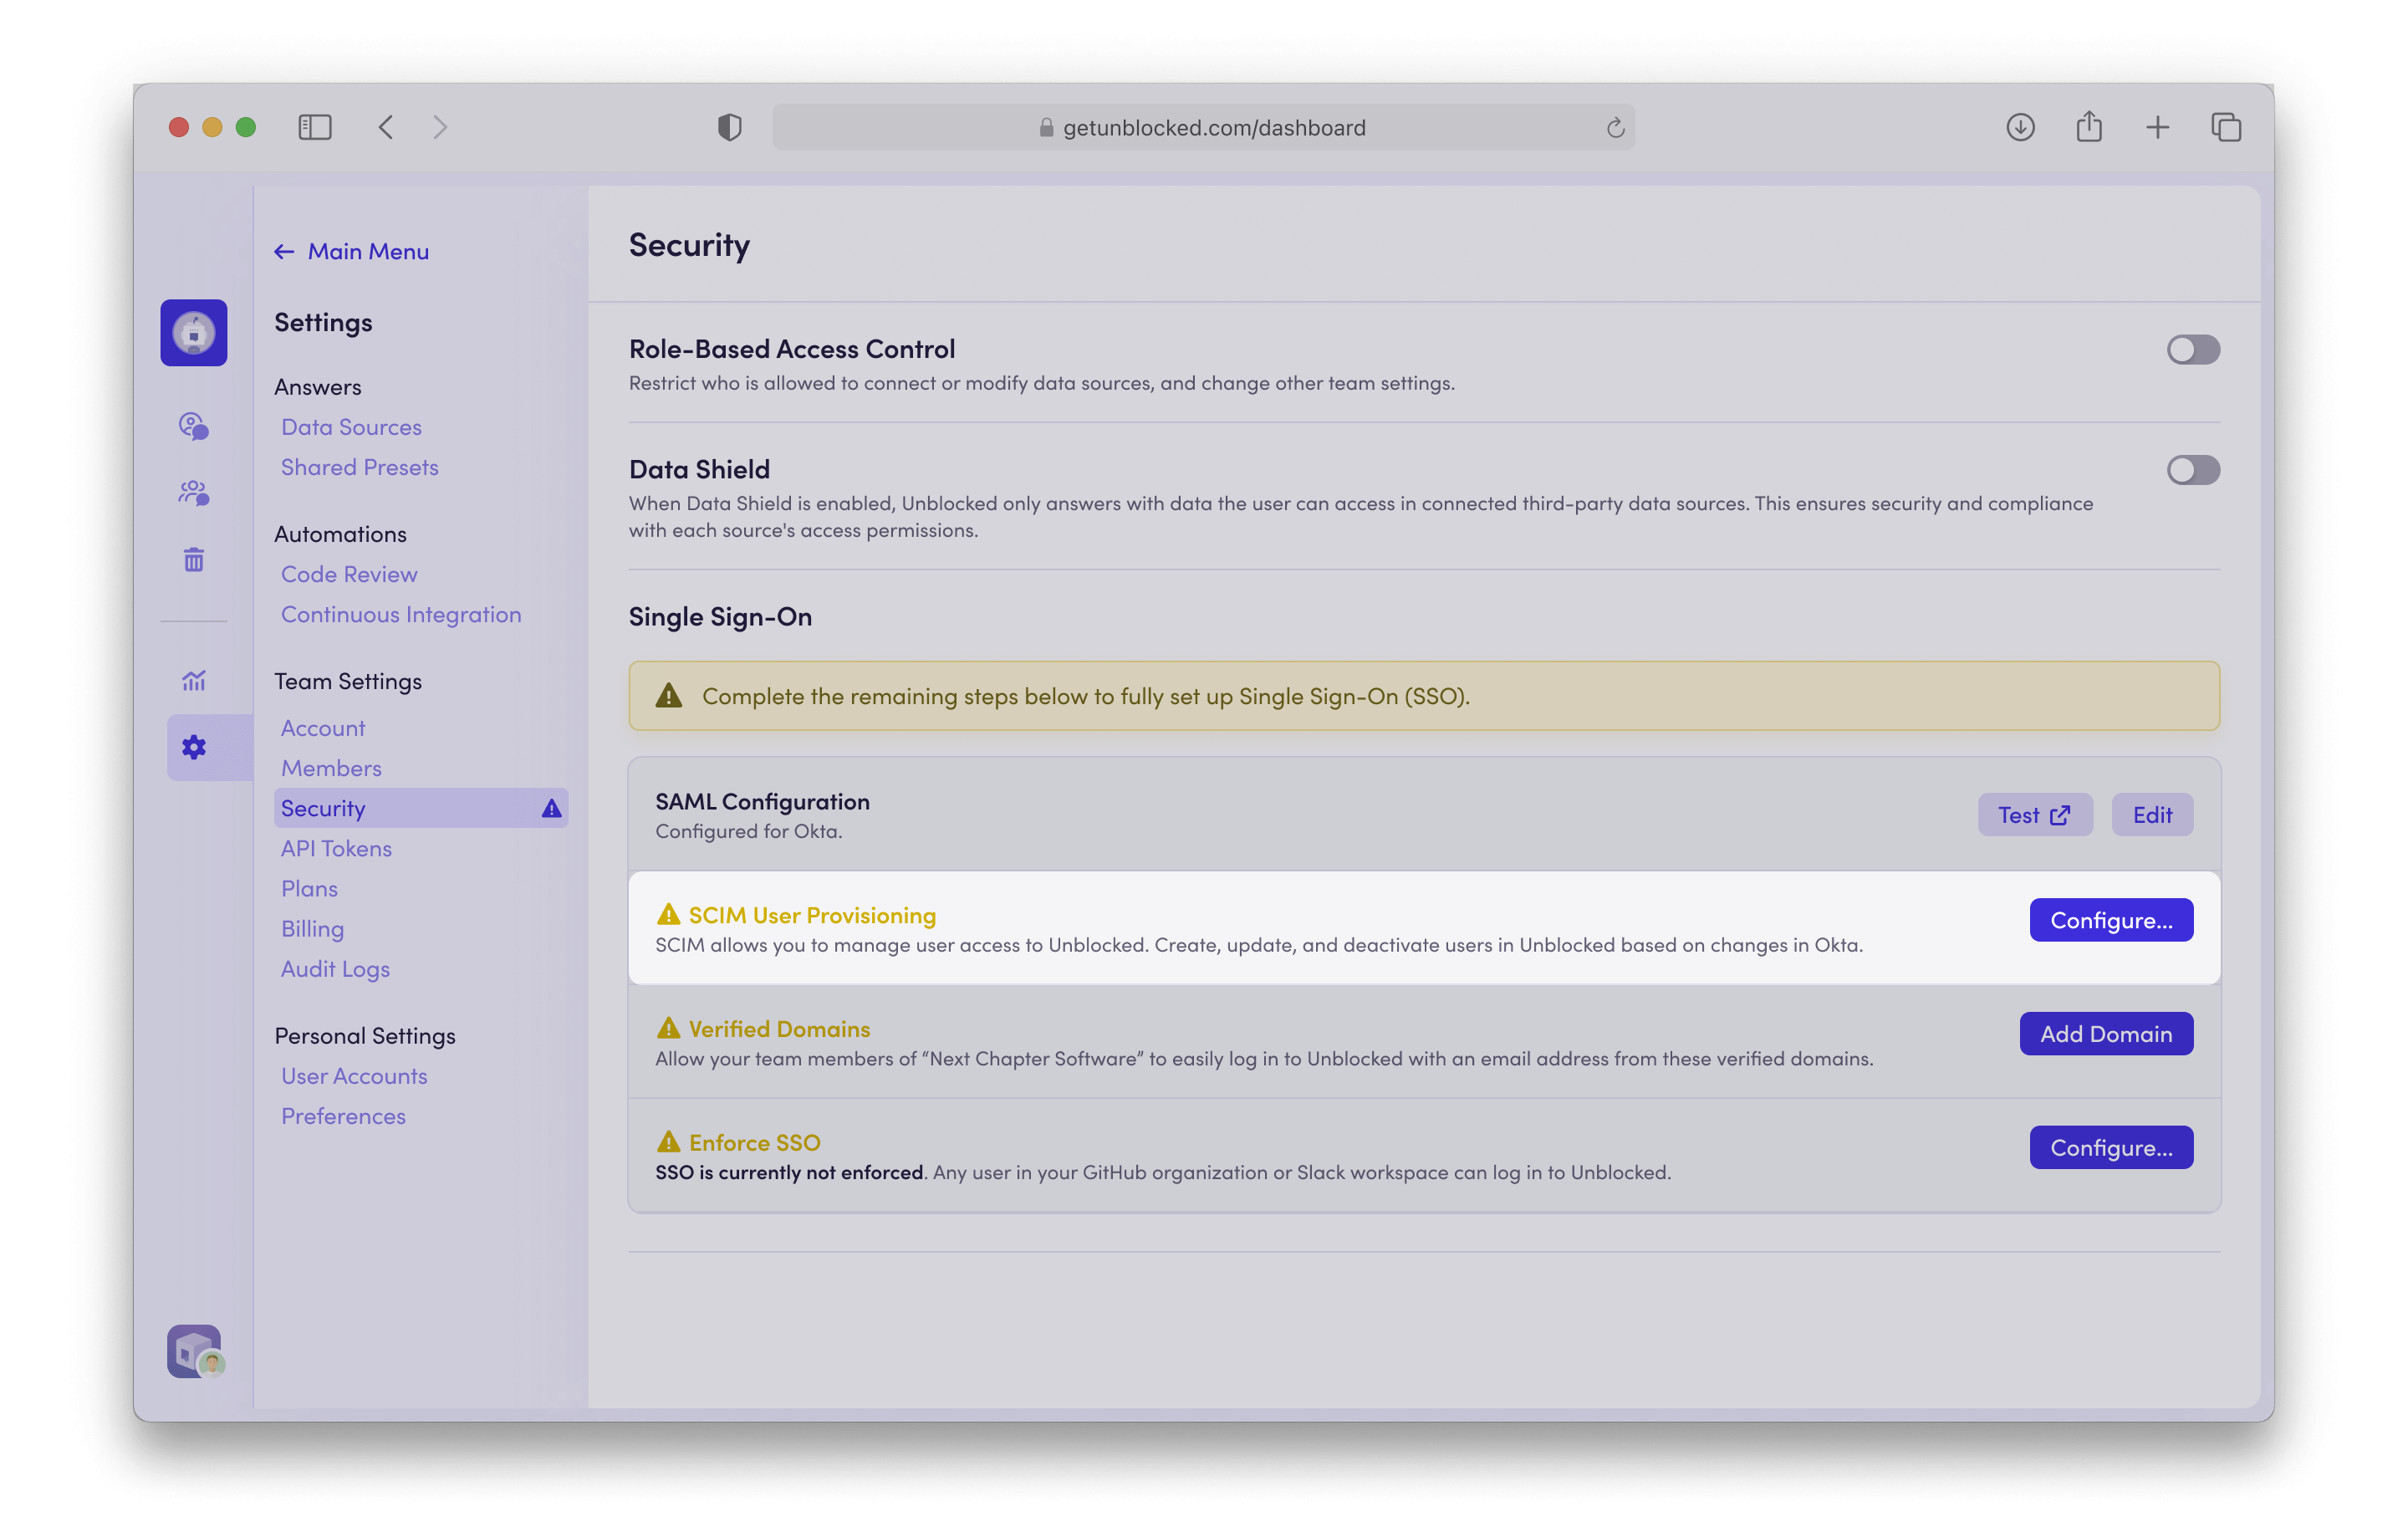
In the Unblocked web app, navigate to the **Settings** section.
Under Team Settings, select **Security**.
Locate the SCIM User and Group Provisioning section and click **Configure**.
Assign users and groups to your AWS Identity Center application to grant them access to Unblocked.
## User and Group Provisioning
Once you've configured SSO, you can enable user and group provisioning to automatically manage user access to Unblocked.
This feature allows you to automatically create, update, and deactivate users in Unblocked based on changes in your identity provider.
Unblocked is a fully compliant SCIM 2.0 service provider and supports user and group provisioning from any SCIM-compliant identity provider.
To configure SCIM provisioning from your identity provider to Unblocked, you'll need to generate a SCIM API token in Unblocked, then follow the instructions for your identity provider.
In the Unblocked web app, navigate to the **Settings** section.
Under Team Settings, select **Security**.
Locate the SCIM User and Group Provisioning section and click **Configure**.
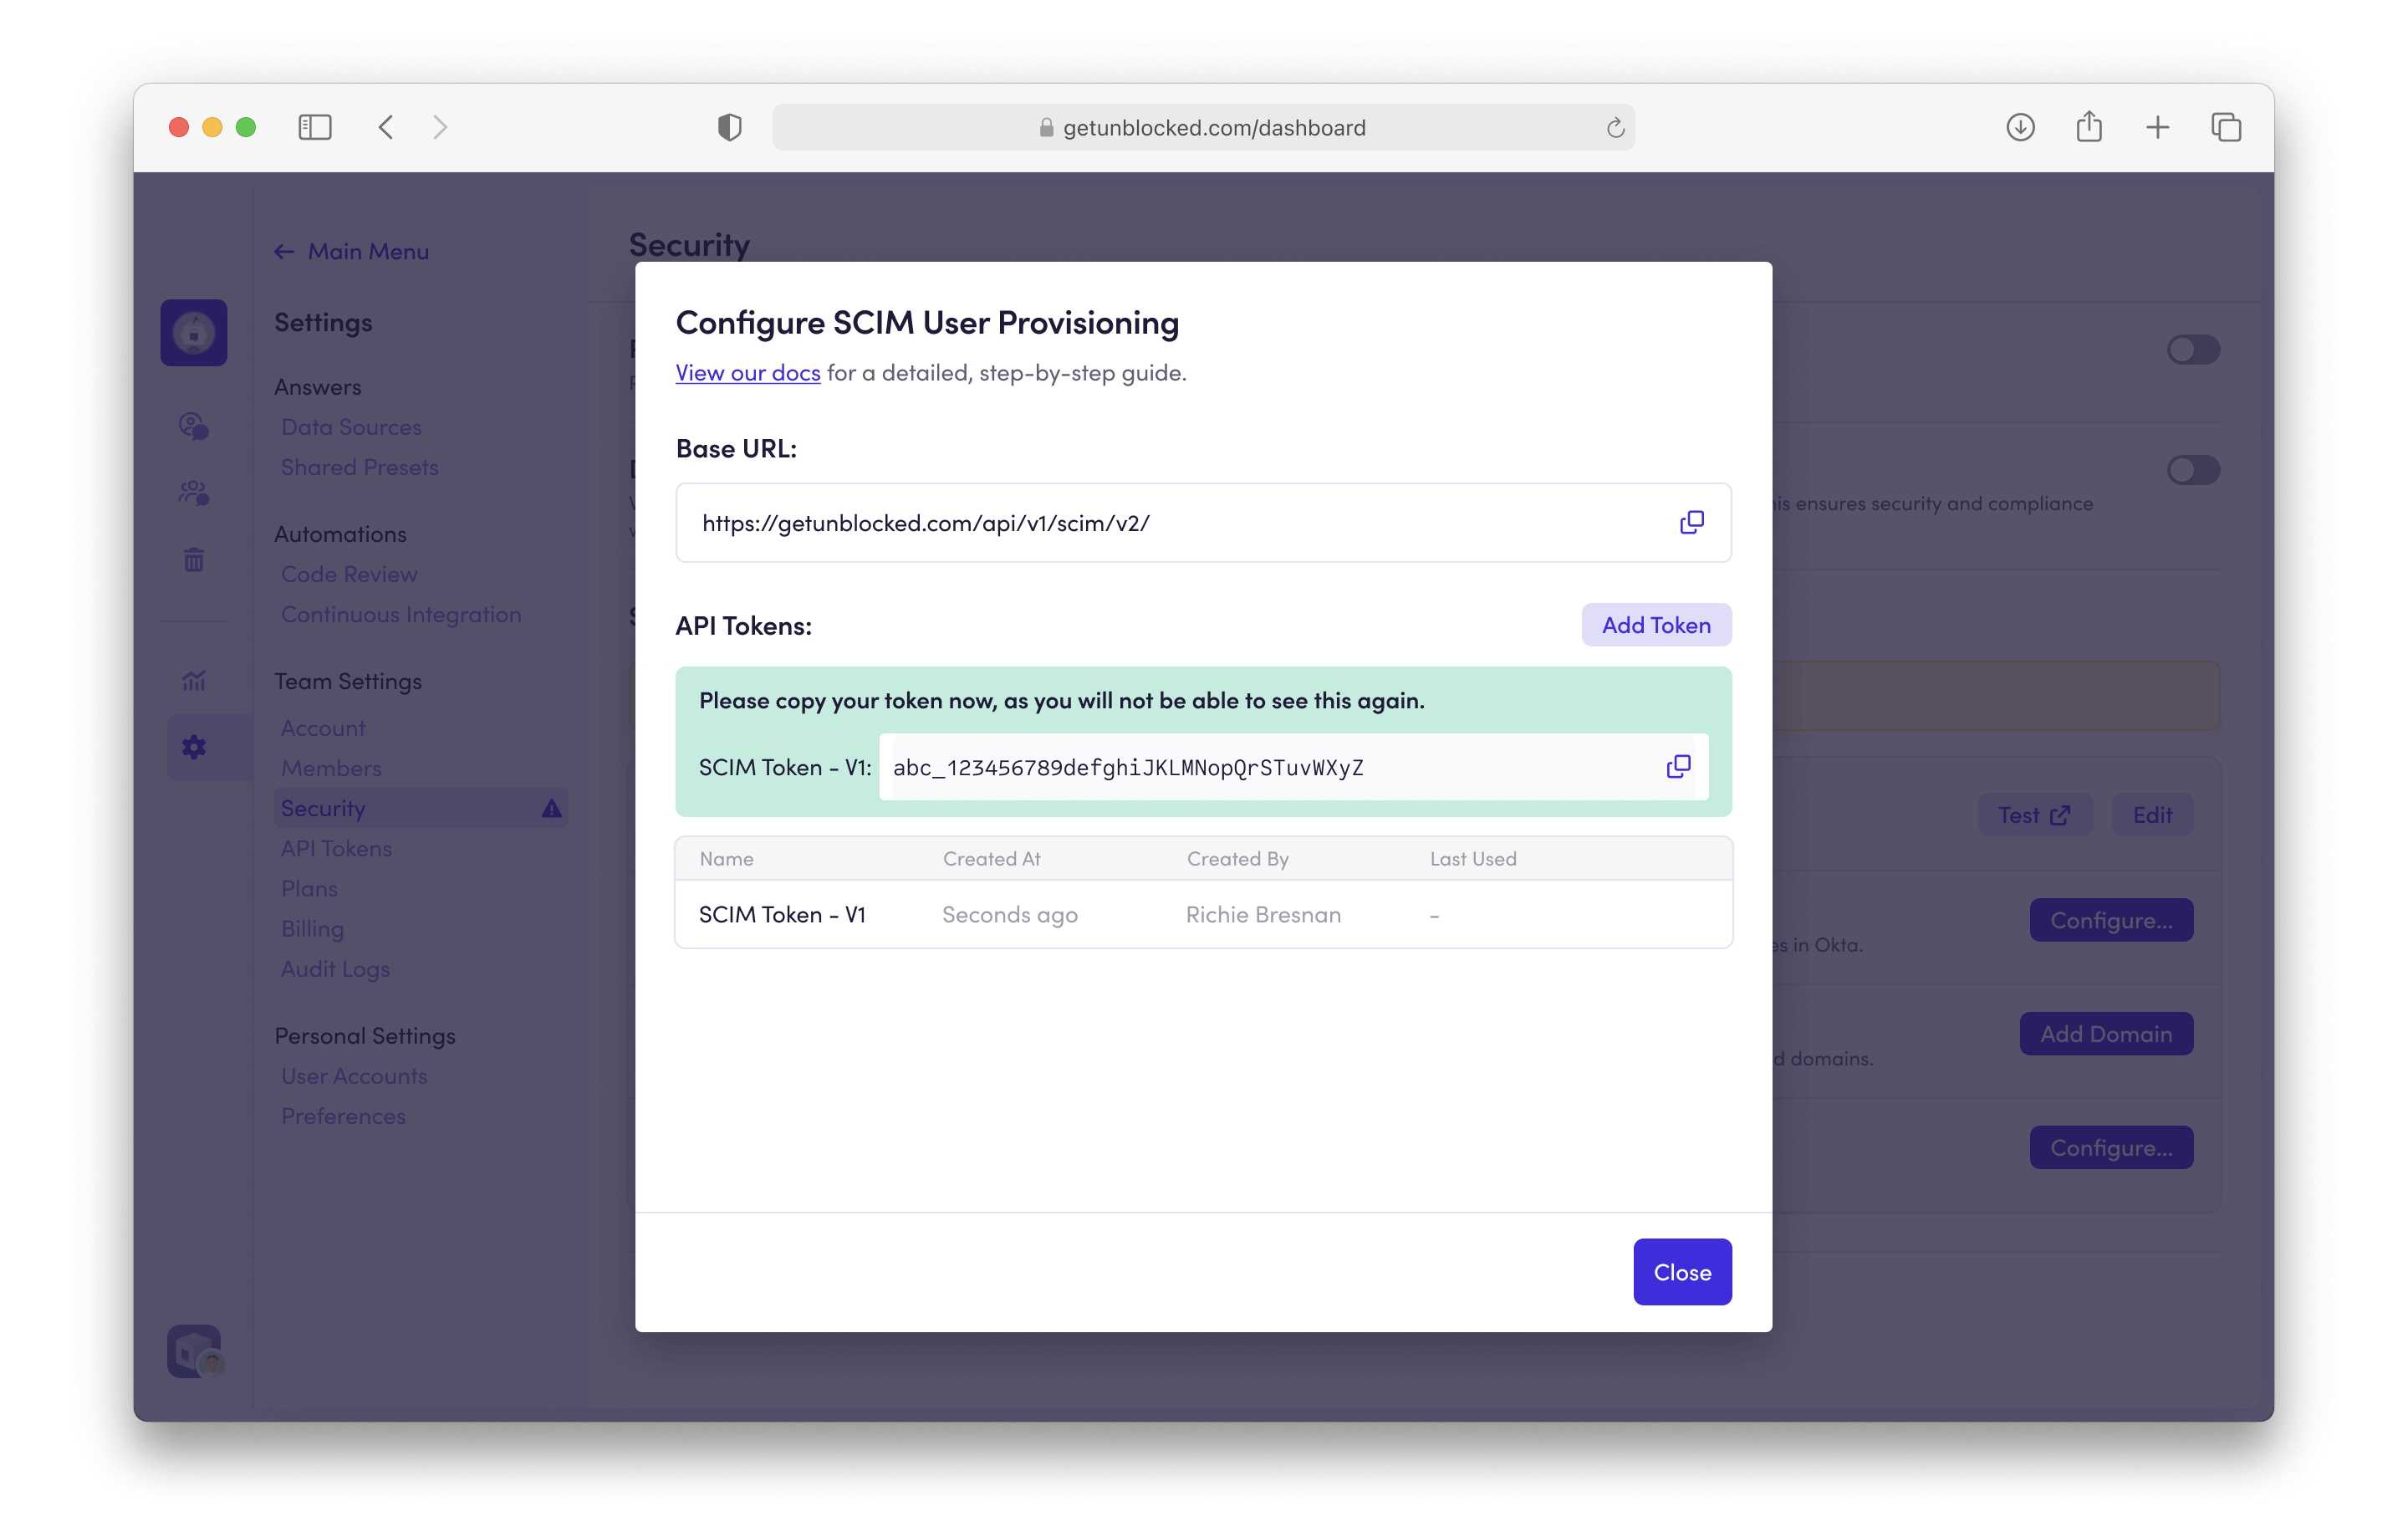
 Click **Add Token** to generate a new API token for SCIM provisioning.
Copy both the new API token and the **Base URL**.
Click **Add Token** to generate a new API token for SCIM provisioning.
Copy both the new API token and the **Base URL**.
 Follow the instructions for your identity provider to configure a SCIM connection to Unblocked.
You will need the **Base URL** and **API Token** that you generated in the previous step.
## Enforce SSO
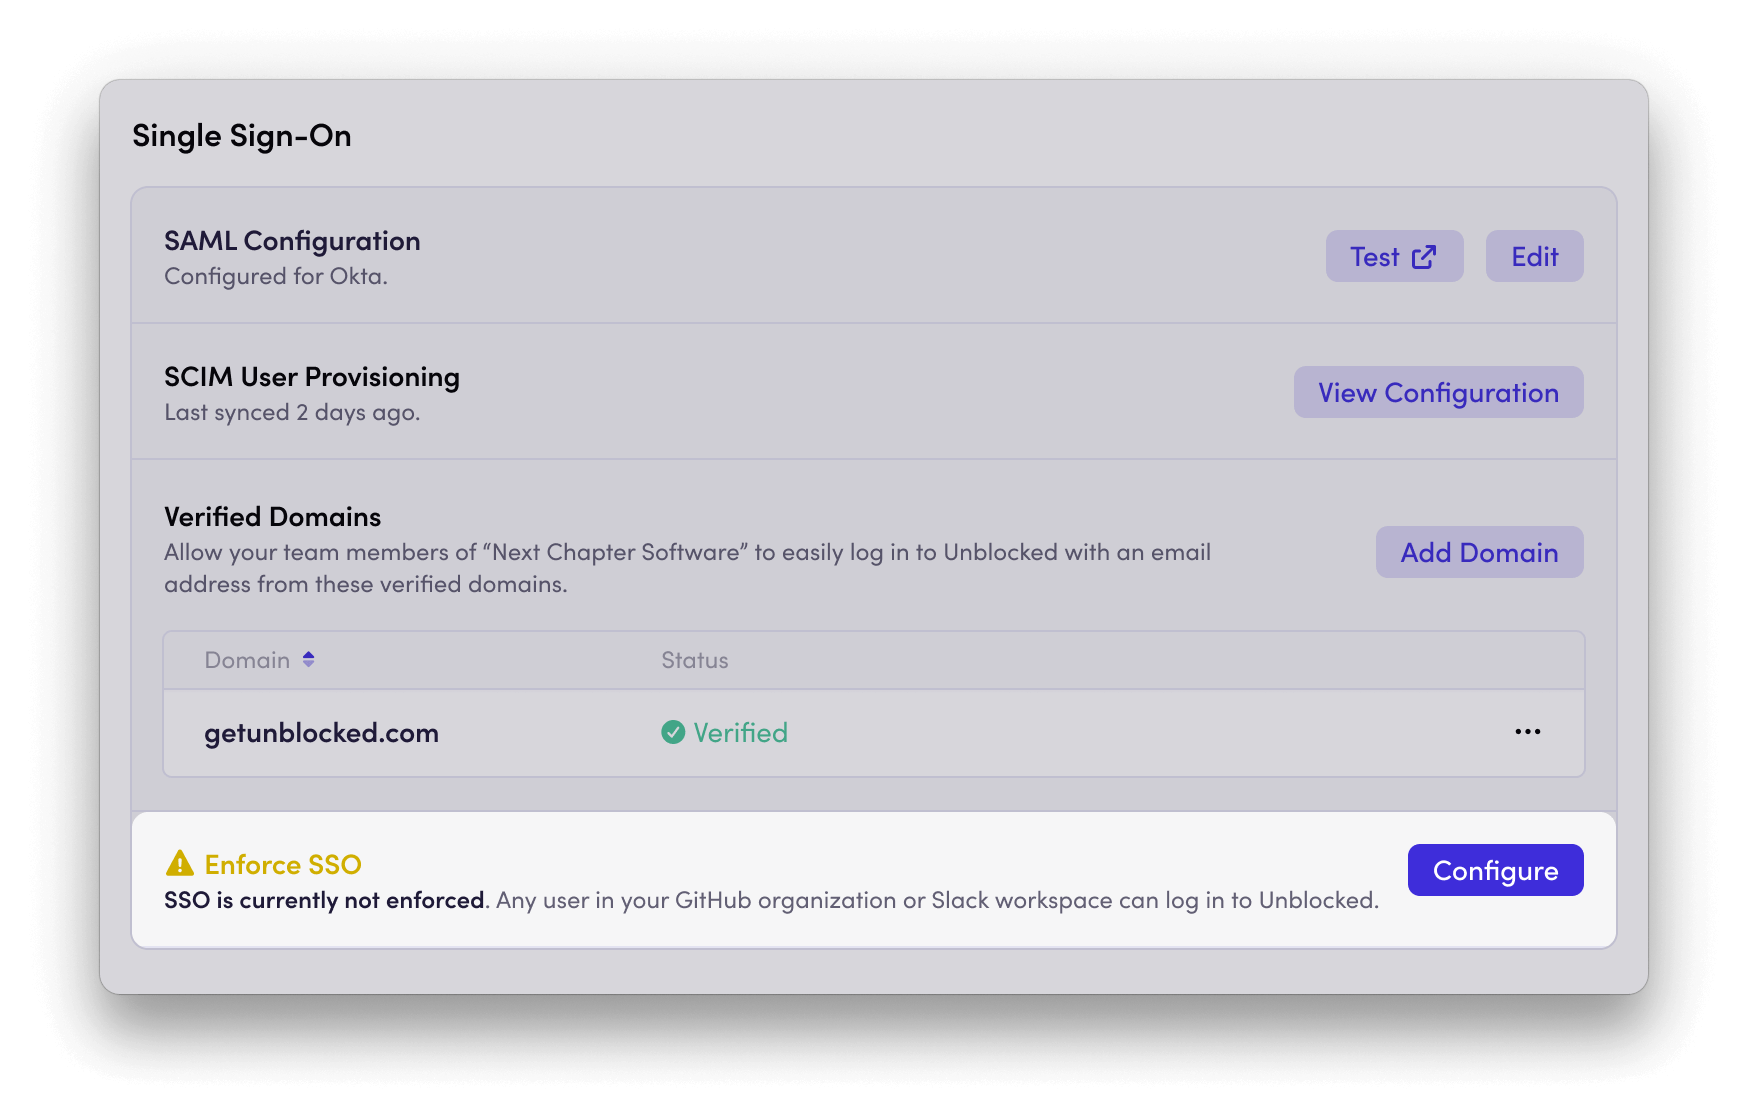
Once SSO is configured, you can enforce its use for your team.
This means all team members will be required to sign in using your SSO provider.
There are two enforcement options:
* **SSO Only**:
Users will be required to sign in to Unblocked using SSO.
You may need to sign in with SSO before enabling this option.
* **SSO, a Source Code System, or Slack**:
Users can sign in using either SSO, their source code system (e.g., GitHub, Bitbucket, or GitLab), or Slack.
Follow the instructions for your identity provider to configure a SCIM connection to Unblocked.
You will need the **Base URL** and **API Token** that you generated in the previous step.
## Enforce SSO
Once SSO is configured, you can enforce its use for your team.
This means all team members will be required to sign in using your SSO provider.
There are two enforcement options:
* **SSO Only**:
Users will be required to sign in to Unblocked using SSO.
You may need to sign in with SSO before enabling this option.
* **SSO, a Source Code System, or Slack**:
Users can sign in using either SSO, their source code system (e.g., GitHub, Bitbucket, or GitLab), or Slack.
 ## Allowed Email Domains
Verifying a domain ensures that users who enter an email address from that domain on the Unblocked sign-in page are automatically directed to your SSO login.
This creates a seamless login experience and routes users through the correct authentication flow.
You can add multiple domains to enable SSO login detection for users with different email addresses.
To verify a domain:
Click **Add Domain** and enter the domain name you want to verify.
Unblocked will prompt you to add a TXT record to your DNS settings to complete the verification.
Once the domain is verified, any user who enters an email address matching that domain on the Unblocked sign-in page will see the SSO login option for your SAML provider.
Verifying a domain only controls the visibility of the SSO login option and does not automatically grant access to
your Unblocked team. Access to Unblocked is still managed through user and group assignments in your identity provider (IdP).
## Download Unblocked Logo
To help your users easily recognize Unblocked in their identity provider dashboard,
download the Unblocked logo for use in your SSO application.
## Allowed Email Domains
Verifying a domain ensures that users who enter an email address from that domain on the Unblocked sign-in page are automatically directed to your SSO login.
This creates a seamless login experience and routes users through the correct authentication flow.
You can add multiple domains to enable SSO login detection for users with different email addresses.
To verify a domain:
Click **Add Domain** and enter the domain name you want to verify.
Unblocked will prompt you to add a TXT record to your DNS settings to complete the verification.
Once the domain is verified, any user who enters an email address matching that domain on the Unblocked sign-in page will see the SSO login option for your SAML provider.
Verifying a domain only controls the visibility of the SSO login option and does not automatically grant access to
your Unblocked team. Access to Unblocked is still managed through user and group assignments in your identity provider (IdP).
## Download Unblocked Logo
To help your users easily recognize Unblocked in their identity provider dashboard,
download the Unblocked logo for use in your SSO application.